Read on to learn about MultiLine Desktop.
Overview
MultiLine Desktop brings the mobile business calling and messaging features critical to your frontline client communications to the browser.
For regulated users, these calls and messages will be captured for compliance teams in the Management Portal just as they are in the mobile apps. You can sync with your Office 365 Exchange Contacts, or build a local contact list. 1:1 messaging and calling is supported. Manage Availability and Call Handling settings can only be set in the mobile app, but will apply for the desktop.
System Requirements
You can use the MultiLine Desktop application with the following browsers:
- Chrome 90.0.4430 or above
- Safari 14 or above
- MS Edge 90.0.818.39 or above
Calling
Making a call
There are multiple ways to make calls in MultiLine Desktop.
Note
- You must grant MultiLine Desktop permission to use your microphone and speakers to make calls.
- Your organization must allow calling for you to make calls from MultiLine Desktop.
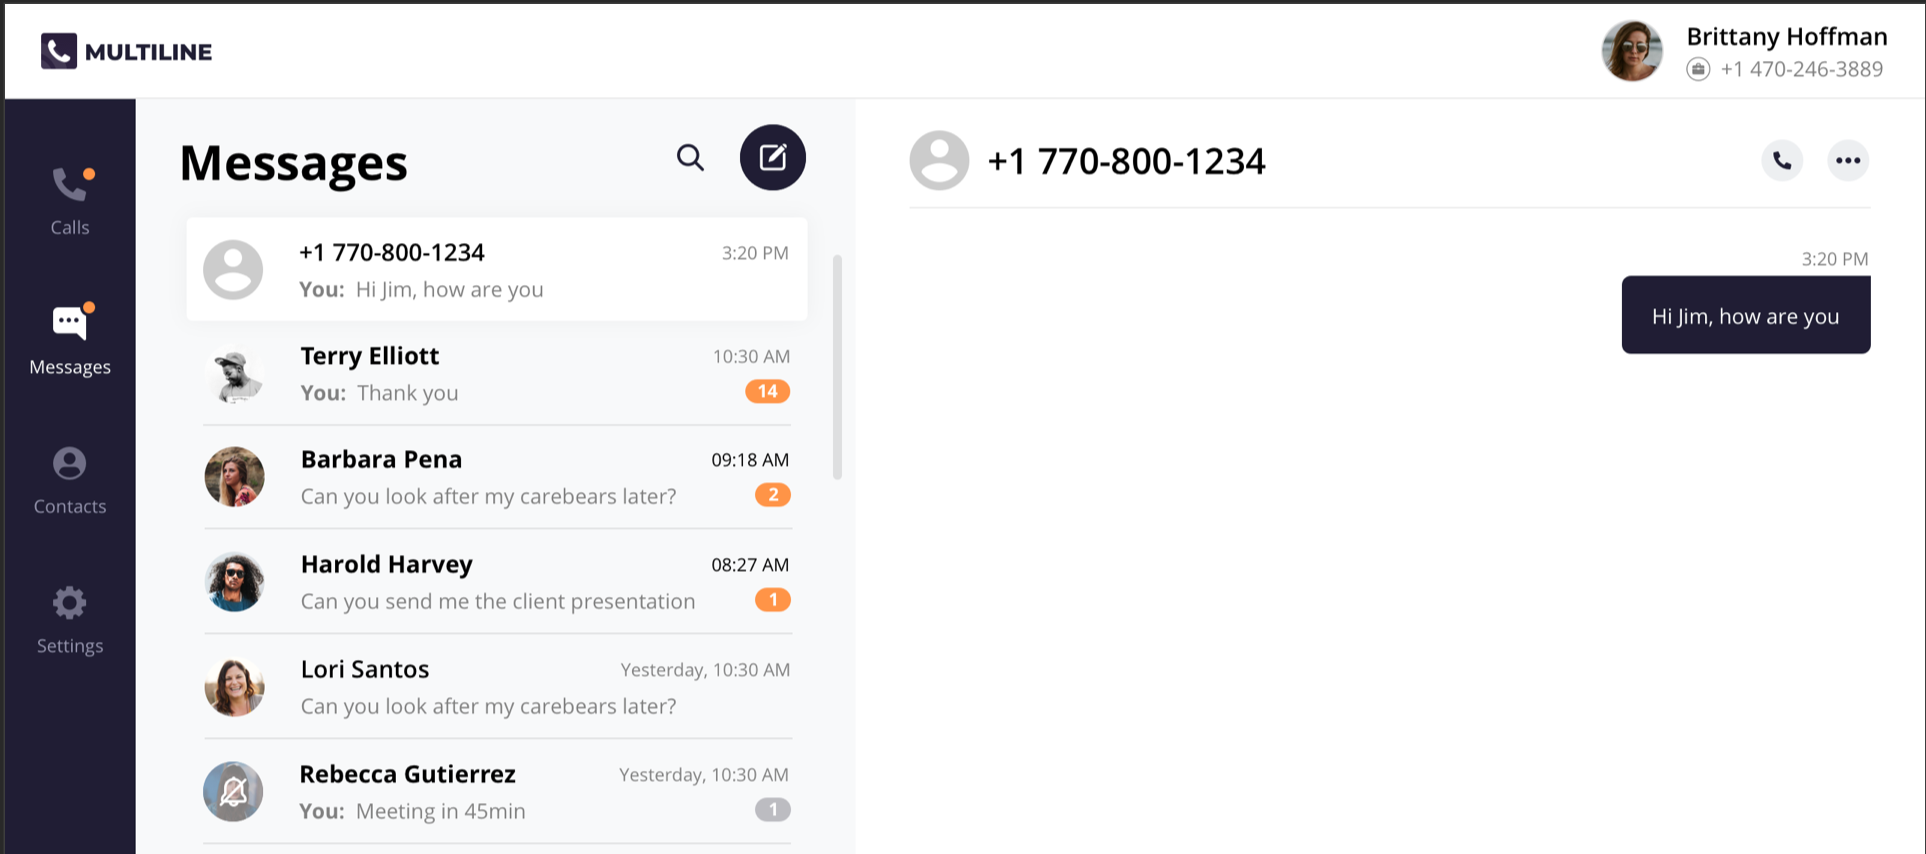
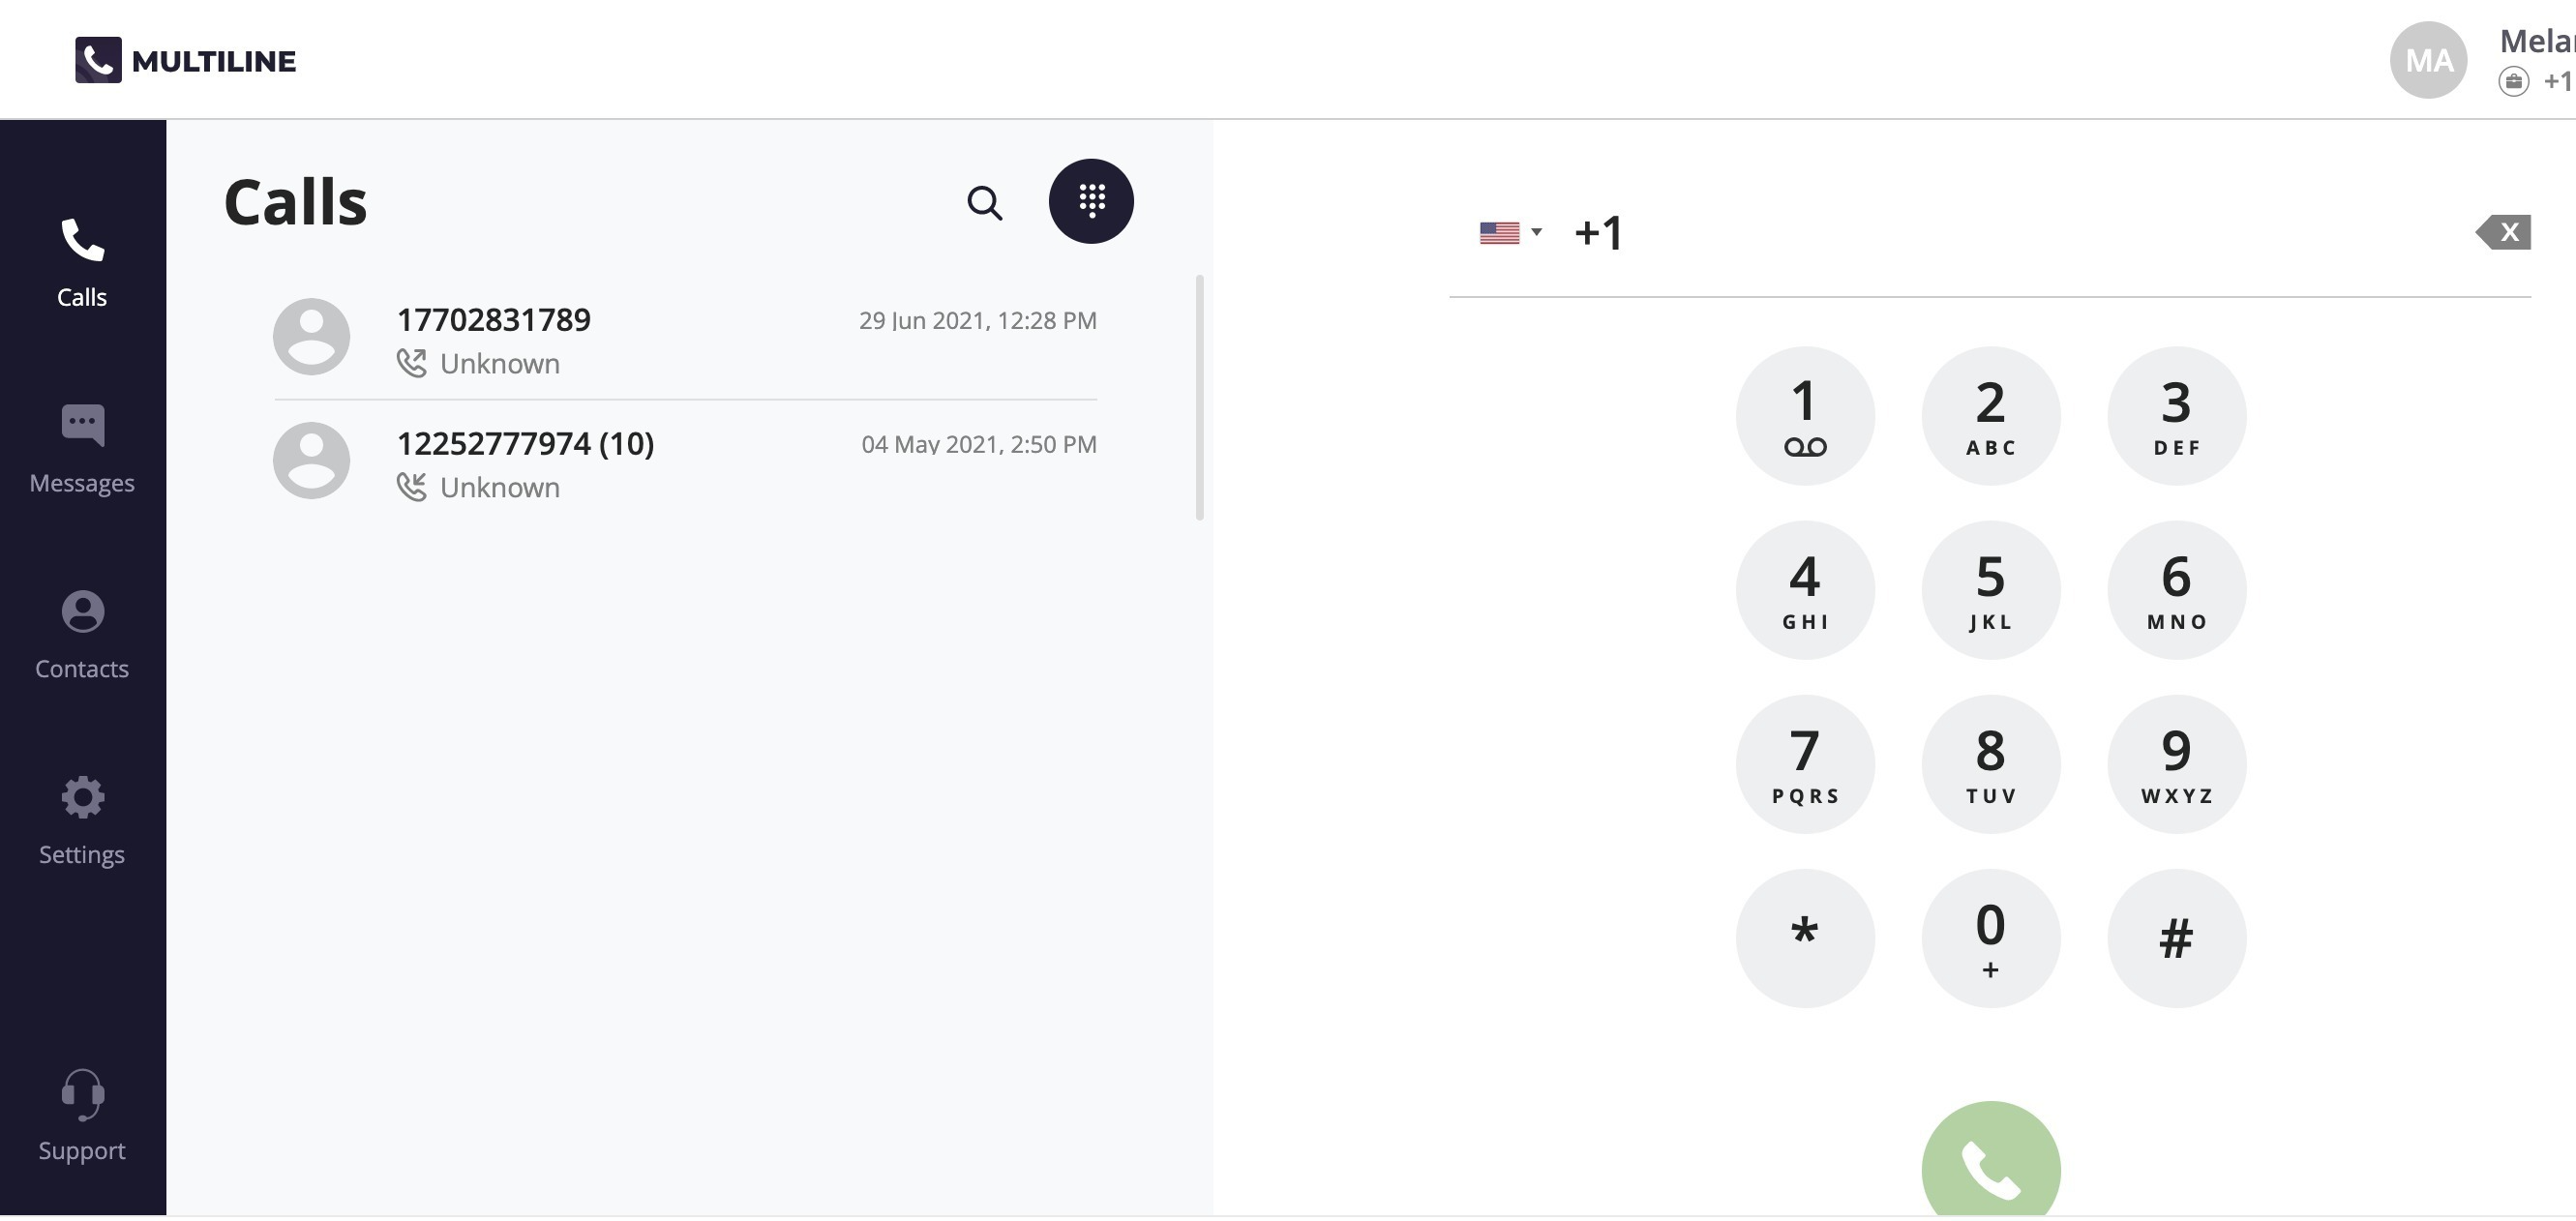
Calls Screen
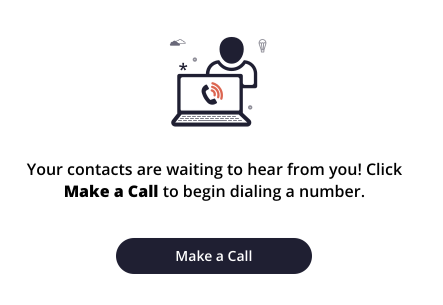
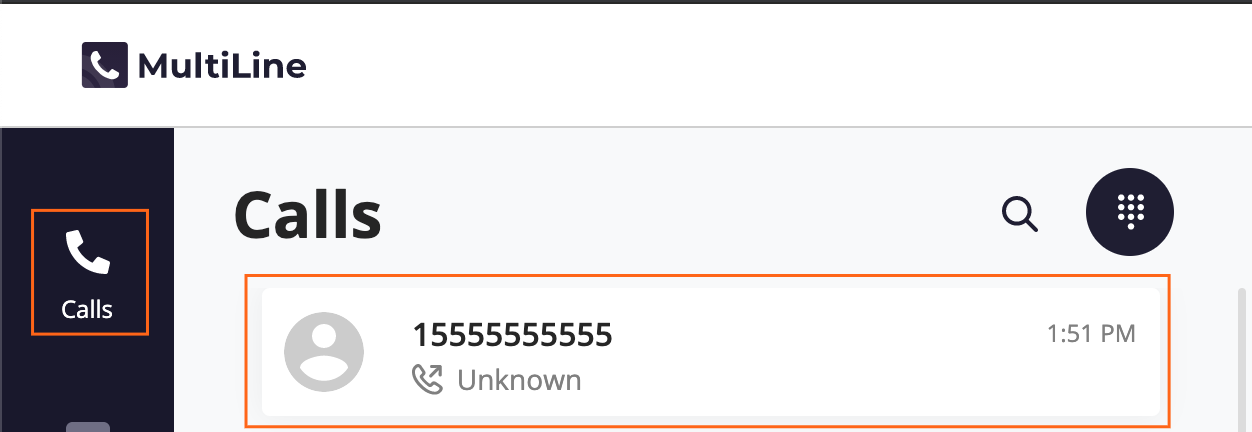
The first time you go to the Calls screen, click the Make a Call button to place your first call.
After you place your first call, your list of recent calls will appear on the Call logs screen.
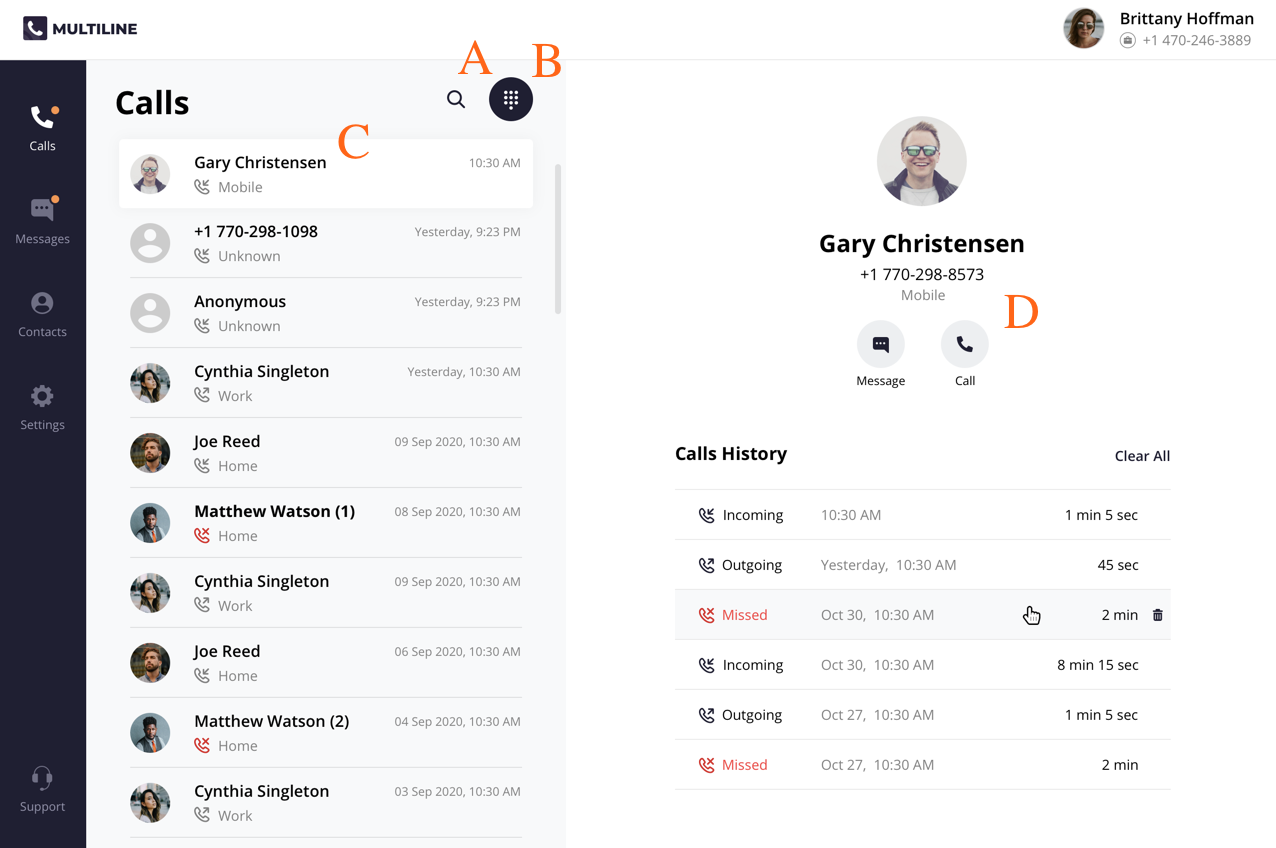
- Use the Search icon to search your recent Calls.
- Use the Dialer icon to bring up the Dialer screen.
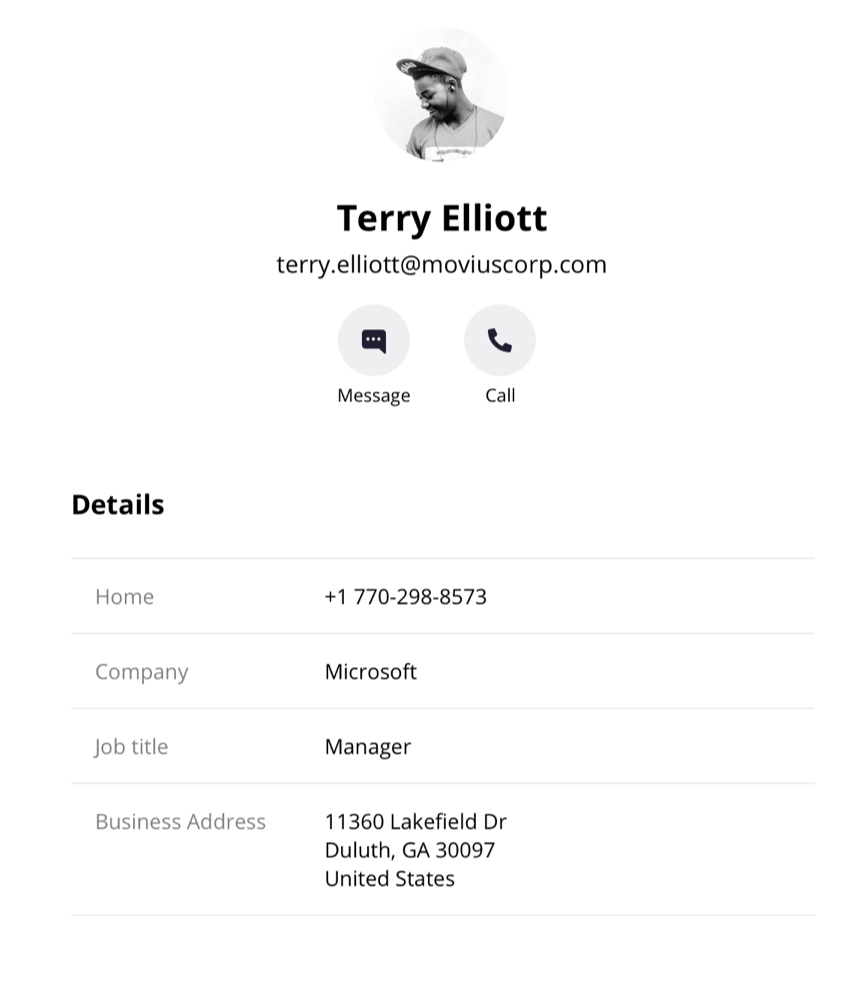
- Clicking a Call log will display the call history and contact information, if available. For a saved Contact clicking on the Contact name or Contact picture will take you to the specific Contact detail page.
- You can easily call or message a contact again from this screen by clicking the Call and Message icons.
Dialer Screen
From the dialer, you can manually dial a number or enter the first or last name of a contact to pull up their number.
- You can click the numbers or use your keyboard.
- When dialing numbers, please make sure to include the international country code even when placing domestic calls.
Note:
- Dynamic search will only display saved contacts, it doesn't search the GAL. See Search and Store Contacts from GAL.
- You must type at least three numbers or three letters of a contact's first or last name to activate the dynamic search.
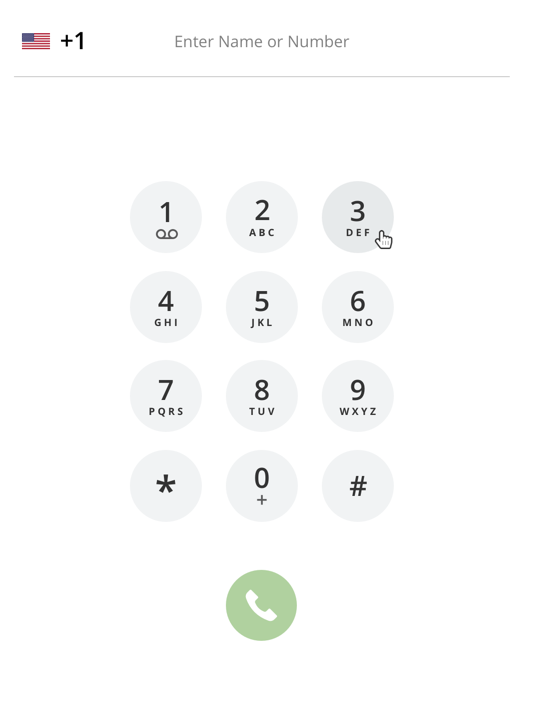
Entering a number:
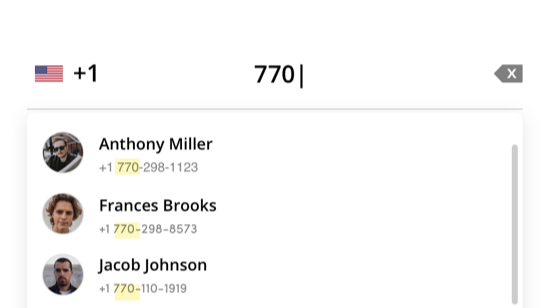
Entering a name:

Complete dialing the number, or select the contact, then click the Start Call  button.
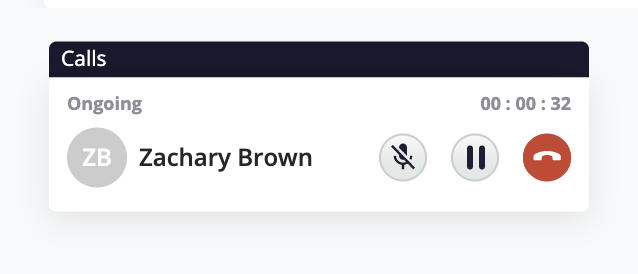
In-Call Screen
The In-Call screen will appear when someone you call answers the call, or you answer a call from someone else.
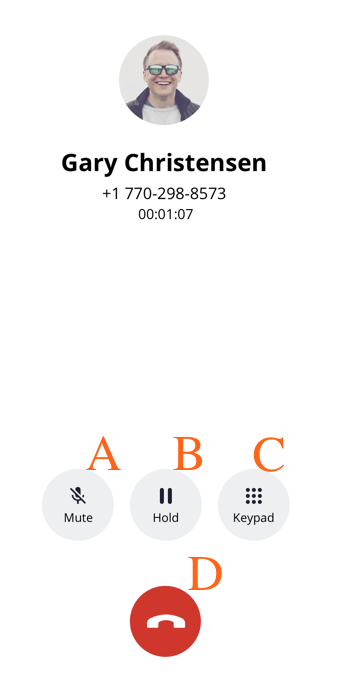
- Use Mute to cut off your microphone. You can hear the other caller, but they can't hear you. Press it again to turn your microphone back on.
- Use Hold to suspend the call. The call will not be disconnected, but neither party will be able to hear the other party during the hold. Press it again to end the hold.
- Open the Keypad to dial numbers.
- Use the End Call button to end the call.
Accept or reject incoming calls
Your incoming call screen and notifications may appear differently depending on what you're doing.
Incoming Call Notifications and Screens
Whether you're on the MultiLine Desktop tab or window, the ringtone will play and a visual notification will display when you receive an incoming call.
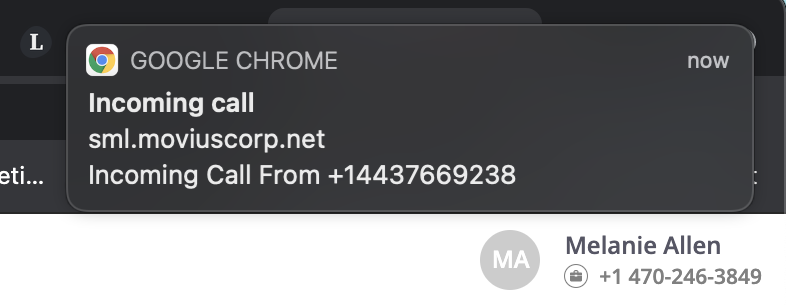
If the caller is in your contacts, you'll see their contact information on the incoming call screen and options to Reject and Accept. Clicking Reject will send the user to your voicemail, and Accept will answer the call.
As you move through screens on MultiLine Desktop when you're on a call, the call window will follow. You can move it by clicking and dragging.
If you receive another incoming call, your option to accept or reject the incoming call will appear below your ongoing call. If you accept a call while on a call, this will automatically put the person you're currently talking to on hold.
A window will appear with the two calls. From this screen you can swap calls, and perform other actions.

Many web users were bothered by nuisance audio coming from web sites that automatically play when a page is loaded, such as that from videos and advertisements. To address this, Chrome and Safari browsers added a feature that blocks audio by default from web pages if the page or tab is refreshed, but not clicked on by the user.
Therefore, if you haven't accessed the MultiLine Desktop tab since the last time it refreshed (for example, if you closed and restarted chrome and loaded your tabs from the previous session) the ringing sound will be blocked. However, you'll still be able to see the visual notification of the incoming call.
To unblock the ringtone from being played, open the tab where MultiLine Desktop has recently refreshed and click anywhere within the MultiLine Desktop application and this should ensure that the ring sound will play.
Place a call on hold
Click the Hold button to put the call on hold. 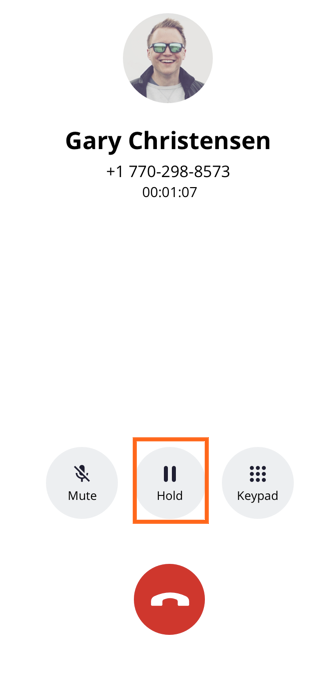
After putting the call on hold, you can dial a number by clicking the Keypad.

When you have two ongoing calls, your ongoing call window will display the information of the two parties. You can only speak to one party at a time the other will be placed on hold.
You will see the Mute icon, Hold icon, and End Call icon for the party you are speaking with. You will see the Swap Call icon for the party on hold. Click the Swap Call icon to put the party you're speaking with on hold, and begin speaking to the other party.
Use the Manage Availability and Call Handling in the mobile app MultiLine Settings menu to set in MultiLine Desktop.
- Call Handling
- Set Simultaneous and Sequential Dialing
- Set Call Forwarding
- Set Business Hours
- Set Do Not Disturb
Messaging
MultiLine Desktop currently only supports 1:1 SMS messaging. Group Messaging, Picture Messaging, and WhatsApp messaging coming soon!
When it's your first time on the Messages screen, click Start a Chat to send your first message.

At the new message window, begin typing the first or last name of someone in your saved contacts, or a mobile number.

After you've entered at least 4 digits (including country code) or letters, you'll see a list of auto-suggestions. Note: only saved contacts will appear in the auto-suggestions.

When you have completed entering the number, or selected from the results, you can type your message in the Type your message... field.

Press the enter or return key, or click the Send Message icon to send the message.
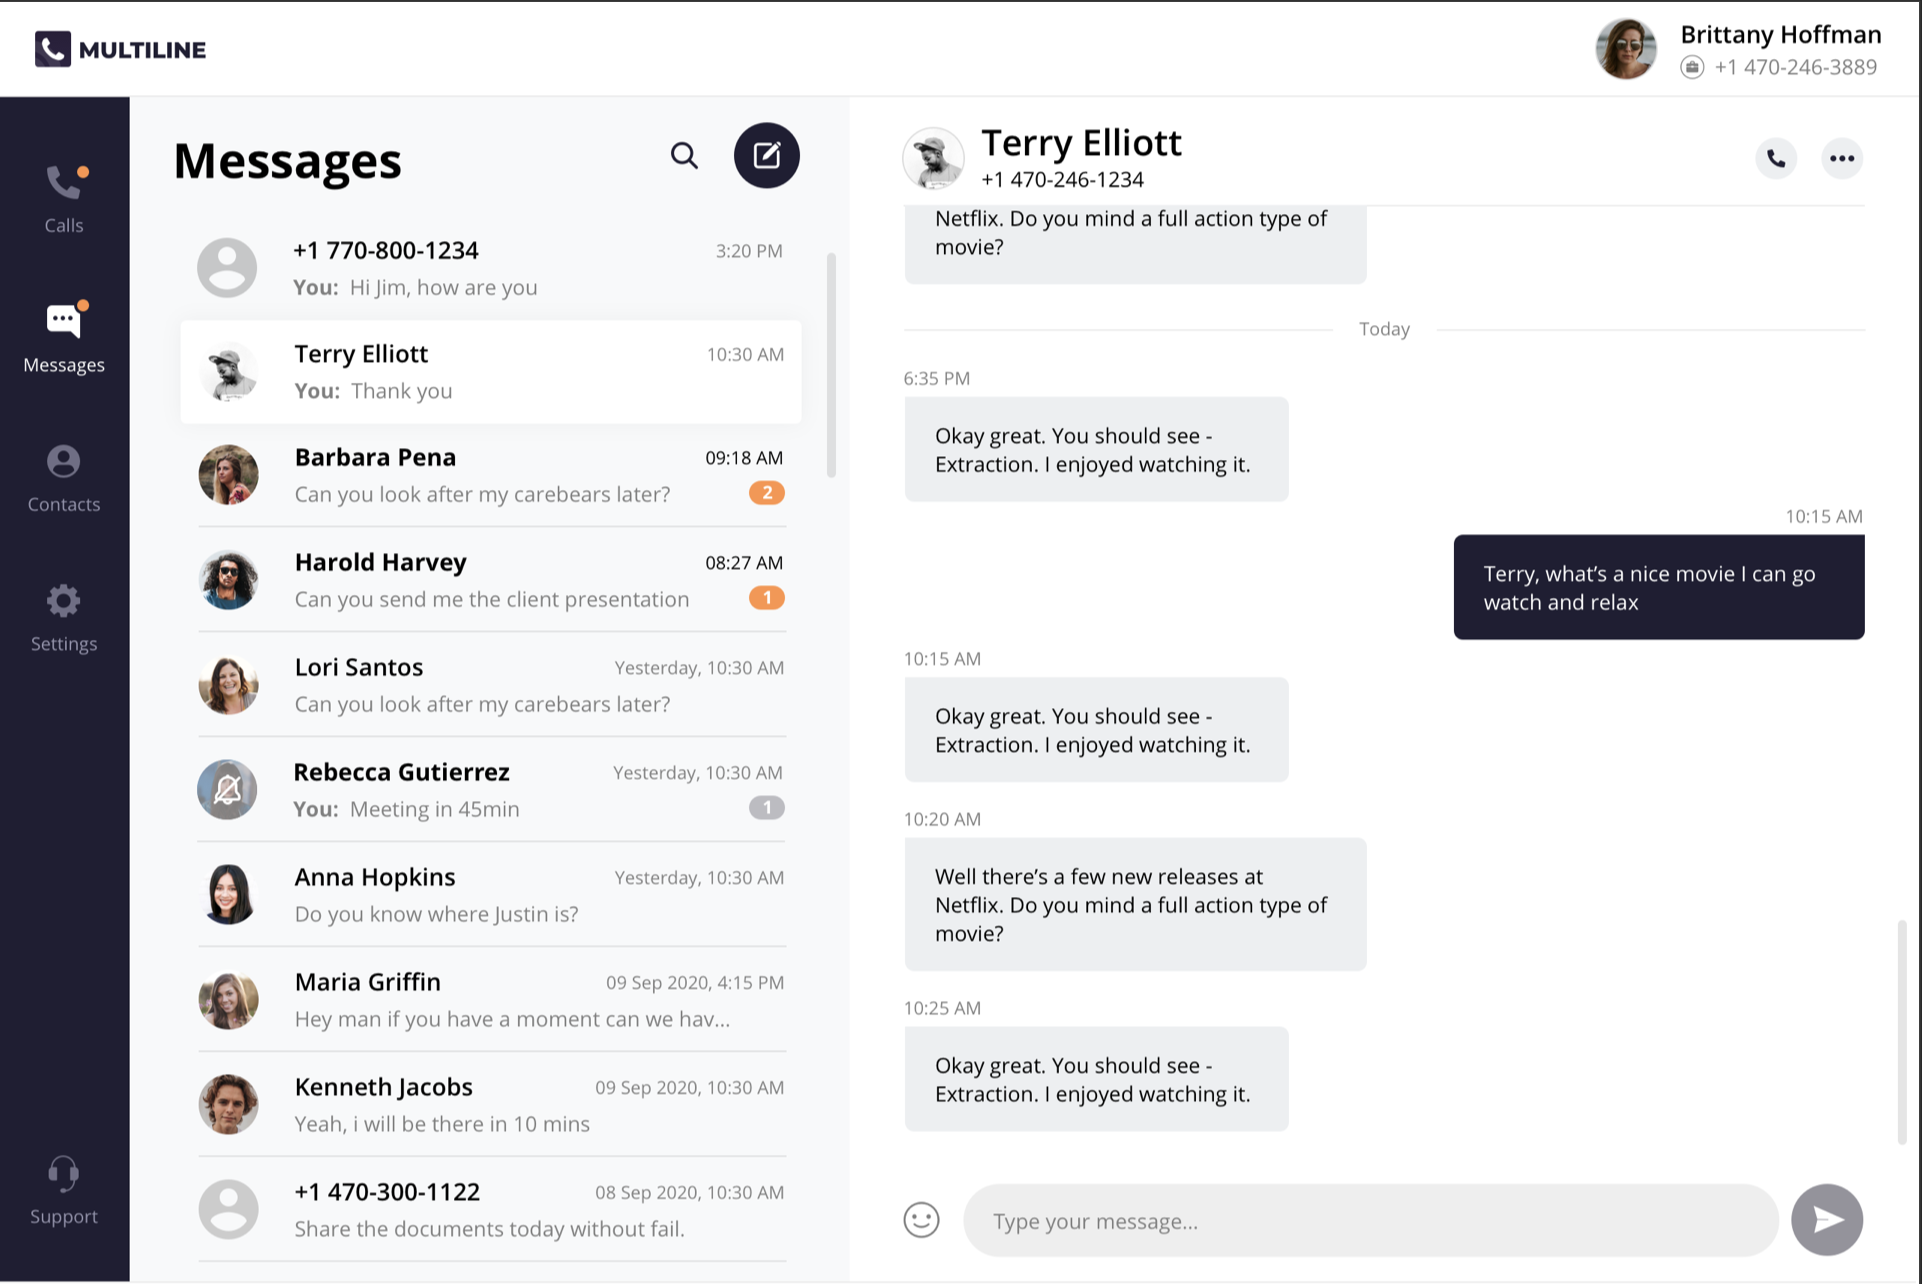
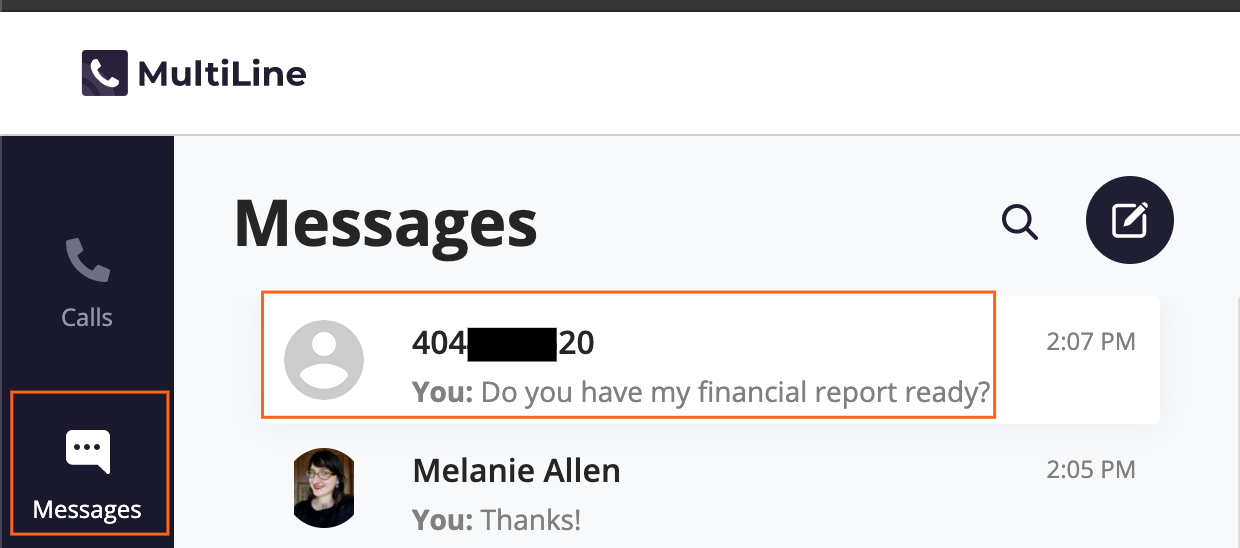
Once you've sent at least one message, your list of Messages will appear on the screen.
- Click any Message to see your Message history.
- Click the Search icon
 to search your messages by name or number. Note: search does not search message content.
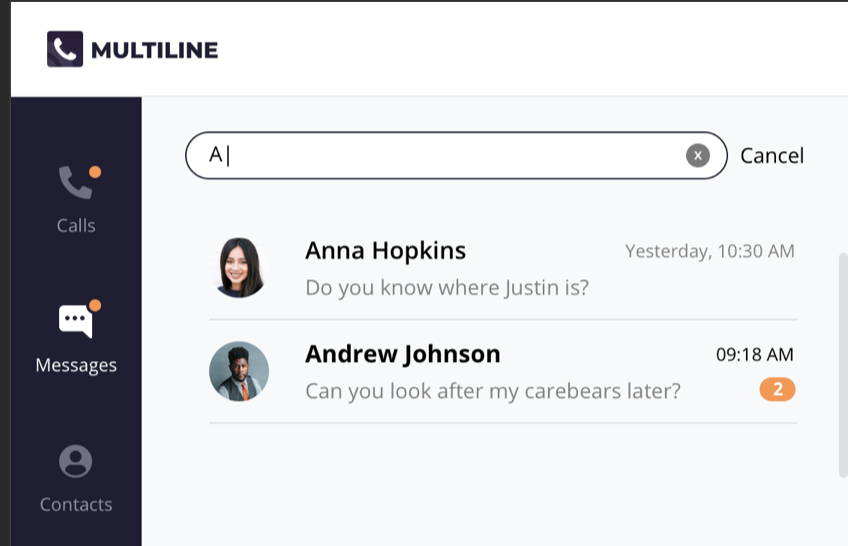
- Click the New Message icon
 to start a new message.
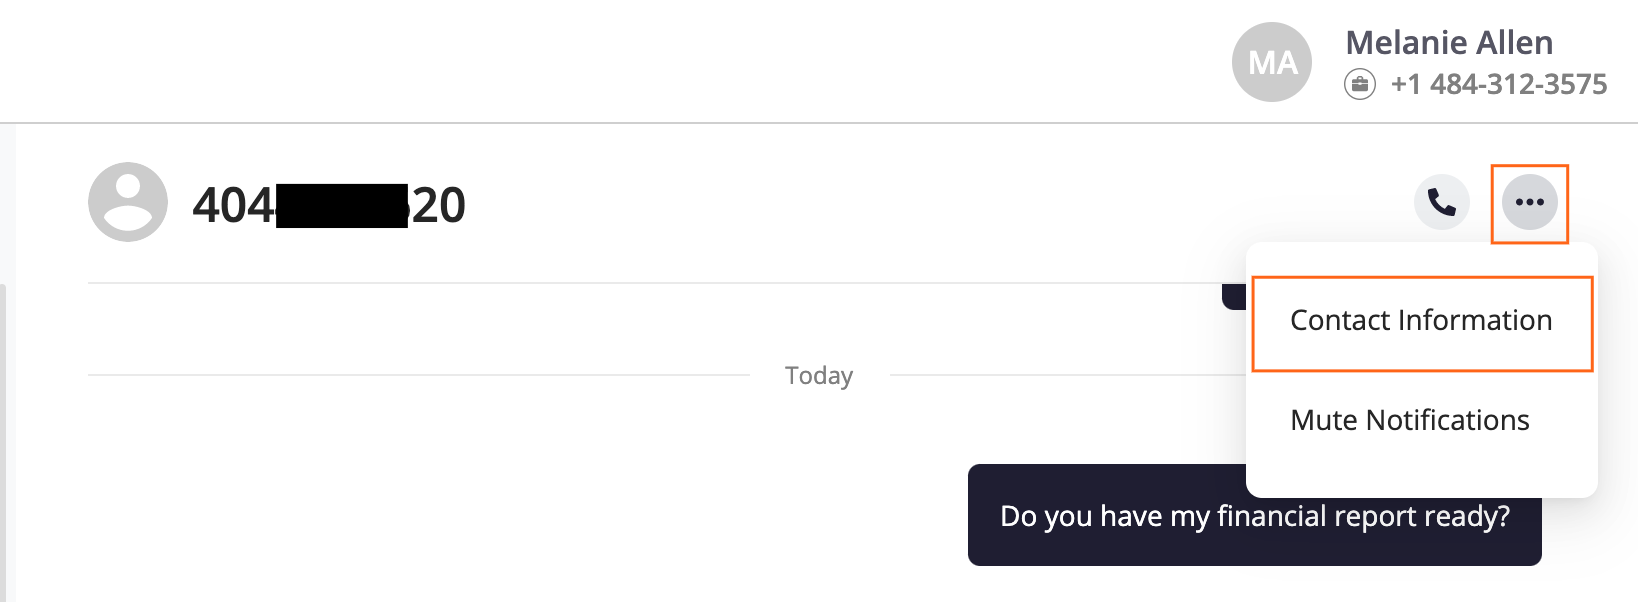
 - Click the menu icon to see Contact Information or Mute Notifications
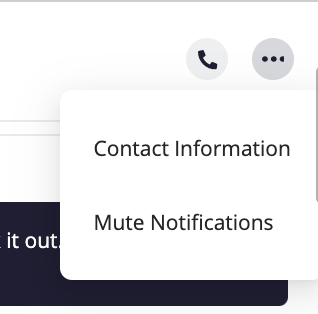
- Select Contact Information to see the Contact Information screen. If the user is in your contacts, you'll see the information stored. If not, you'll be able to add the user to your contacts from this screen.
- User is in contacts:
- User is not in contacts:
- User is in contacts:
- Select Mute Notifications to stop sound and visual notifications when the contact messages you. You will see the messages sent to you when visiting the message thread.
- Select Contact Information to see the Contact Information screen. If the user is in your contacts, you'll see the information stored. If not, you'll be able to add the user to your contacts from this screen.

 to search your messages by name or number. Note: search does not search message content.
 to start a new message.


When you have new messages there will be an orange badge notification on the Messages tab.

Threads with new messages will have an orange badge notification. The number represents how many unread messages are in the conversation thread.

We provide helpful reminders to help you know what to pay attention to. For example, we might show you that a set of messages is from today.

Or if you've had many new messages, we will show you where your unread messages begin.

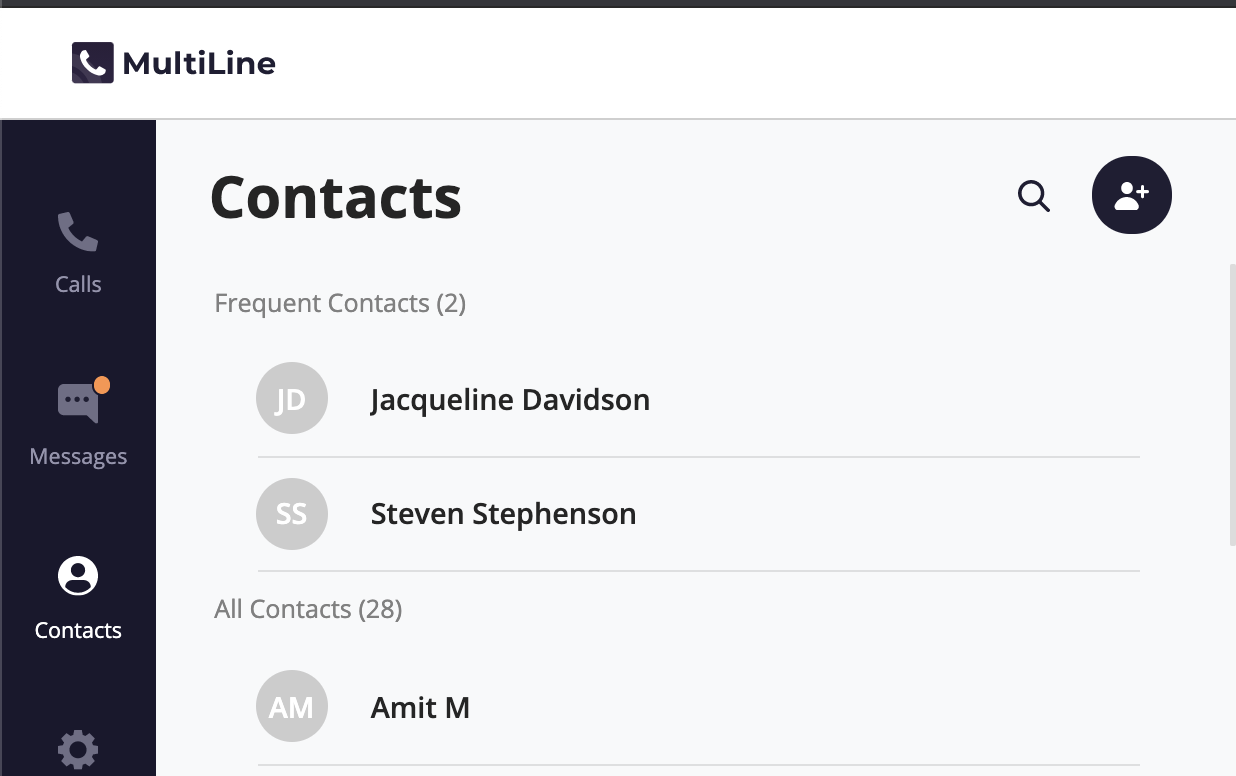
Contacts
You can add, edit, update and delete contacts from the Contacts screen. You can also add and update unknown numbers from the Calls and Messages screens.
Note: When using Exchange Contacts, you can also add contacts to your list by adding them directly to the Office 365 Exchange Server. It will reflect in your contacts list at the next sync period.
Add a new Contact
You can add, edit, and delete contacts from the Contacts screen.
- Go to Contacts and click the Create Contact icon.

- The Create Contact screen will appear. Fill out the details then click Create. Note: The only required fields are First Name and Last Name and at least one phone number. You can add all fields that are available in Office 365 Exchange Contacts.
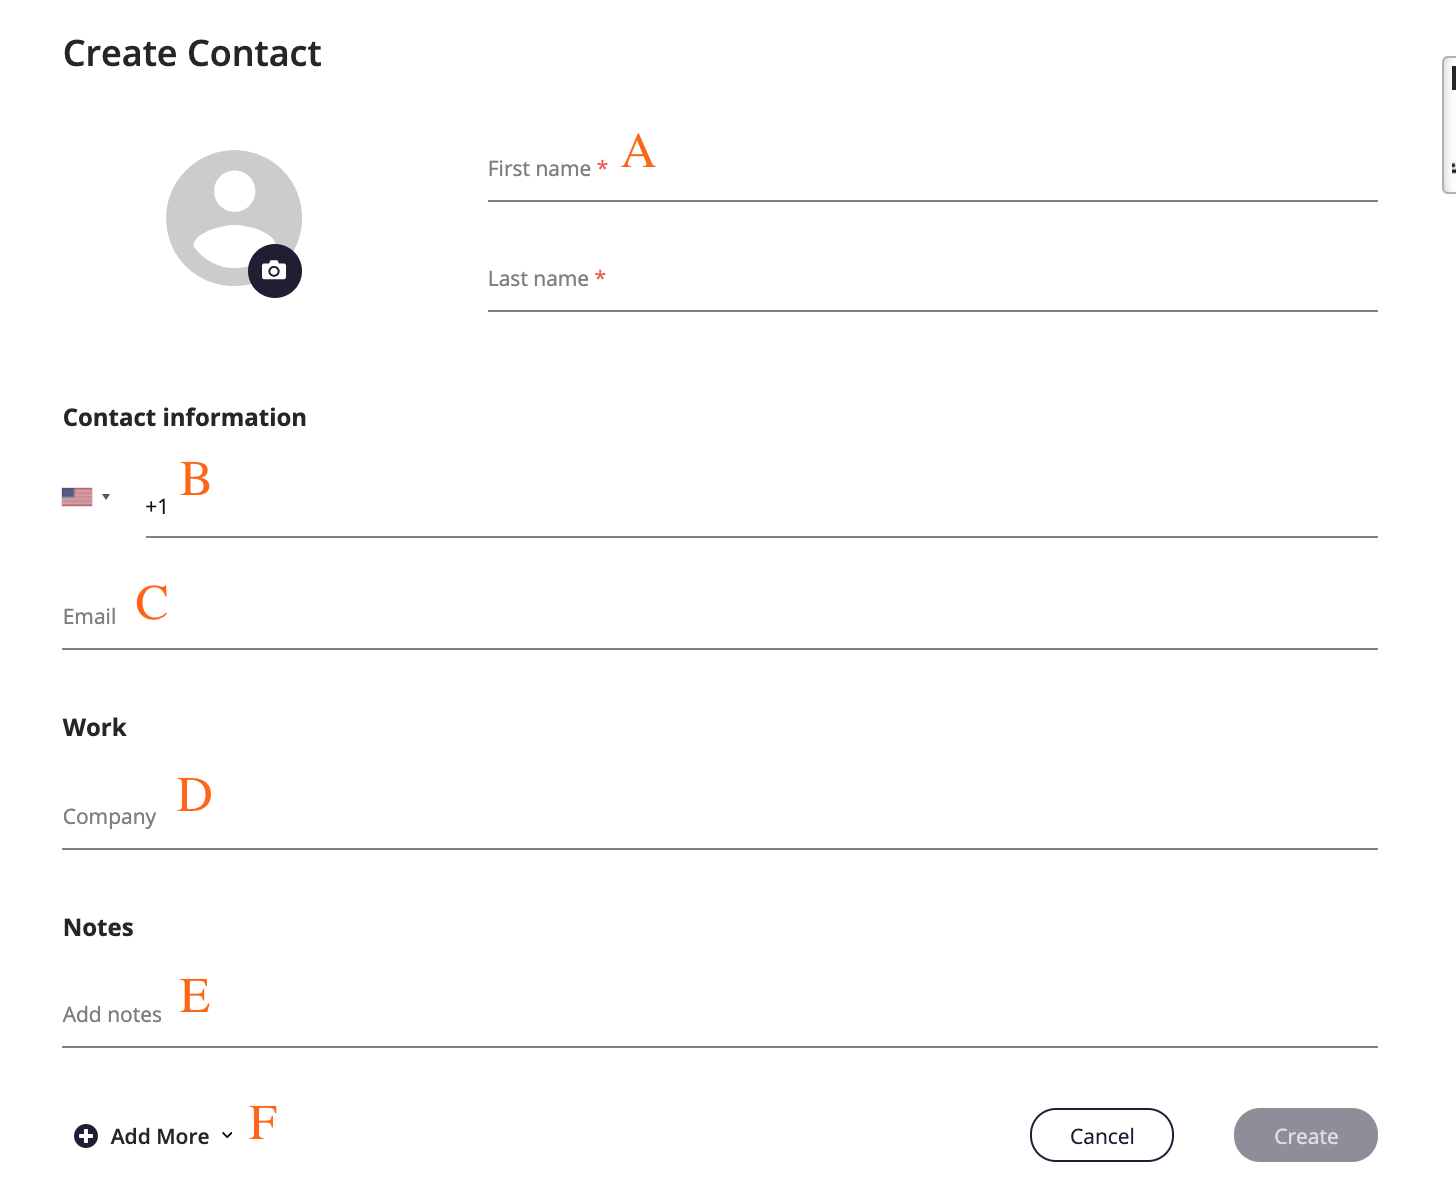
- First Name and Last Name
- Contact Information
- Business Phone is the default label
- Make sure to include country code when entering phone numbers
- Email Address
- Work (Company Name)
- Notes
- Add More menu
- Click Add More menu to add more fields
Expanded Contacts screen
- Click Add More menu to add more fields
- Add a picture for the contact by clicking the camera icon.

- Add your photo, and then click Apply.
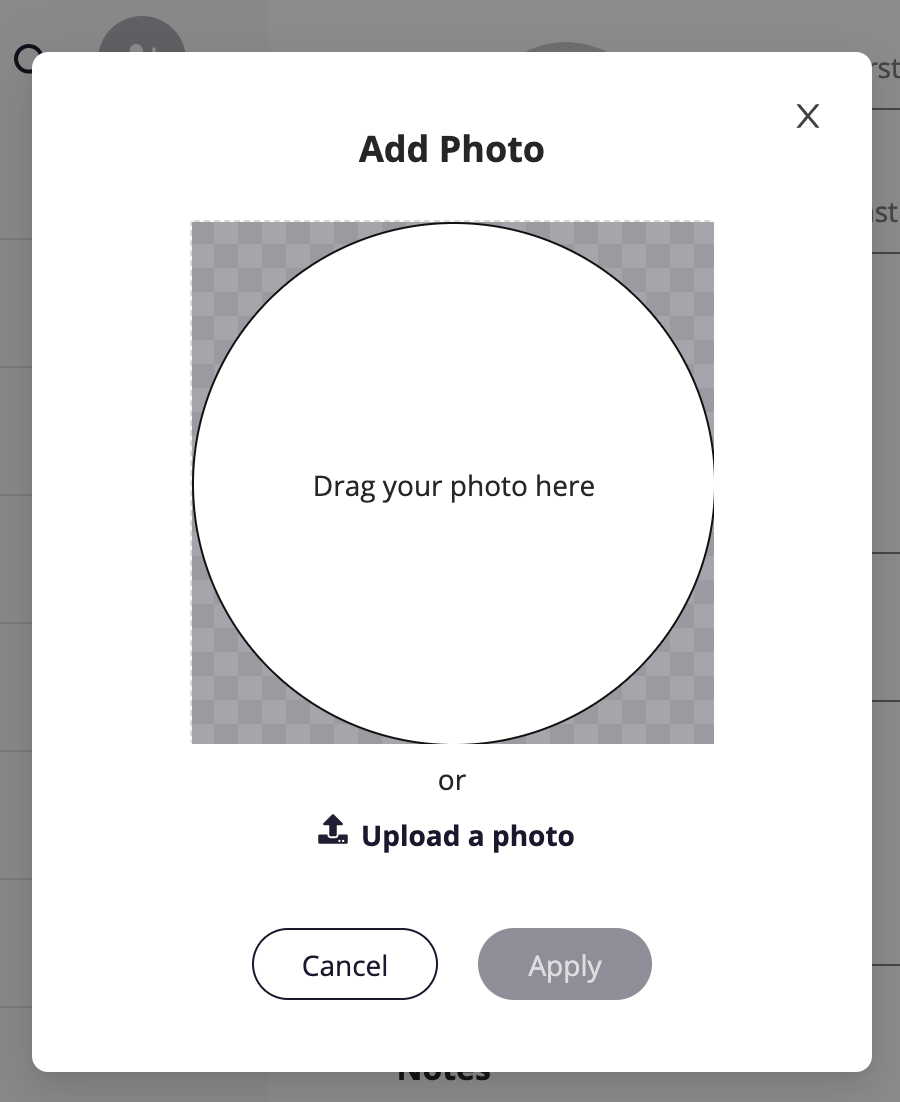
- Add your photo, and then click Apply.
- When completed, click Create.


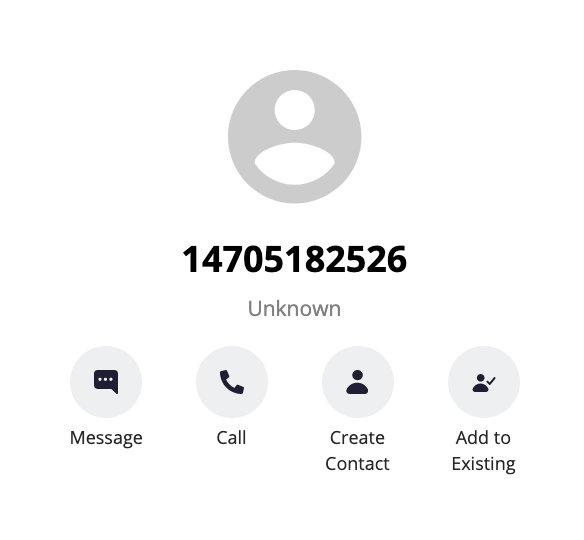
Add an unknown number to Contacts
- You can add an unknown number from Calls or Messages:
- For calls: Go to Calls and click the Call log.
- For messages:
- Go to Calls and click the Message Log.
- Click the Messages Menu and select Contact Information.
- Go to Calls and click the Message Log.
- For calls: Go to Calls and click the Call log.
- You have two options to add the caller to your Contacts list:
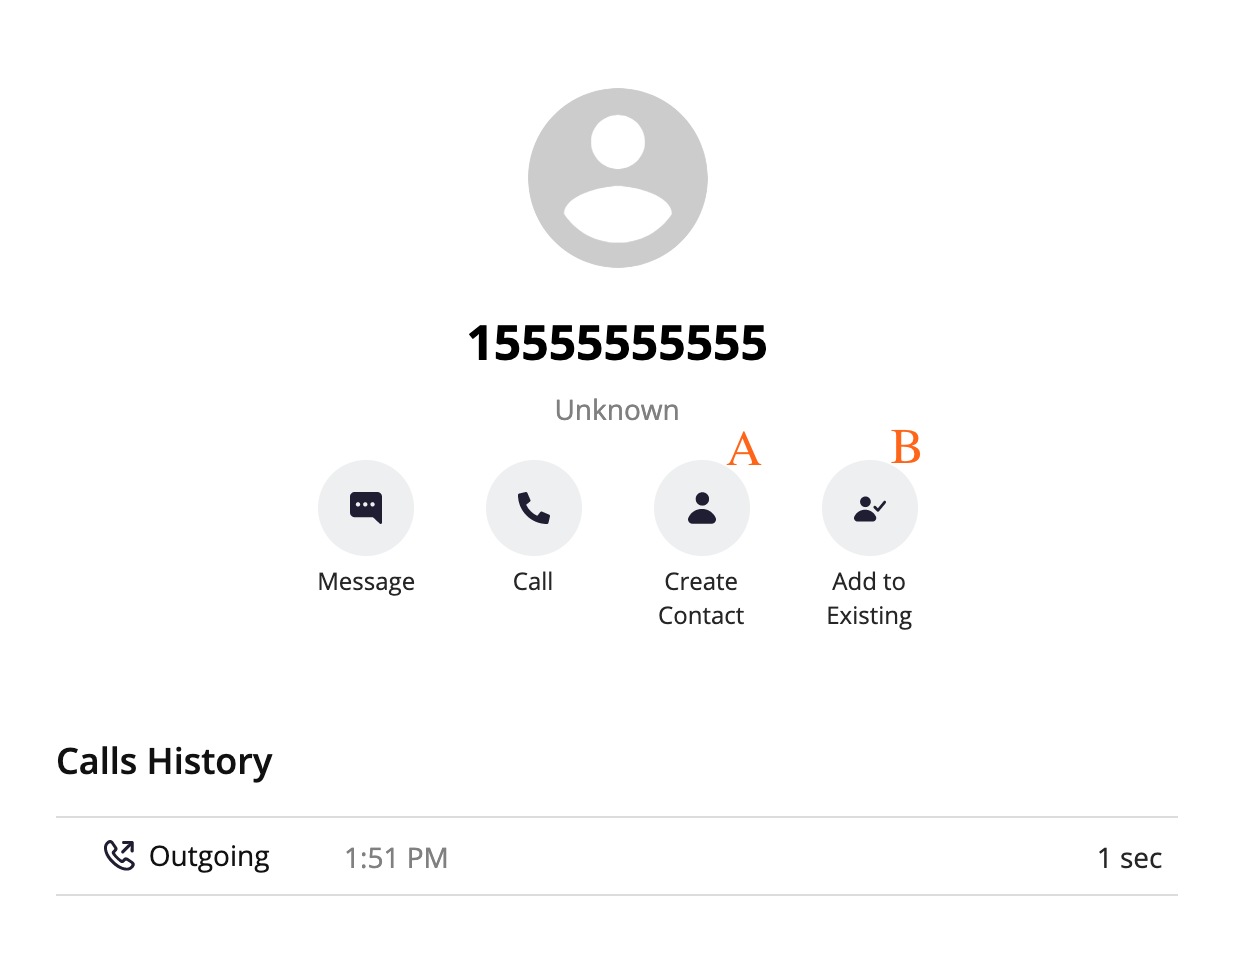
- To make a new contact from the Unknown number, click Create Contact.
- This will pull up the Add a Contact screen, where you can fill out the details as desired.
- To add the Unknown number to an existing contact, click Add to Existing.
- Narrow down the list of contacts by typing in at least one letter of the existing contact's first or last name into the search field.
- Click the radio button for the desired contact, then click Add to Contact.
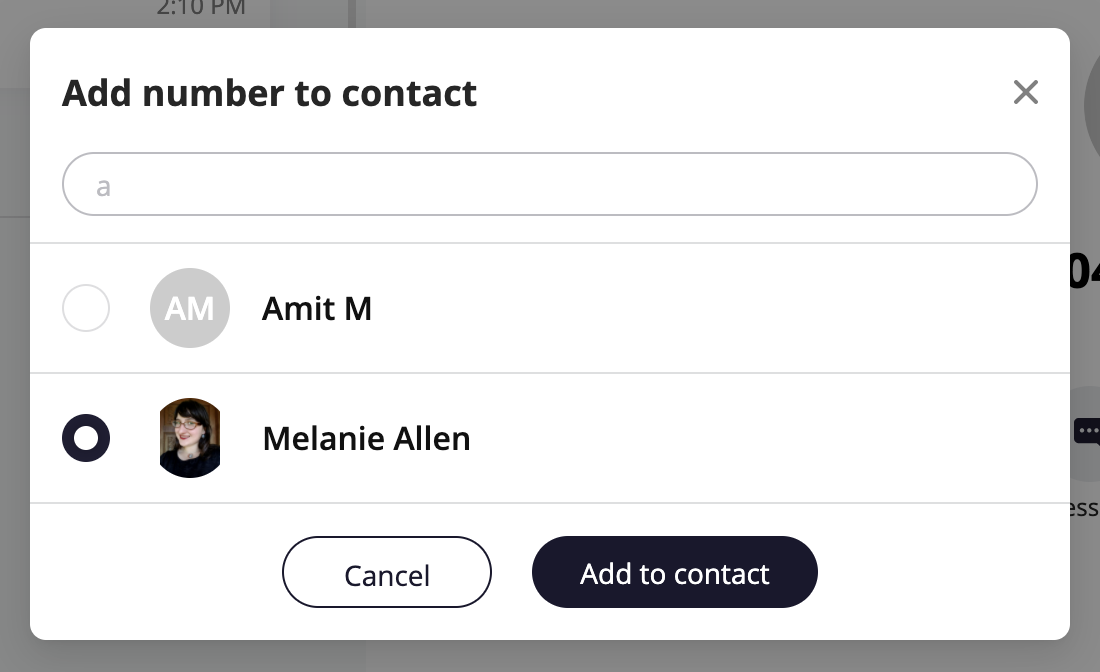
- This will pull up the Update Contact screen and automatically add the new number.
- Click Update to add the new number.
- If you need to delete the old number, hover over the number to reveal the trashcan icon, click it to remove the number, then click Update.

- To make a new contact from the Unknown number, click Create Contact.


Edit or Update a Contact
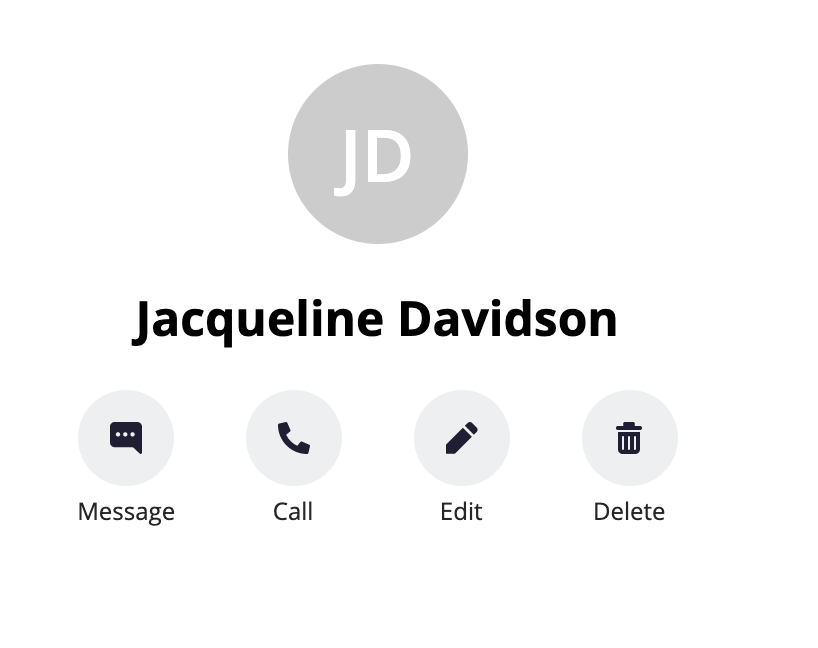
- Go to Contacts, and click the Contact.
- Click Edit.
- On the Update Contact screen, make your desired changes.
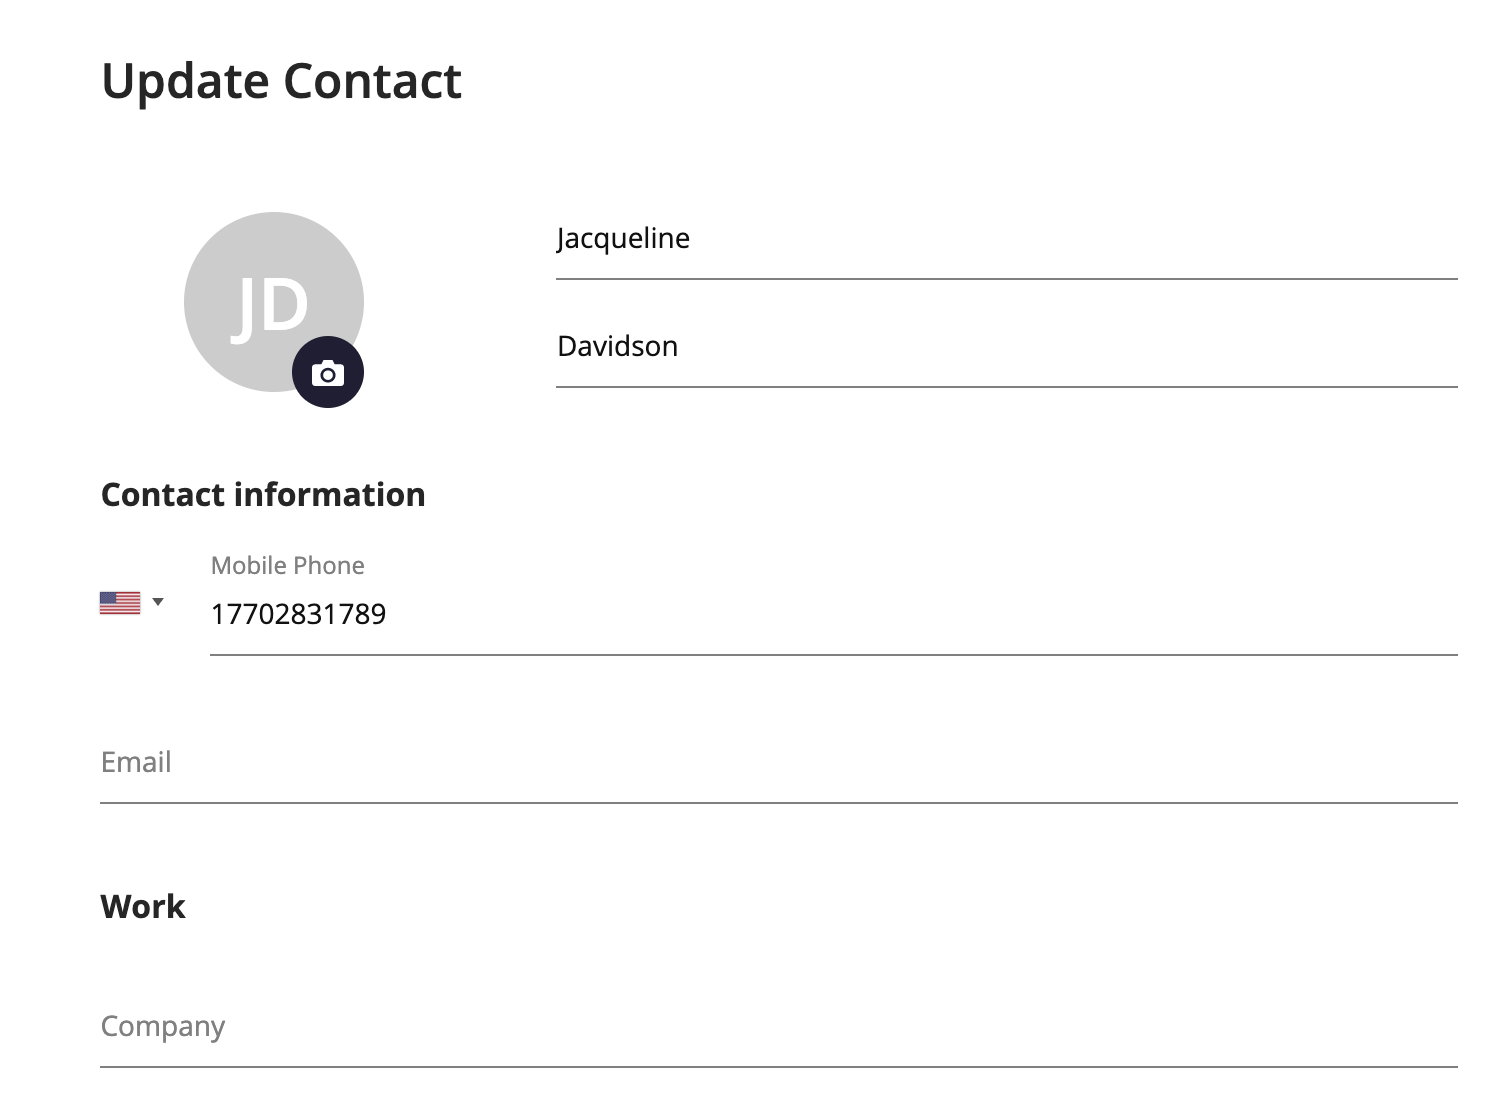
- Click Update.


Delete a Contact
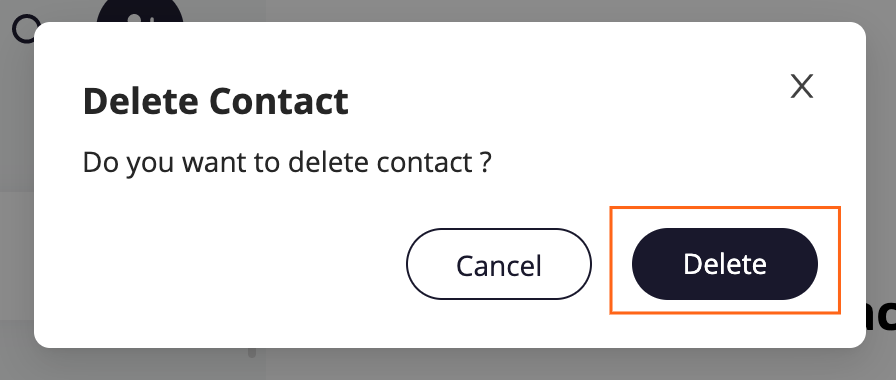
- Go to Contacts and click the Contact.
- Click Delete.
- At the confirmation prompt, click Delete.

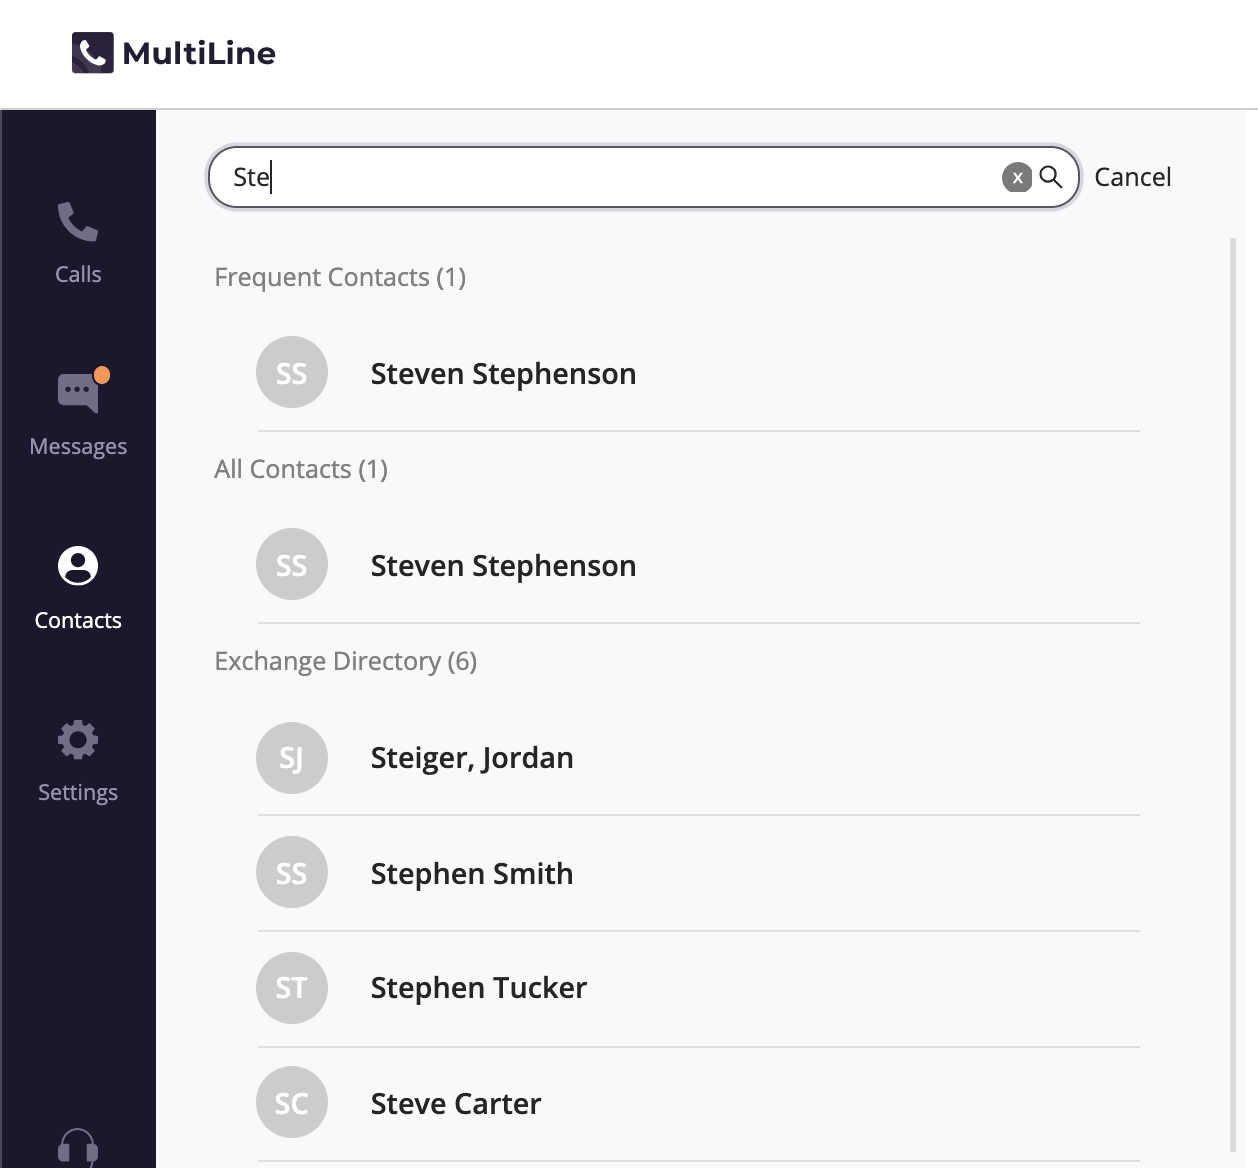
Searching Contacts
You can search contacts from the Contacts page by their first or last name.
- Click the Search icon to pull up the search field.
- Once you begin typing the first letter, dynamic search will automatically pull up matches from your locally added contacts.
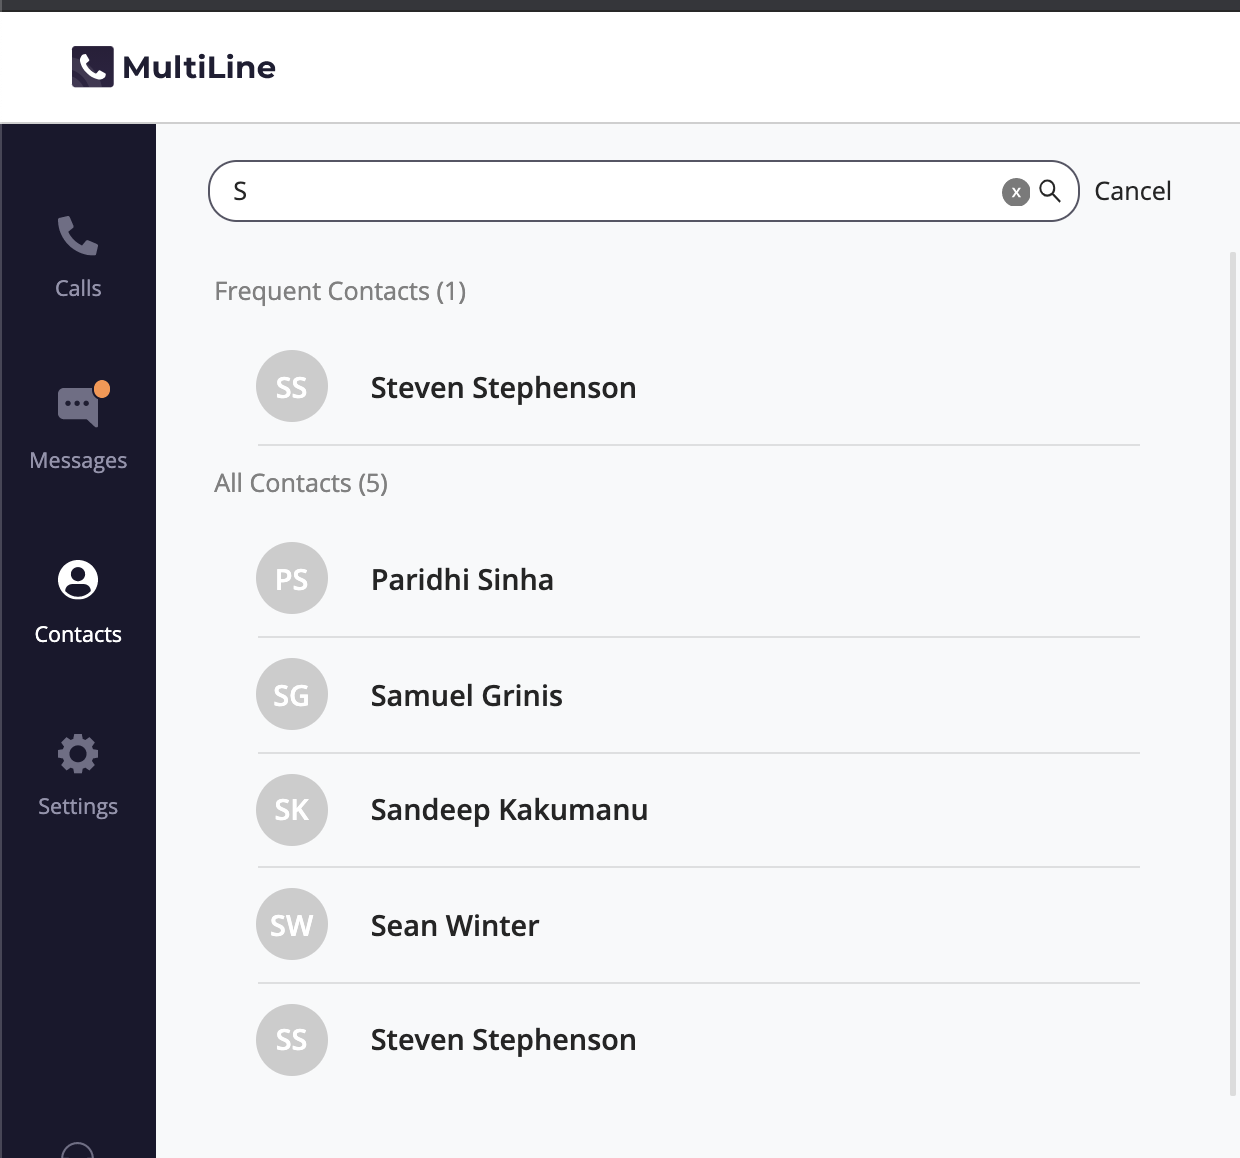
- If you're using Exchange contacts, type at least 3 characters to search the entire GAL directory.


Voicemail
The first time you dial your voicemail you'll need to set up your voicemail password. The automated system will guide you through the steps.
- Go to the Dialer screen.
- Long press on 1 for a few seconds until it begins dialing your voicemail.
- When prompted, dial your voicemail password.

You'll be able to listen to each voicemail, repeat, and delete voicemails.
Support
To get technical assistance or submit a bug, click the Support icon.

- Click the number to dial IT.
- Click the email to send an email to IT.
- Please use the form to describe your issue.
- This email will automatically include logs to help diagnose your issue.
- Click the Knowledge base URL to return here and use our self-help resources.