Read on to learn about bulk user import configuration for Salesforce Administrator.
Overview
For organizations that need to provision many users, it is possible to bulk import them using these configuration instructions. These instructions will allow the administrator to onboard the users in batches to Salesforce saving time and effort.
Before you start
- These instructions are for the Salesforce Administrator.
- MultiLine Administrator and Salesforce Administrator must have completed pre-requisite steps.
MultiLine Bulk User Import Configuration
To create your MultiLine Bulk User Import Configuration, you will:
- Set the type of MultiLine Invites allowed (Salesforce invitations, Movius invitations, or both)
- Set the Bulk Provision Target
- Set the BP Admin
- Set the Batch Job Frequency
- Set the Batch Job to Active or Inactive
- Configure
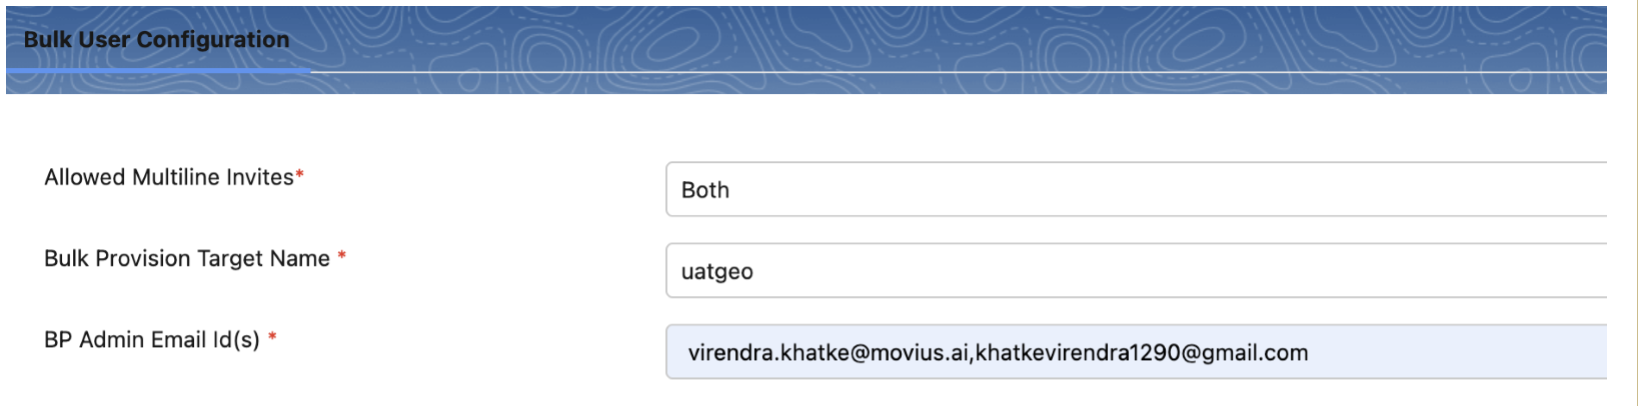
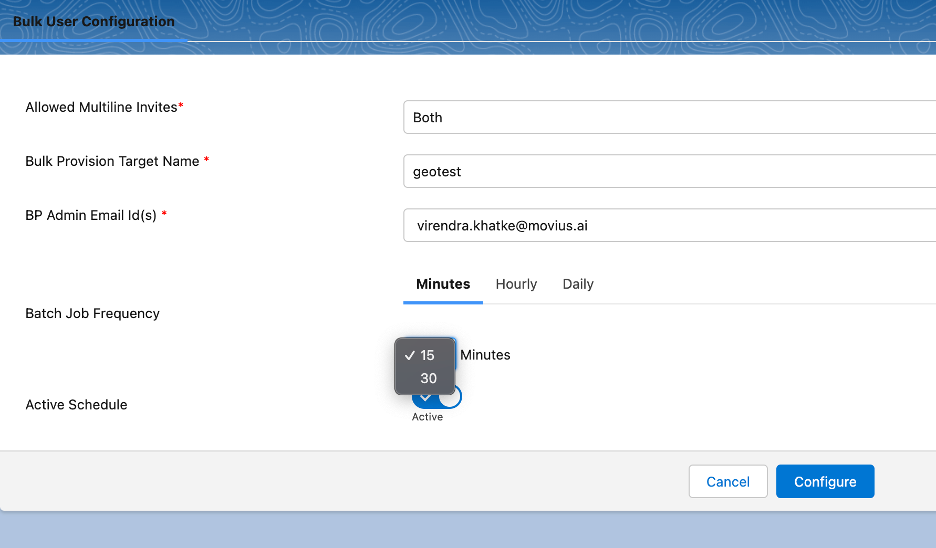
1. Set the type of MultiLine Invites allowed
There are three options available Both, Salesforce Only and Movius Only.
- With “Both”: Users will receive emails from both the Salesforce and Movius environments.
- With “Salesforce Only”: Users will receive an email from Salesforce platform.
- With “Movius”: Users will receive an email from the Movius environment.

2. Set the Bulk Provision Target
Select Bulk Provision Target Name from the dropdown. This field points to Movius server instance.

3. Set the BP Admin
- Provide email IDs to receive emails for the list of Email Invites, Successful Jobs, and Failed Jobs.
- A maximum of 5 emails can be provided in this field with a comma separator.
4. Set the Batch Job Frequency
For Batch Job Frequency, the user selects which time interval user wants to run the batch job. There are three tabs of options: Minutes, Hourly, and Daily.
4.1 Frequency (Minutes)
The Minutes tab allows you to set the batch job to run every 15 minutes or 30 minutes.
- Go to Minutes tab.
- Select the desired option (15 or 30) from the dropdown menu.
- 15: The job will run every 15 Minutes
- 30: The job will run every 30 Minutes.

4.2 Frequency (Hourly)
The Hourly tab allows you to set the batch job to run a designated number of hours.
- Go to the Hourly tab.
- Use the Every Hour menu to select how many hours should elapse between each run.


4.3 Frequency (Daily)
The Daily tab allows you to set the batch job to run Everyday (Monday-Sunday) or Every weekday (Monday-Friday) at a designated time.
- Go to Daily tab.
- Select the desired radio option from the menu:
- Everyday
- Every weekday (Monday-Friday)
- Select the desired time option from the Starts Hour menu:
- Hours: Set the hour (1-12).
- Example: Select "8" for "8:11 PM"
- Minutes: Set the Minutes (0-59).
- Example: Select "11" for "8:11 PM"
- Set AM or PM
- Example: Select "PM" for 8:11 PM"
- Hours: Set the hour (1-12).

5. Active Schedule
You can set the Active Schedule to "Active" or "Inactive".
- Set the Active Schedule toggle to "Active" for the batch job to run according to your selections once configured.

- Set the Active Schedule toggle to "Inactive", and the batch job will be paused. The scheduled job will run, but the actions that are configured will not take place.

6. Click Configure
- After making your selections, click Configure to complete.

- Batch jobs will be scheduled as per the selected configuration.
- If you set the Active Schedule to "Active", a confirmation message will appear:
- If you set the Active Schedule to "Inactive", you will see a message that the job is paused:
- Click the confirmation message to visit the All Scheduled Jobs page
 Job Details for scheduled Every weekday (Monday-Friday)
- The BP Admin Email Id(s) will receive the list of Email Invites, Successful Users, and Failed Users list.


You have completed the bulk user import configuration steps.