Read on to learn about Movius for BlackBerry's unique integration features.
What is Movius for BlackBerry?
Movius for BlackBerry is a MultiLine mobile app that specially integrates with BlackBerry UEM.
Dynamics Launcher Integration
The Movius for BlackBerry client is registered with the BlackBerry Dynamics Launcher, therefore, appearing in the list of available Dynamics apps when the user hits the blue floating launcher button to open the Dynamics Launcher overlay screen.

BlackBerry Exchange Contacts
Most Movius for BlackBerry users will use BlackBerry Exchange Contacts.
- Tap the menu icon ⋮ in the bottom right (iOS) or upper right-hand corner (Android).
- Tap Settings.
- Tap Contact Settings.
- Tap Exchange Contacts.
- Once you select BlackBerry exchange contacts the sync will begin and you'll soon have access to your contacts.
- If you'd like to change how often your contacts sync with the exchange server, tap Sync Interval and choose your preference.
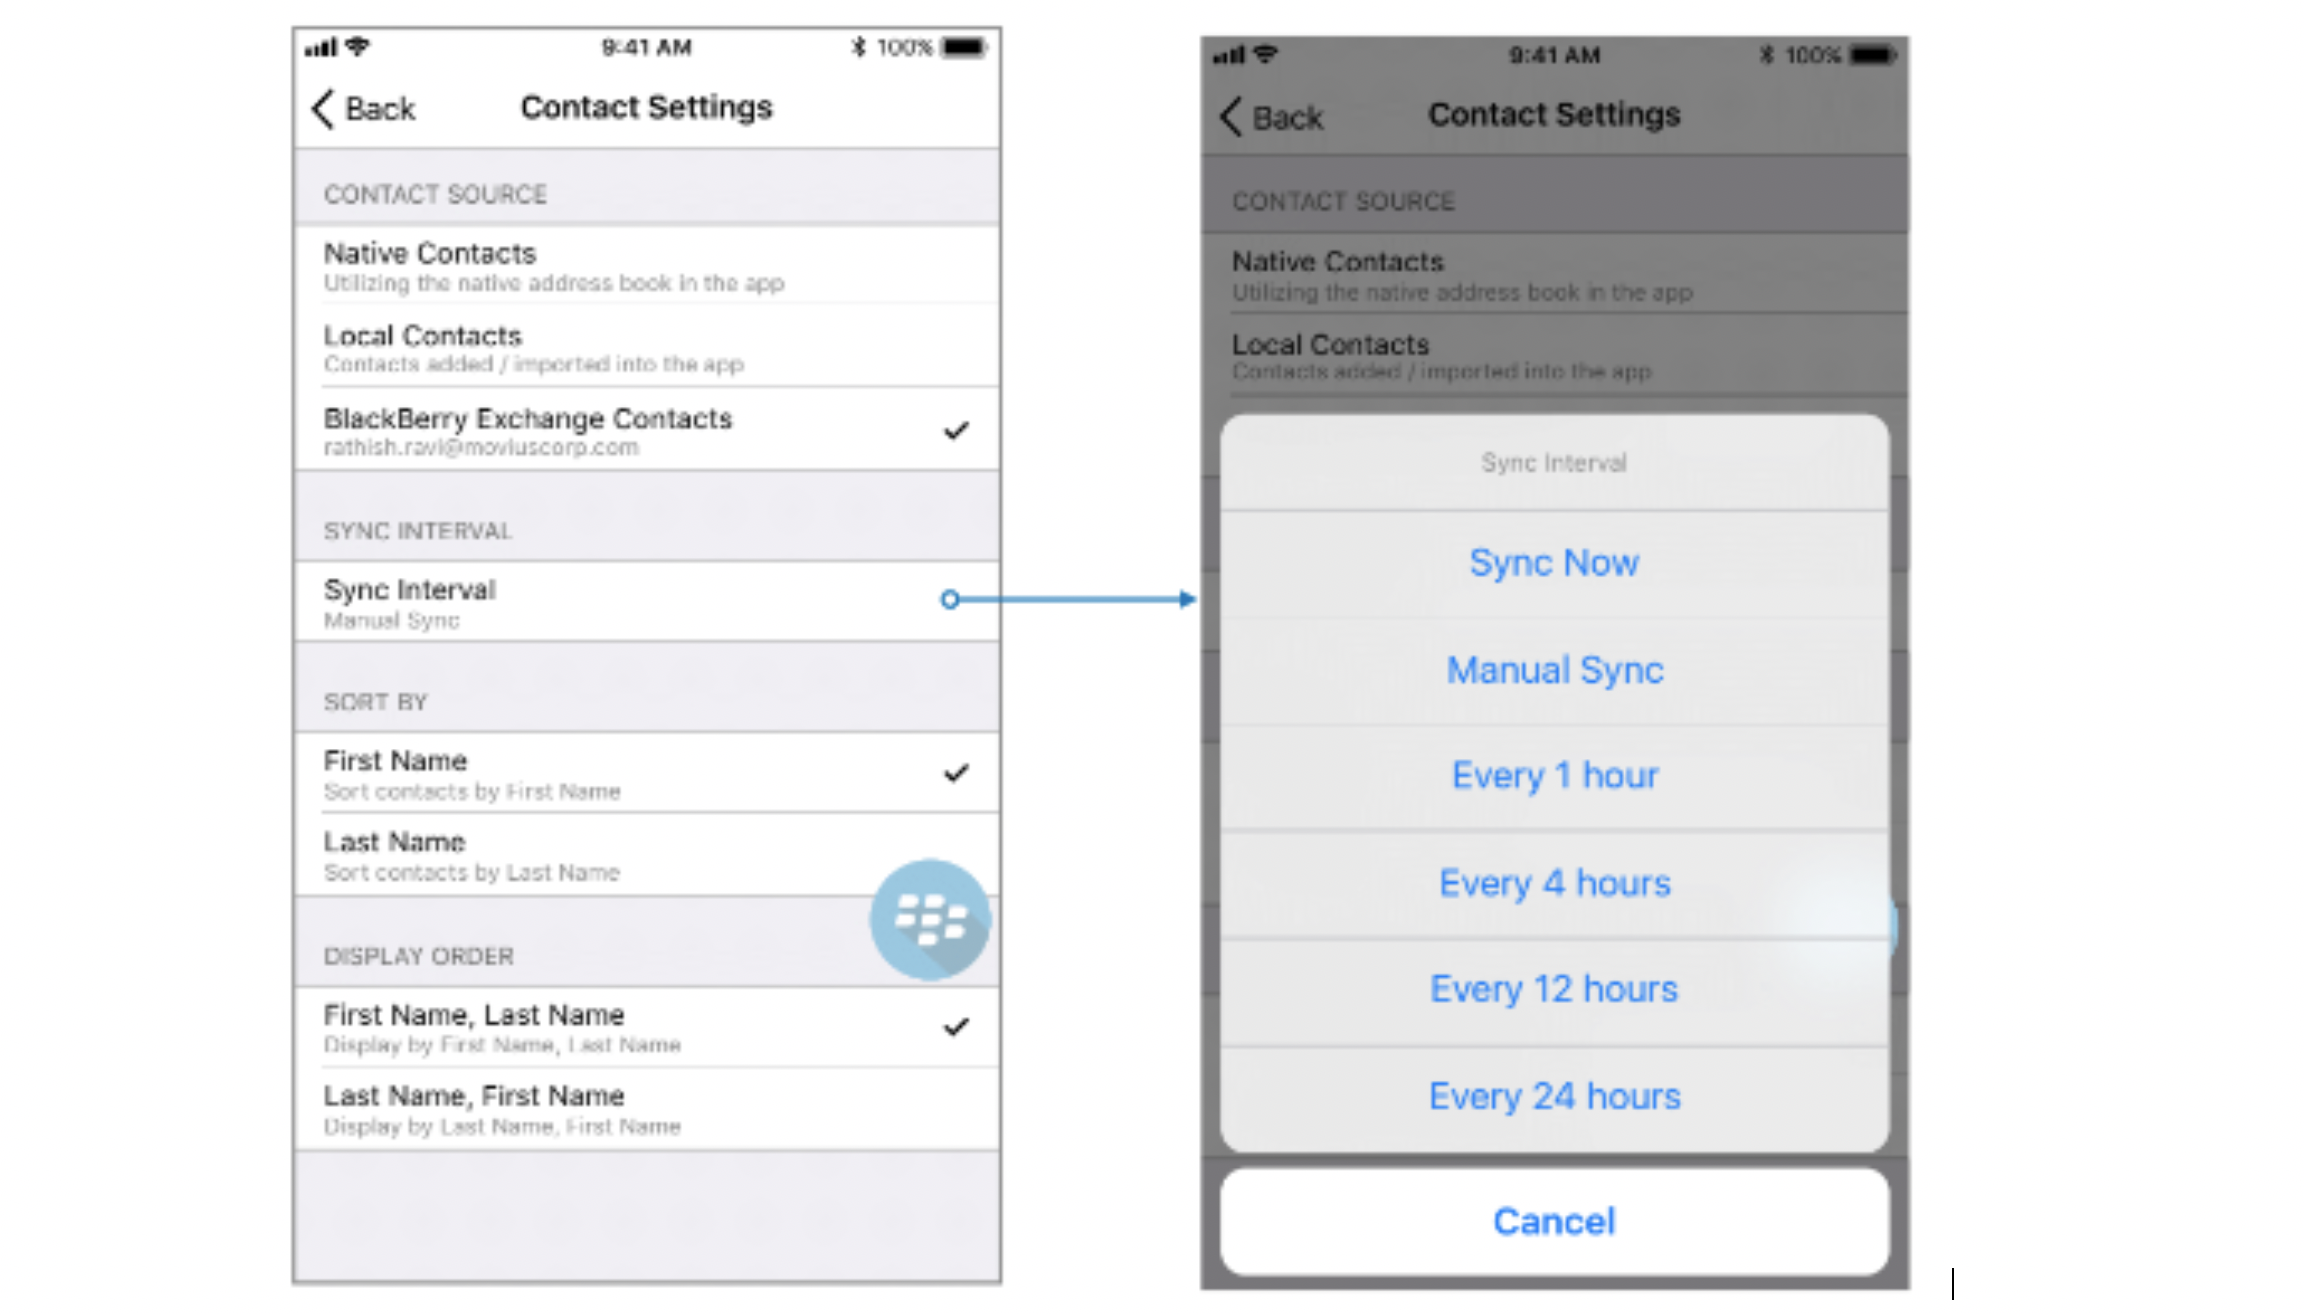
Note: If you created contacts while using Local Contacts or Native Contacts before switching to Exchange, these contacts will be deleted.
Add contact
If you add a contact on your device locally it won't be synced or created on exchange server. You can modify locally added contacts in Movius for Blackberry but cannot modify imported contacts.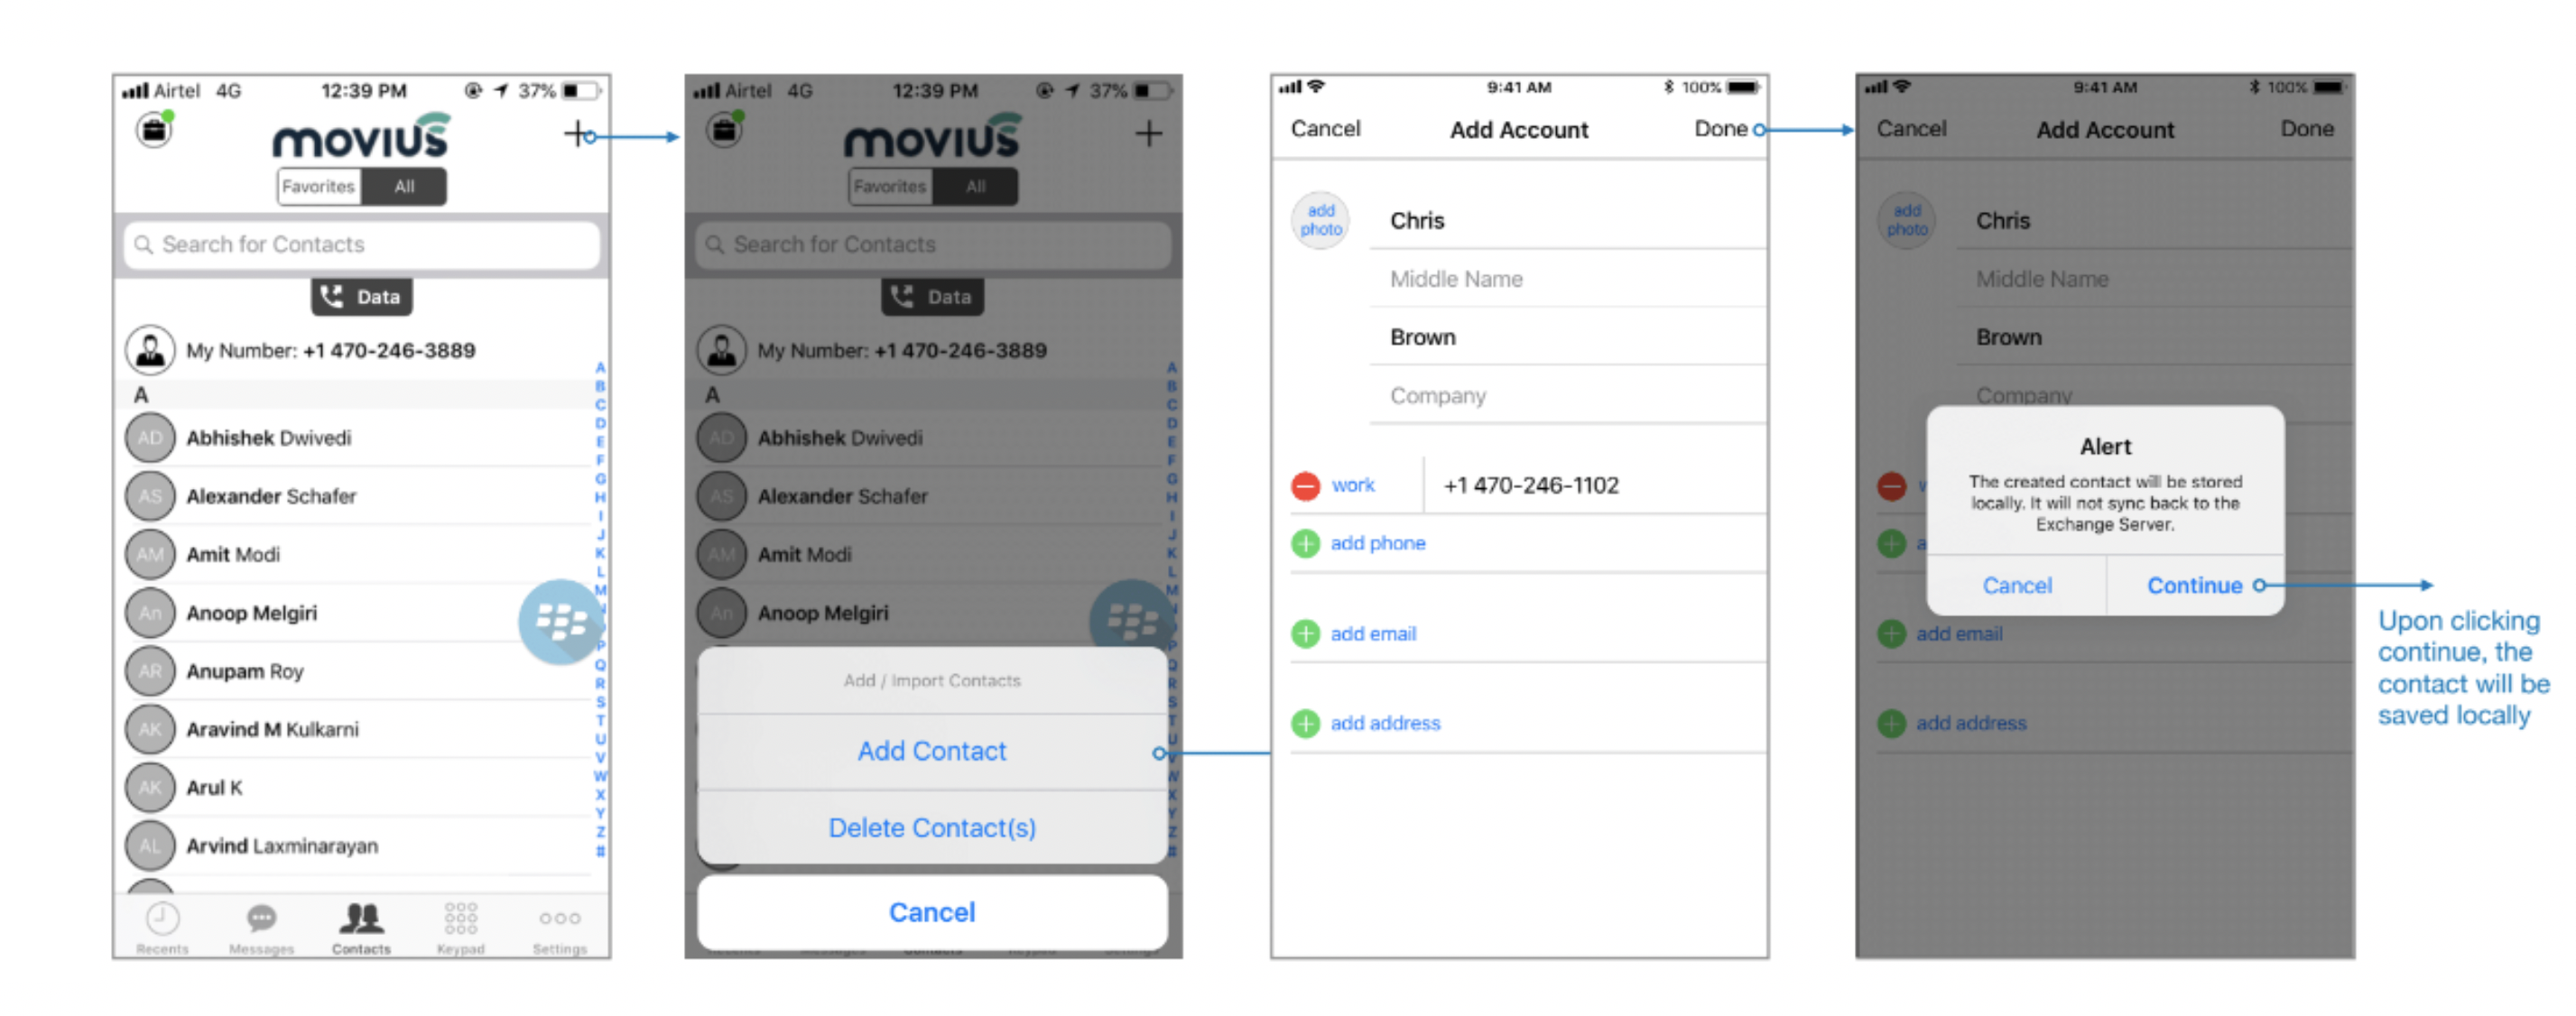
Delete contact
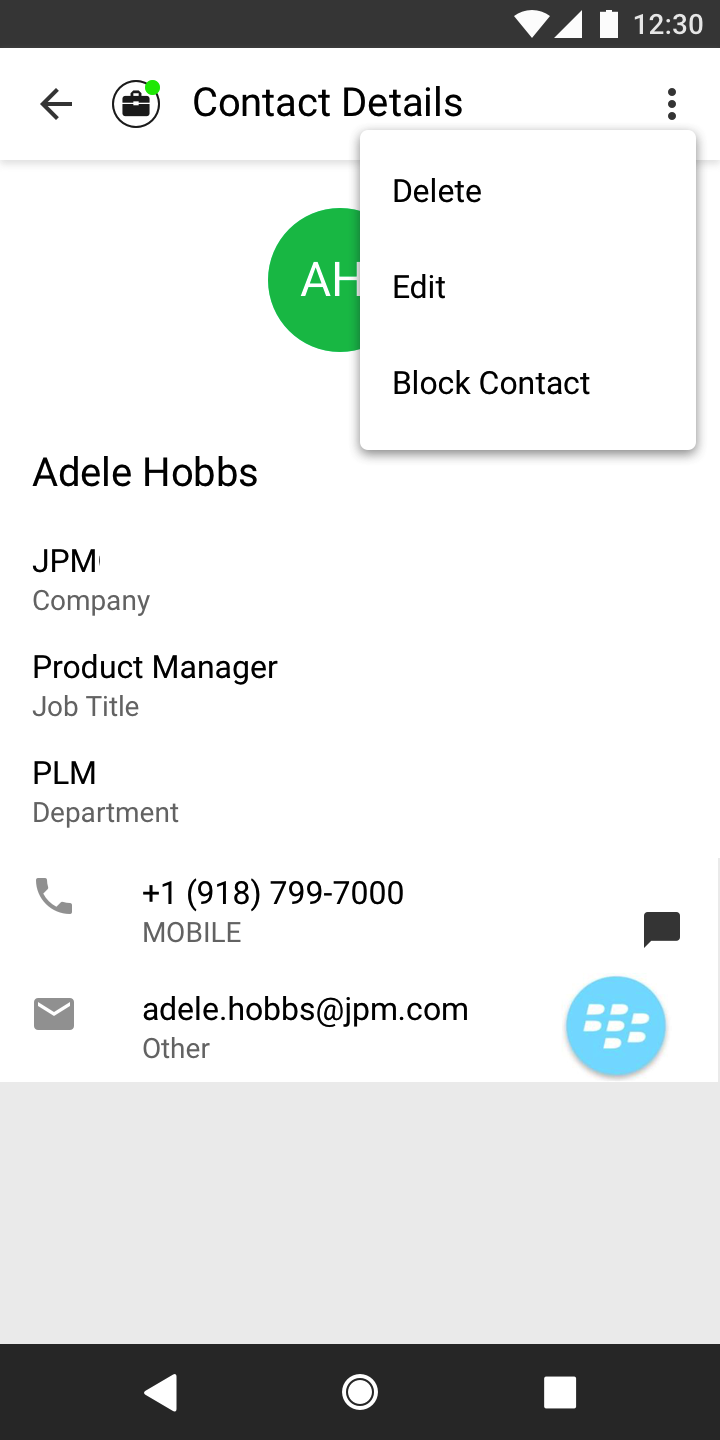
If you try to delete a contact from Movius for Blackberry, the client will show an error message. You can't delete an imported contact; only locally saved contacts.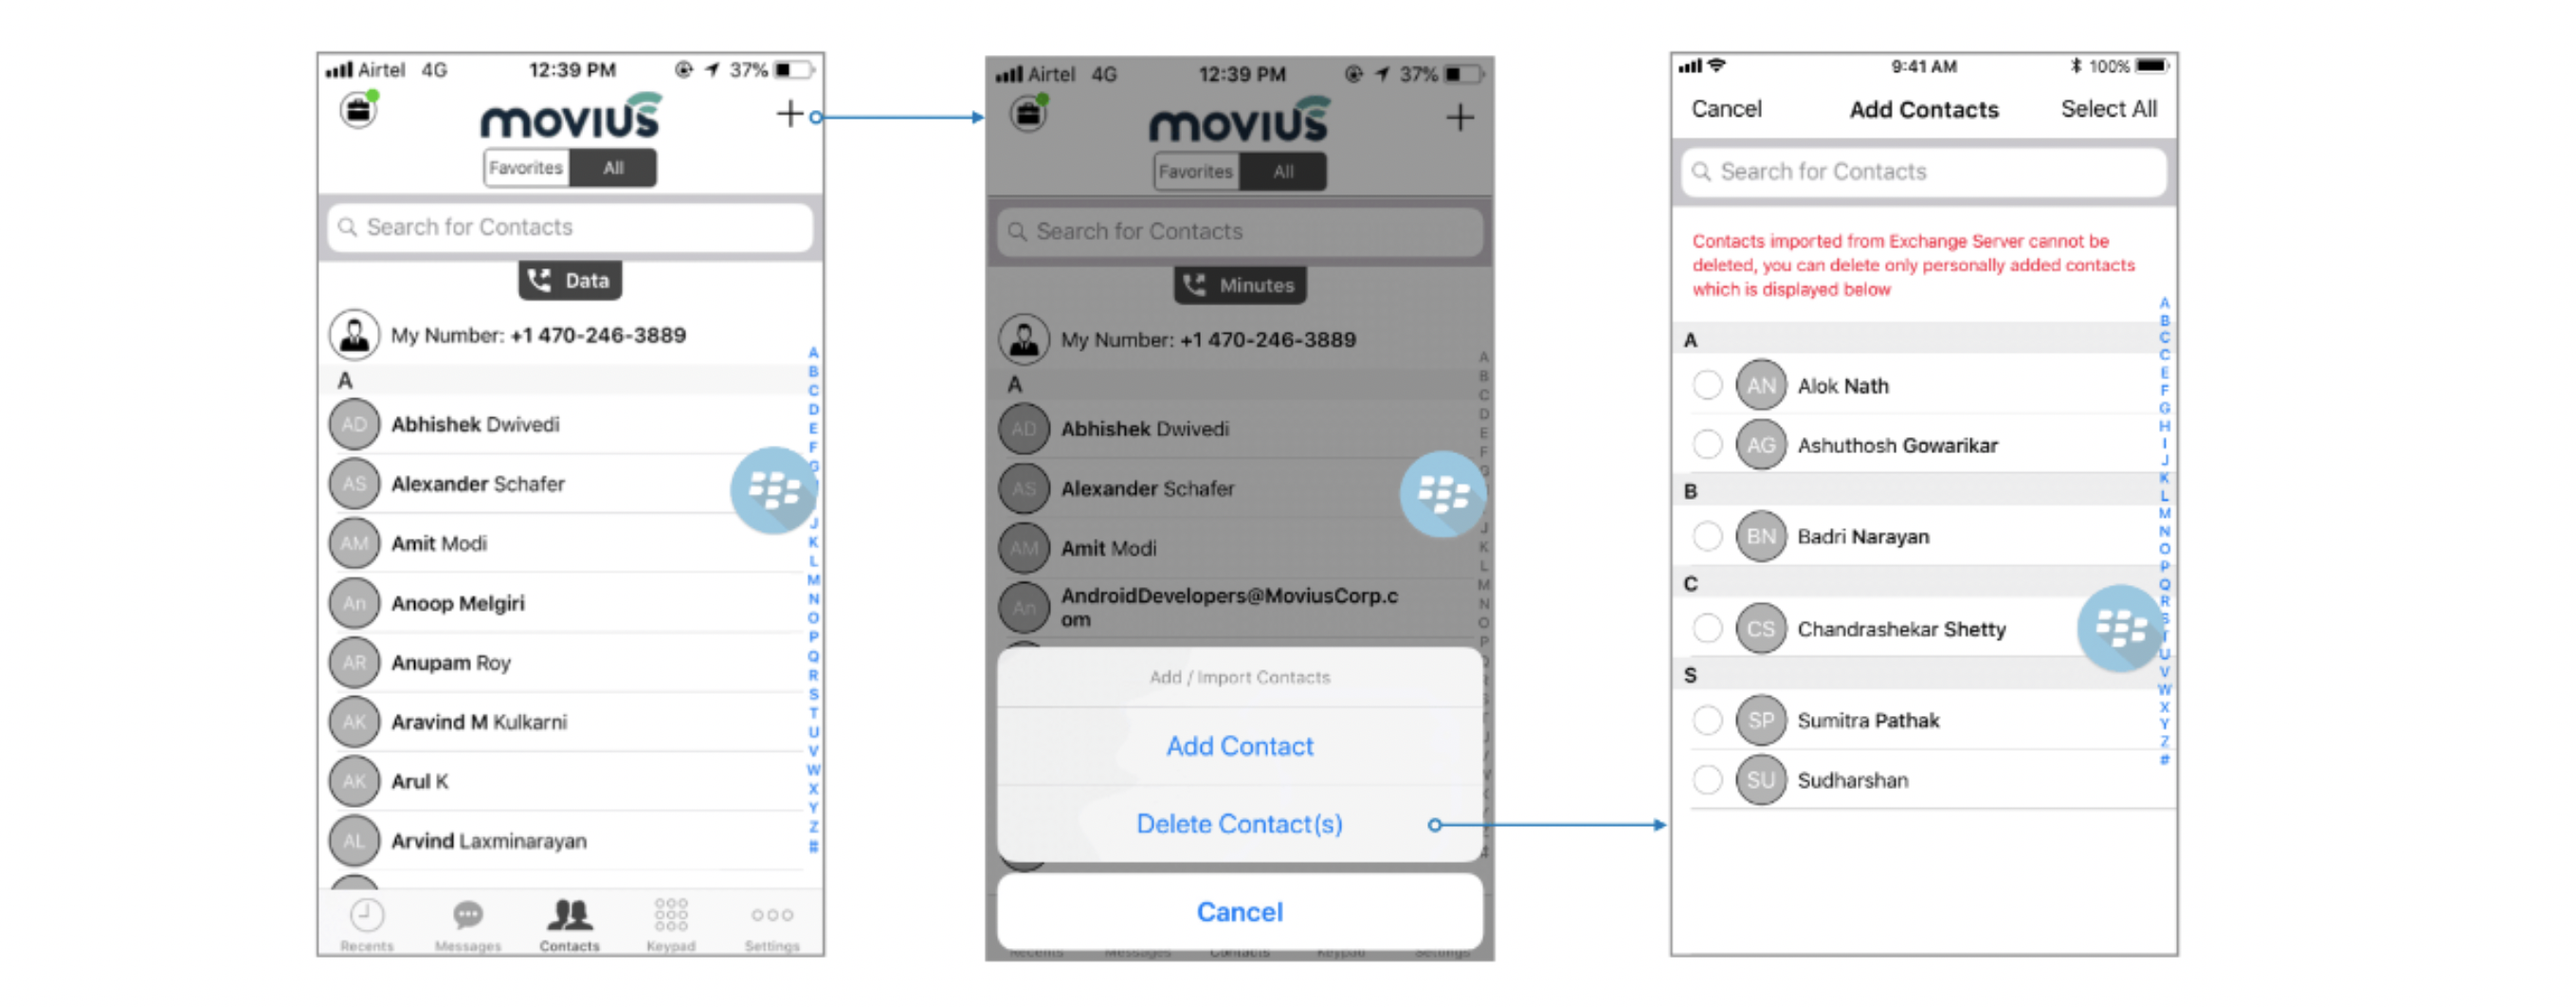
Block contact
You can add a contact (local/exchange) or a number to the Blocked Number list. You won't receive any calls or messages from the blocked number.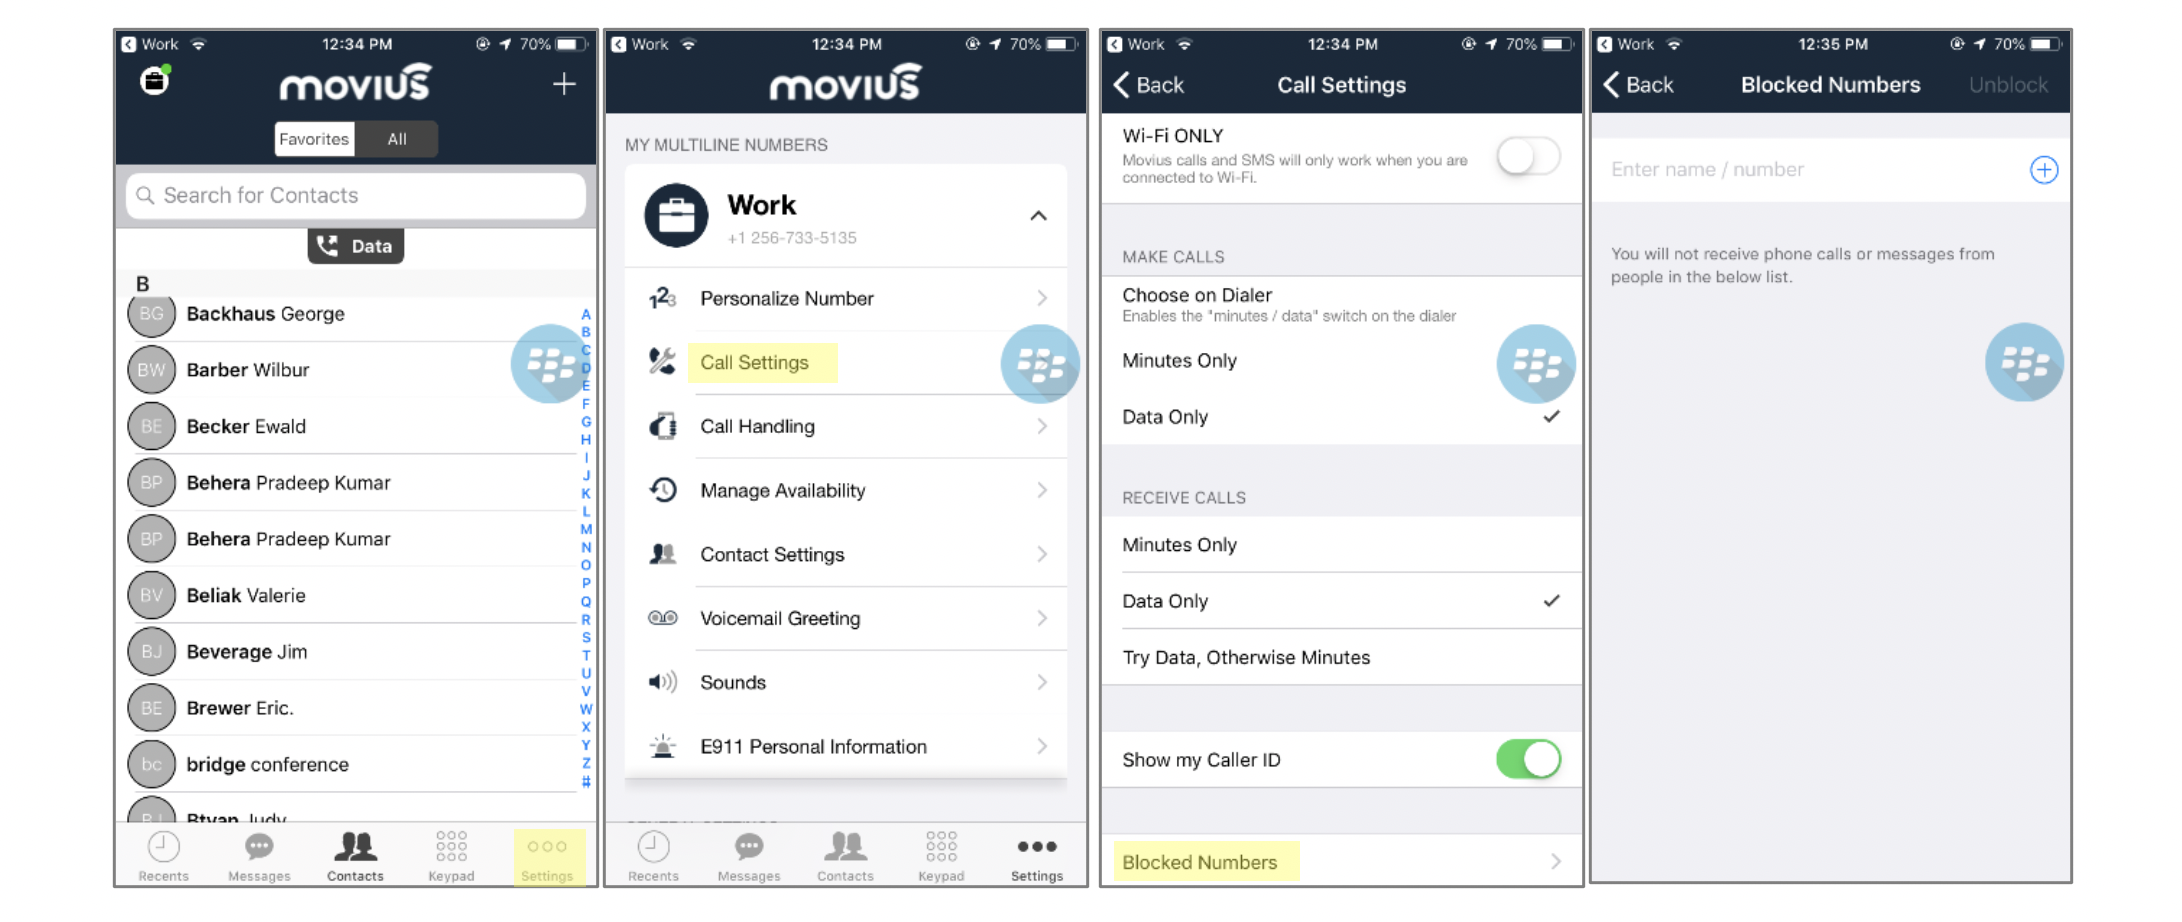
GAL Look up
Global Address List (GAL) doesn't allow search for a contact by contact number. If you search for a contact using a number, you'll see a notification message. You can search for a contact using First Name, Last Name, Display Name, Full Name, Alias and Email fields.
Call or text contact
Calling or texting a Contact using the Movius for BlackBerry client directly from the BlackBerry Work Contacts application:
Open a BlackBerry Work Contact and hit the phone number for that contact, or the phone icon beside the number. The Movius for BlackBerry client will call the number directly; as shown below:

Tapping the message bubble icon beside a contact/number will open the Movius for BlackBerry client to the draft message screen to allow the user to type a message and tap send.
BlackBerry Work Email Integration
When BlackBerry Work recognizes a phone number in an email, it turns the number into a link.
- Tapping on a recognized phone number in a BlackBerry Work email prompts the user to choose to call or text the number.
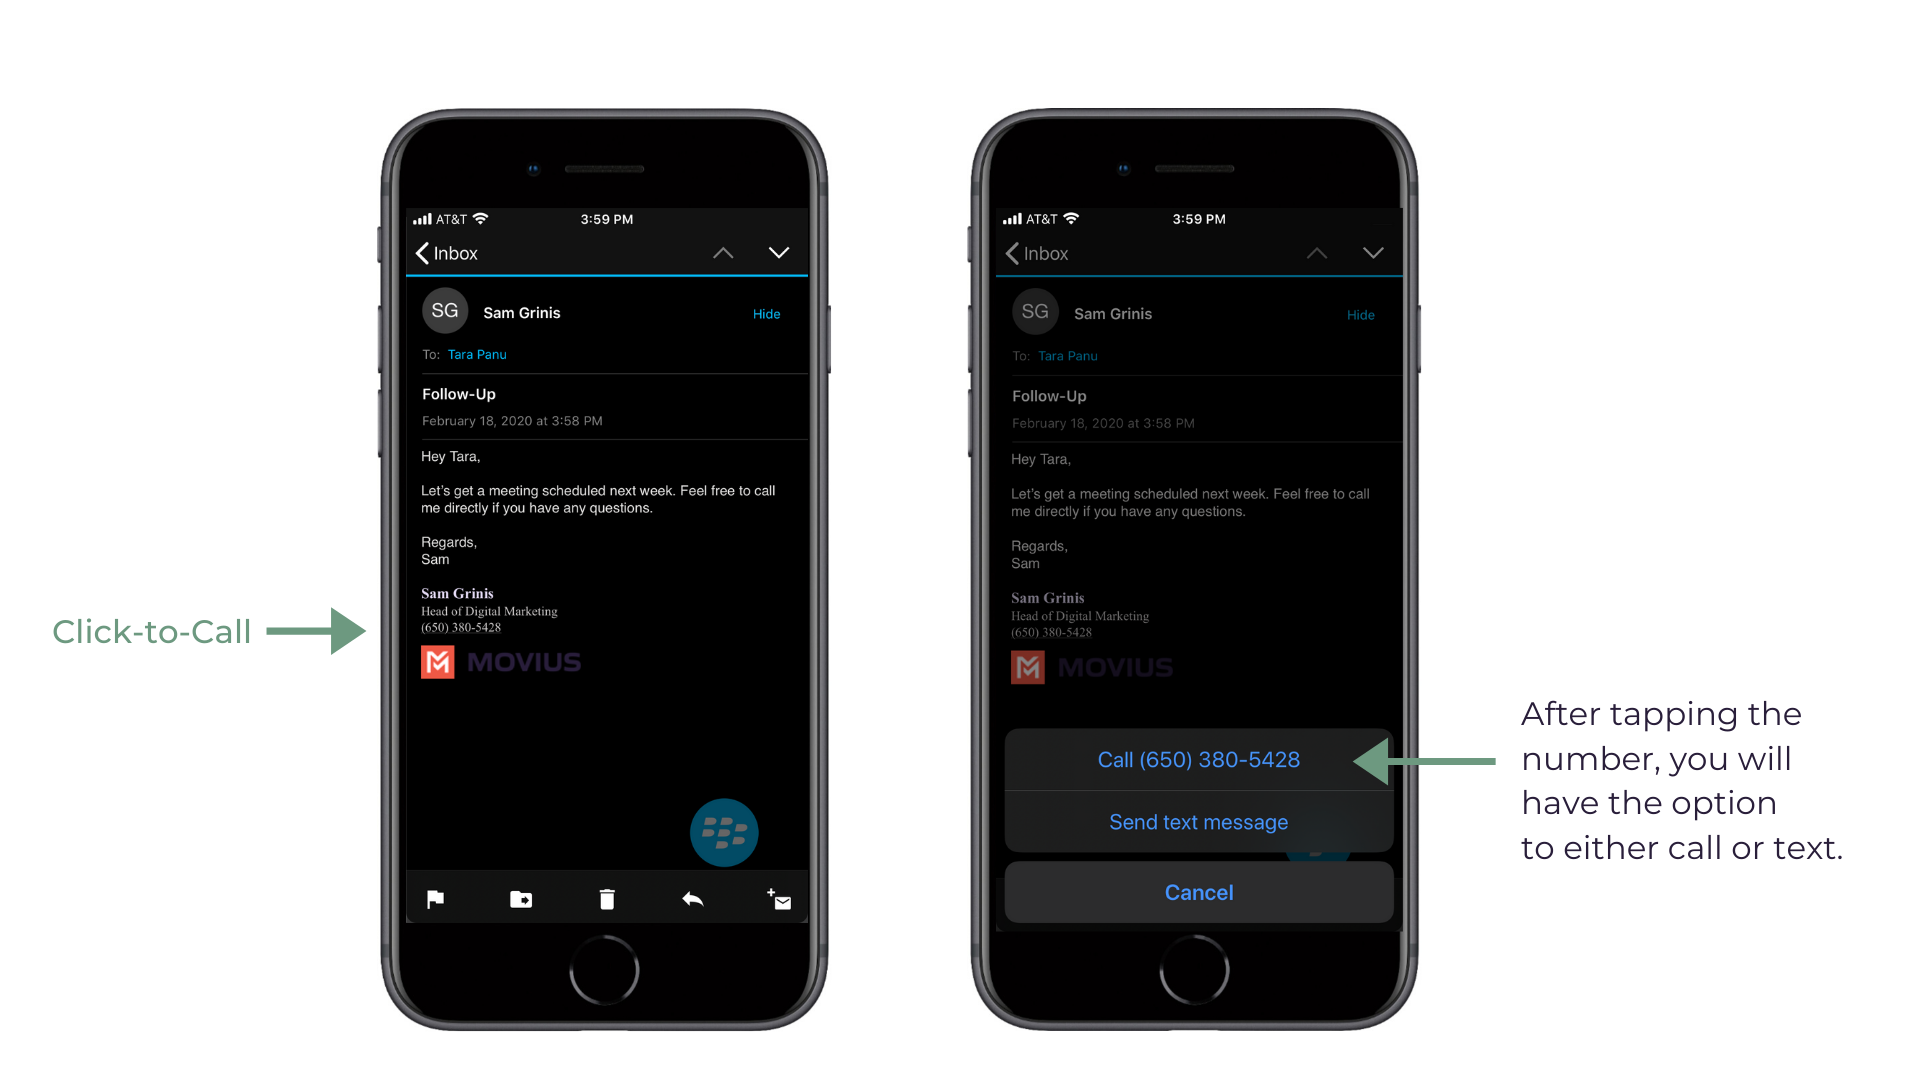
- If you choose call, the client will open and make a call to the number.
- If you choose text, the Movius for BlackBerry client will open to the draft message screen to allow you to type the message and tap Send.
BlackBerry Work Calendar integration
Calling a phone number directly from a BlackBerry Work Calendar invitation is supported with Movius for BlackBerry.
When opening a BlackBerry Work Calendar event, if BlackBerry Dynamics recognizes a number within the event details as a phone number, it will be underlined and stylized as blue text.
If the user clicks directly on the phone number, they will be prompted to choose whether they want to make a call or send a text.

- When choosing to make a call, the call is made directly using the Movius for BlackBerry client:
- When choosing to send a text, the user will be taken directly to the draft message screen in the Movius for BlackBerry client.
Minutes Calling
If the Movius for BlackBerry client is configured to make calls using minutes, when choosing Movius for BlackBerry, the UI will display the relationship number in the call box. This is not a mistake! This relationship number is how the Movius application routes your call to the intended number using minutes. Calling this assigned relationship number will allow the call recipient’s caller ID to show your MultiLine number, as with a VoIP call.

Note: Not all screens in this document will be from the Movius for BlackBerry app. Some screens from the MultiLine app will be used when the user interface is similar.
Activating Movius for BlackBerry
Everything you need to get started will be sent to you in a MultiLine invitation. You can use it to start the activation process.
These instructions assume you've already installed BlackBerry EMM on your phone.
Get your invitation
- Expect an invitation to be sent to your work email. Please don't reply to this email, as it is auto-generated.
- Your invitation will contain a Download and Activate button, a QR code, and credentials for activating MultiLine manually.
Sample Email below:

If you ever need to delete and reinstall the mobile app, you'll need this Password from the invitation to activate it. If you lose your invitation, request a new one from your IT administrator.
Some users may receive one of these alternative invitations:
- SMS invitation
- Legacy invitation (email will only contain credentials and not a QR code)
You receive MultiLine invitations from your IT organization, not Movius. Movius cannot send you invitations.
You have multiple options for activating MultiLine on your mobile device:
- If you are opening your email on your phone, tap the Download and Activate button.
- It will check if the MultiLine app is installed on your phone and begin installation if not. The activation process will begin immediately.
- If you are opening your email on your desktop or tablet, take out your phone camera and tap the QR code.
- It will check if the MultiLine app is installed on your phone and begin installation if not. The activation process will begin immediately.
- If you've already downloaded MultiLine, you can also scan the QR code using MultiLine.
- If necessary, you can also activate manually by entering the details from your invitation. Click the Activate Manually link from the invitation or the first screen.
That's it! You're done
Want to learn more about using Movius for BlackBerry?
Calls
Making Calls
Read on to learn about return calls in MultiLine and MultiLine for Intune iOS.
Overview
Recent calls show up in the Recents tab.
Before you start
- Your organization may enable or disable certain functions, including:
- Calling, Data/Minutes mode, or WiFi calling
- Call forwarding or Call handling
- Call recording
- If you have questions about what functions are enabled, contact your IT group for assistance.
How to call from recents
You can call someone back who you've recently had a call or missed call with.
- Go to your Calls tab in the navigation bar at the bottom of your screen.

- Select the blue "i"
 icon to reveal details about that call.
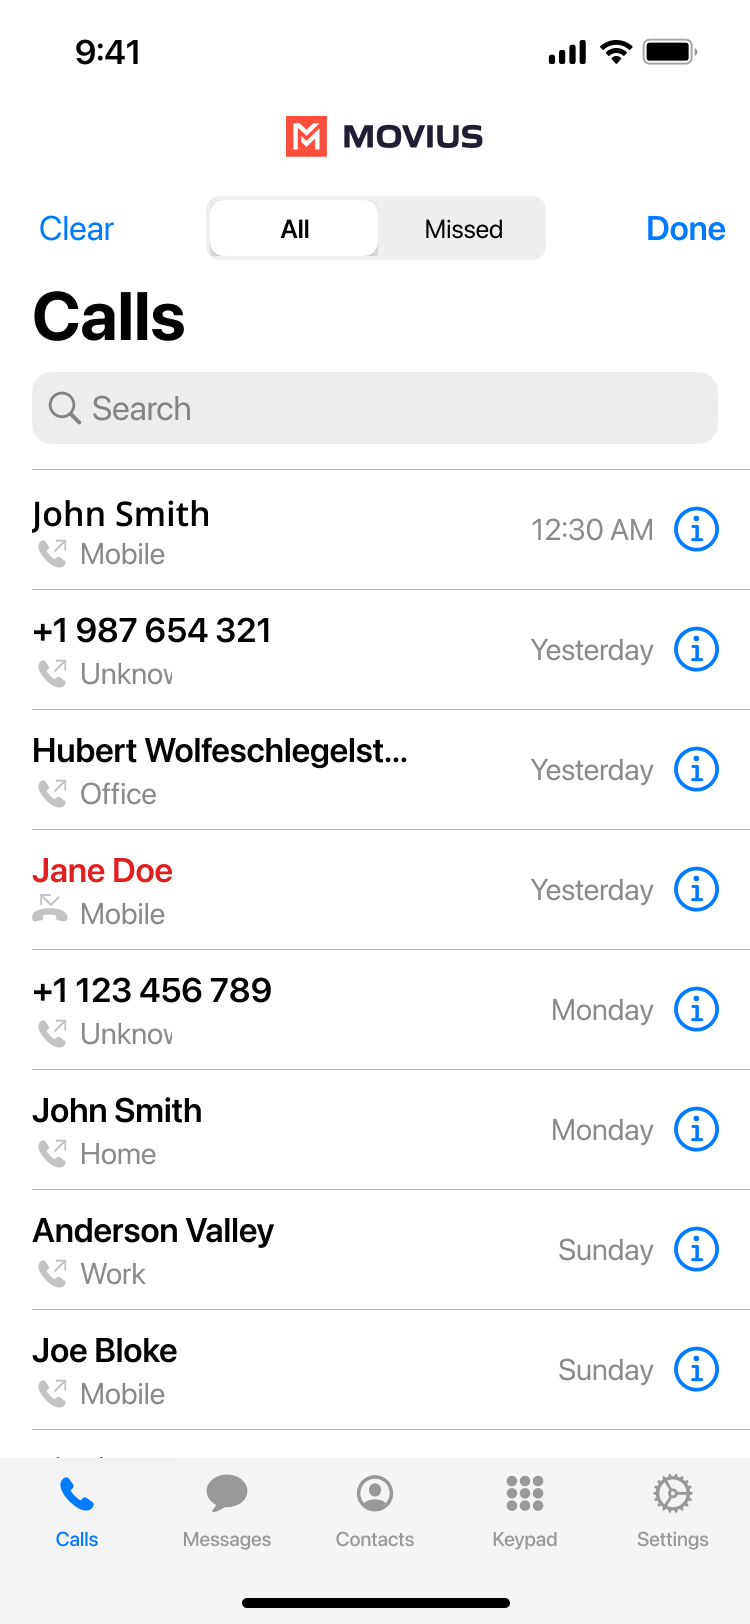
- Select the number or contact name to make a call.
Call icons
Read on to learn about the meaning of icons you will see in your recent calls.
Overview
When you go to your list of recent calls, you see information about your most recent call with each party and an icon. If you go to the details, you can see your call history with that party. It can be useful to understand what the icons mean.
Similar to other calling apps, there is an incoming call icon (meaning that party called you) and outgoing call icon (meaning you called that party), and a missed call icon.
Before you start
- Some organizations may disable Data Mode or Minutes Mode or other Call Settings. If these modes are disabled, you will not be able to set them in Call Settings.
Call icon meanings
iOS
| Icon | Description | Meaning |
|---|---|---|
 | Phone number appears in red, no icon | Missed Call |
 | Icon with arrow pointing towards phone | Incoming Call |
 | Icon with arrow pointing away from phone | Outgoing Call |
Click-to-Dial
Call Settings
Call Handling
Read on to learn about using MultiLine's Call Handling Settings. You can set multiple numbers to receive incoming calls sequentially.
Overview
Use Call Forwarding to send calls to your MultiLine number to the specified number. Your MultiLine phone will not ring or receive the call when Call Forwarding is set.
Before you start
- You need to be connected to the Internet to change your Call Forwarding settings.
- An organization can choose to turn this feature off.
Set Call Forwarding
- Go to Settings and select My Schedule.
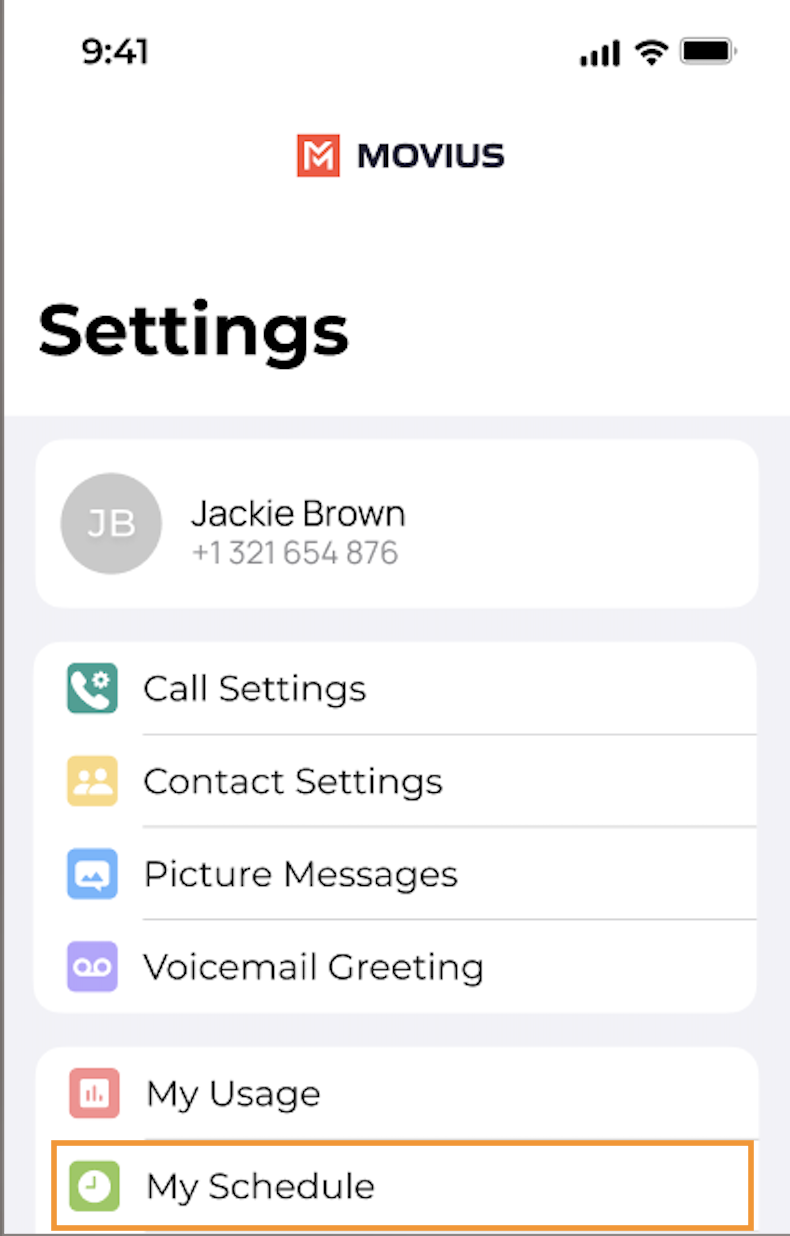
- Tap on Call Forwarding to enable it.
- Enter the forwarding phone number
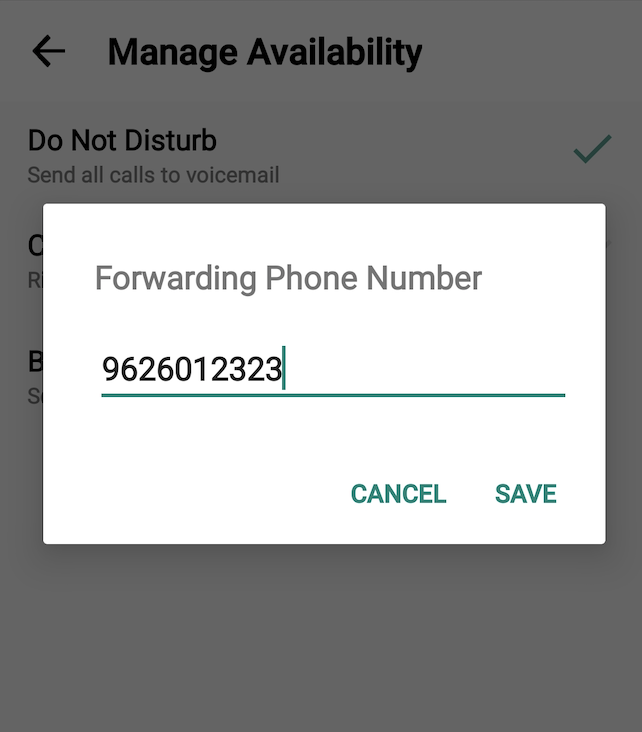
- Tap Save. If successful, you'll see the number you set on the screen.
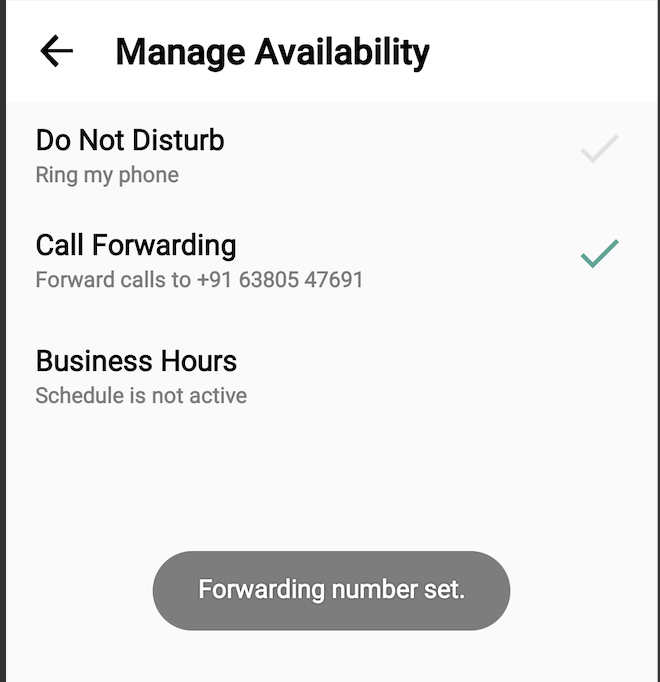
The forward function WILL NOT work if you enter your primary device’s number as the call forwarding number.
Caller ID
Read on to learn about how MultiLine Caller ID works for incoming and outgoing calls.
Overview
- Caller ID behavior for incoming and outgoing calls differs based on whether you are using Minutes Mode or Data Mode
- If you call within your organization, by default your name will appear unless you turn the Caller ID off
- If you call outside your organization to someone who doesn't have you saved as a contact, your MultiLine phone number will display
- You can turn your own Caller ID on or off in Call Settings
Before you start
- If your organization chooses to restrict the type of Call Settings you can use, you may not see certain options in your Call Settings. When disabled, settings are greyed out or absent from the app.
Default Caller ID behavior for outgoing calls
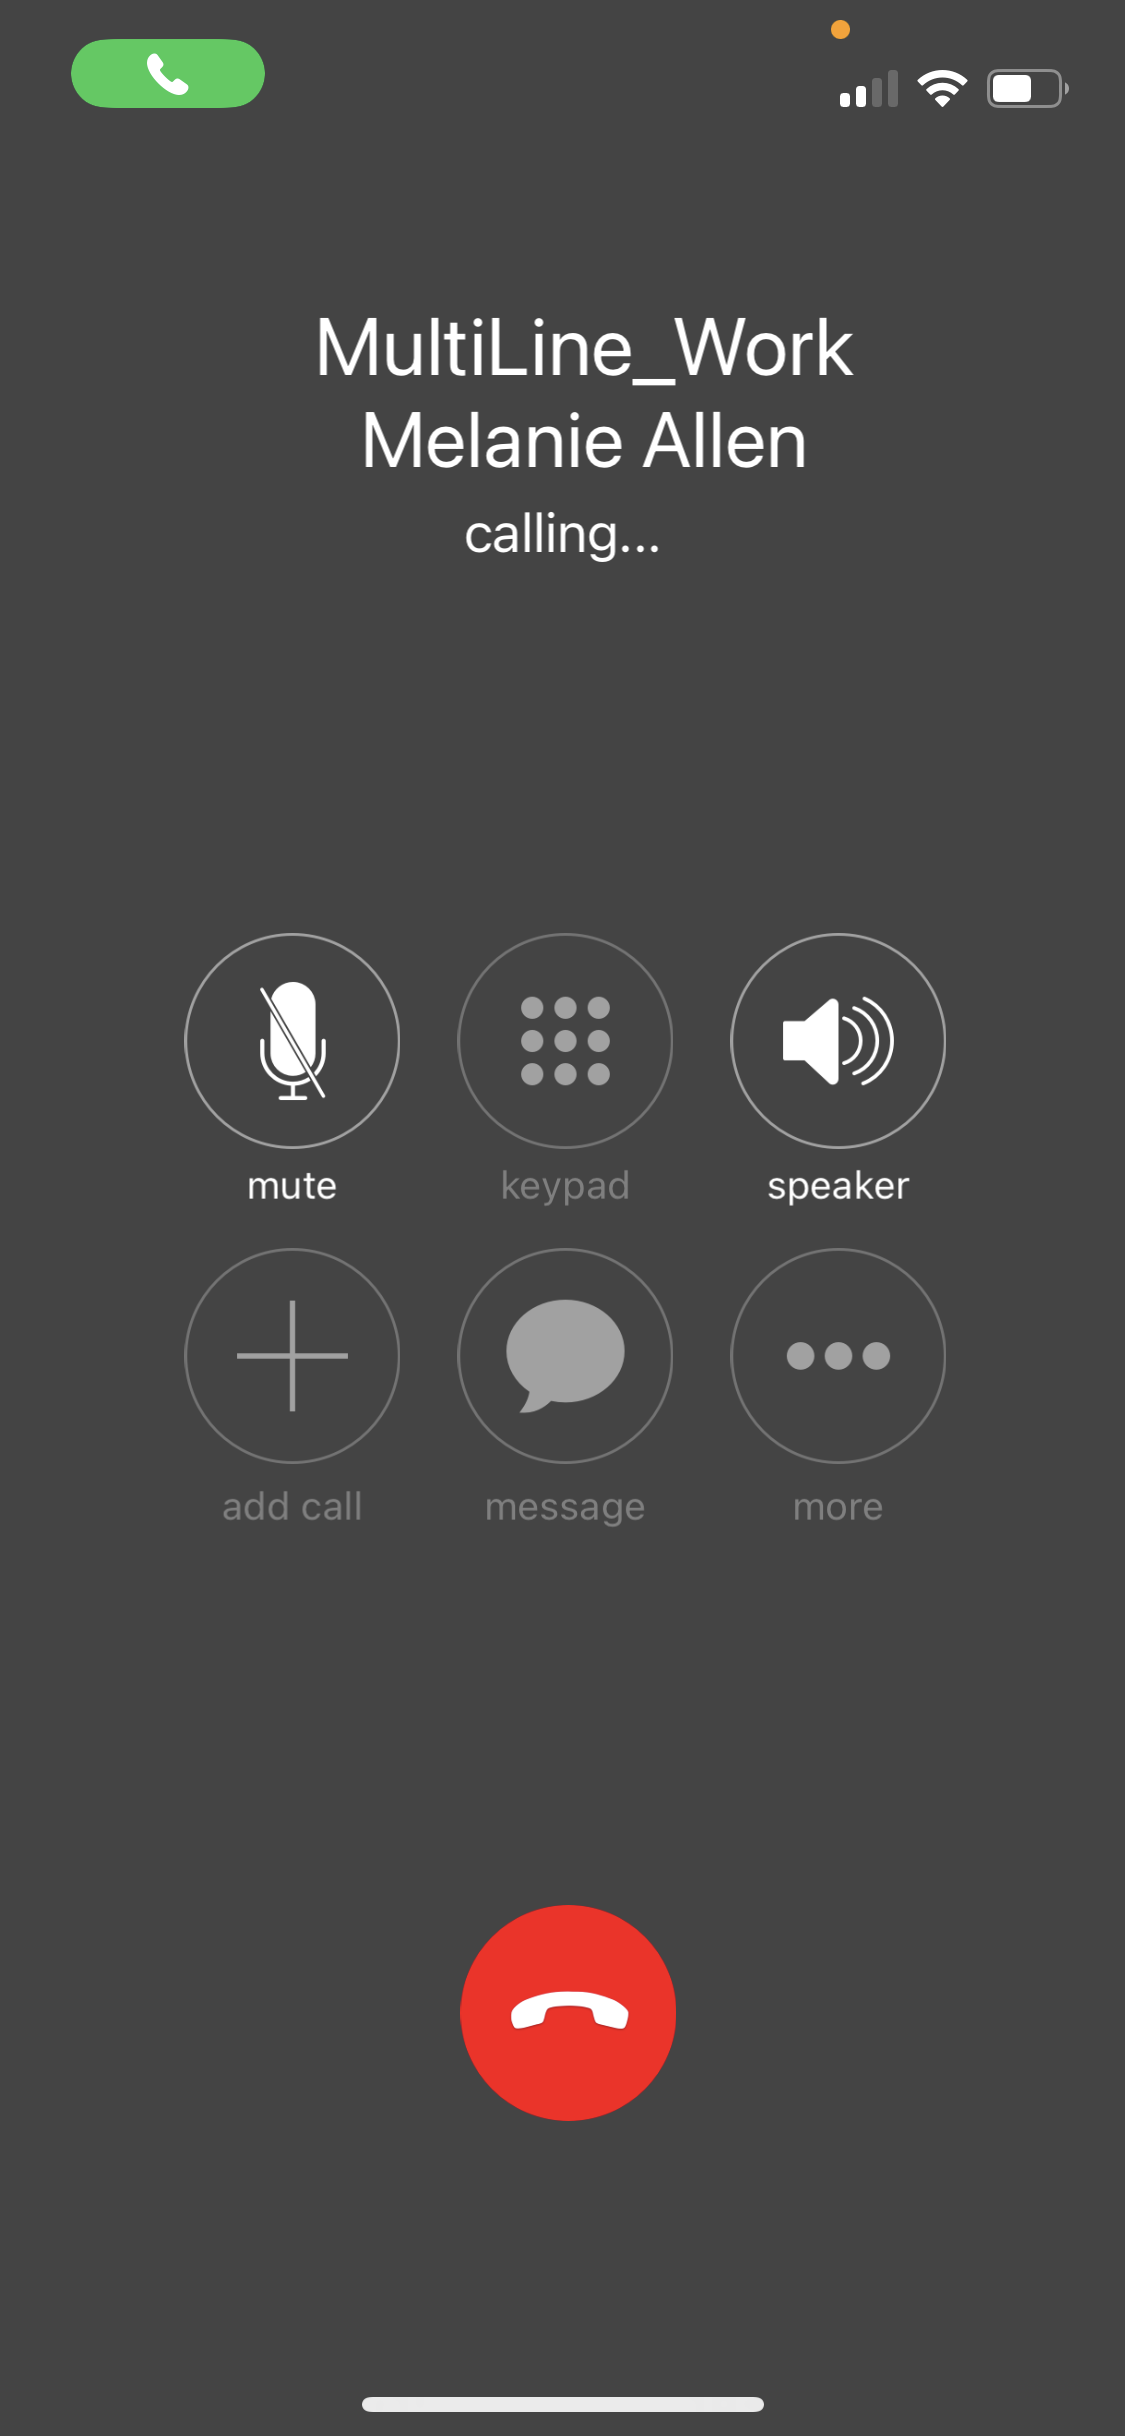
Data Mode
When you use data mode, you will see the MultiLine outgoing calls screen. For example, this is what an iOS user would see if they were trying to call their contact Melanie on data.
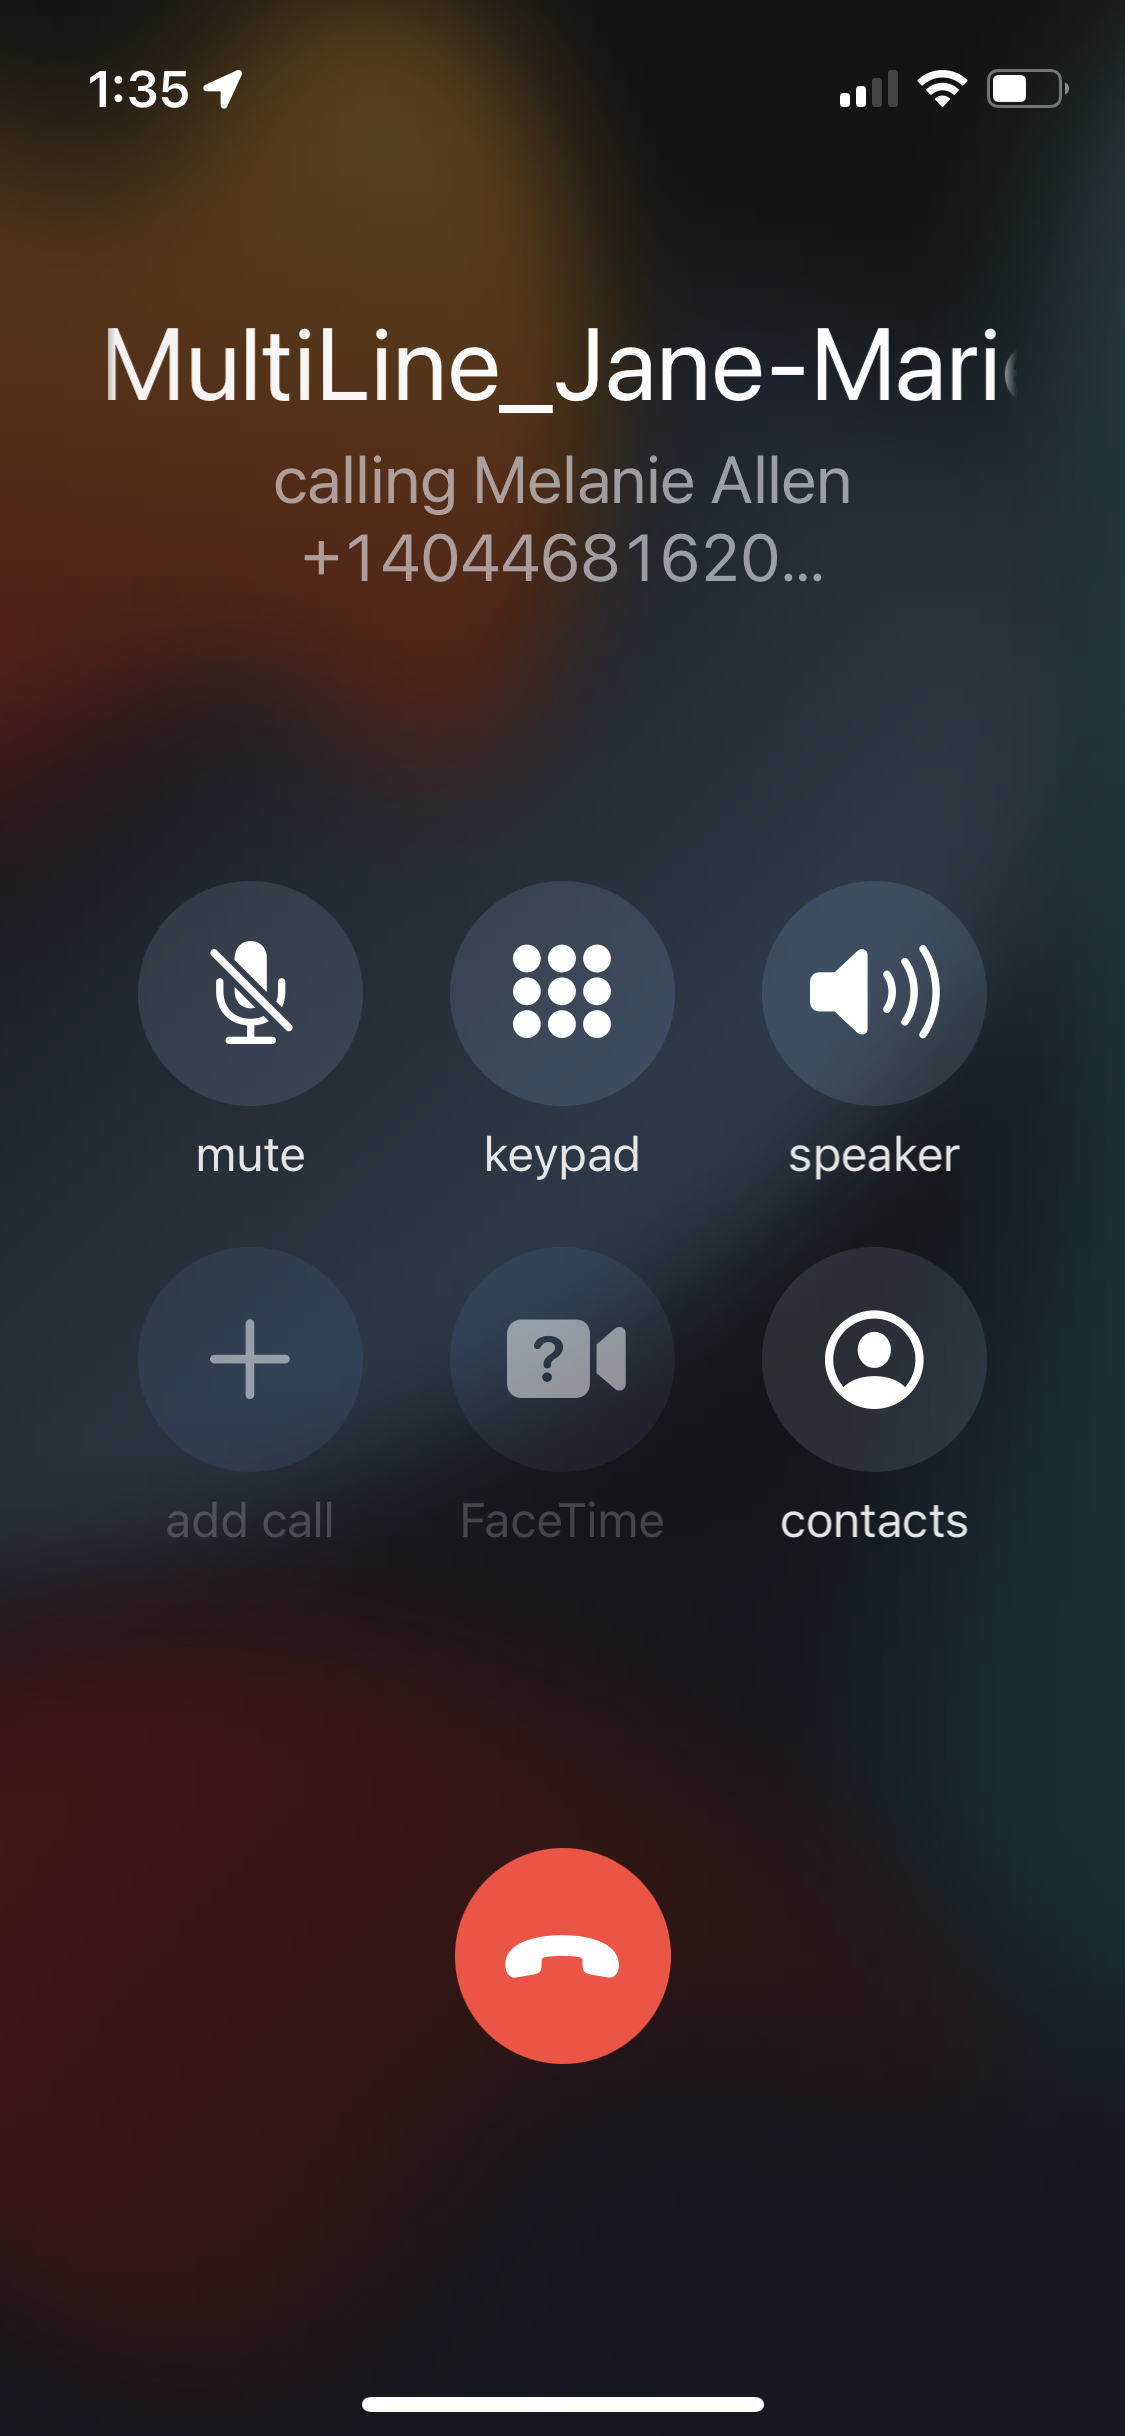
Minutes Mode
When you use minutes mode, you will see your native phone's calling display. For example, this is what an iOS user would see if they were trying to call their contact Melanie on minutes.
Default Caller ID behavior for incoming calls
Incoming calls will look different depending on whether your Call Settings are set to receive on Data Mode or Minutes Mode.
Non-MultiLine being Called
A non-MultiLine user who does not have you saved as a Contact will see your MultiLine number.
MutliLine User Being Called
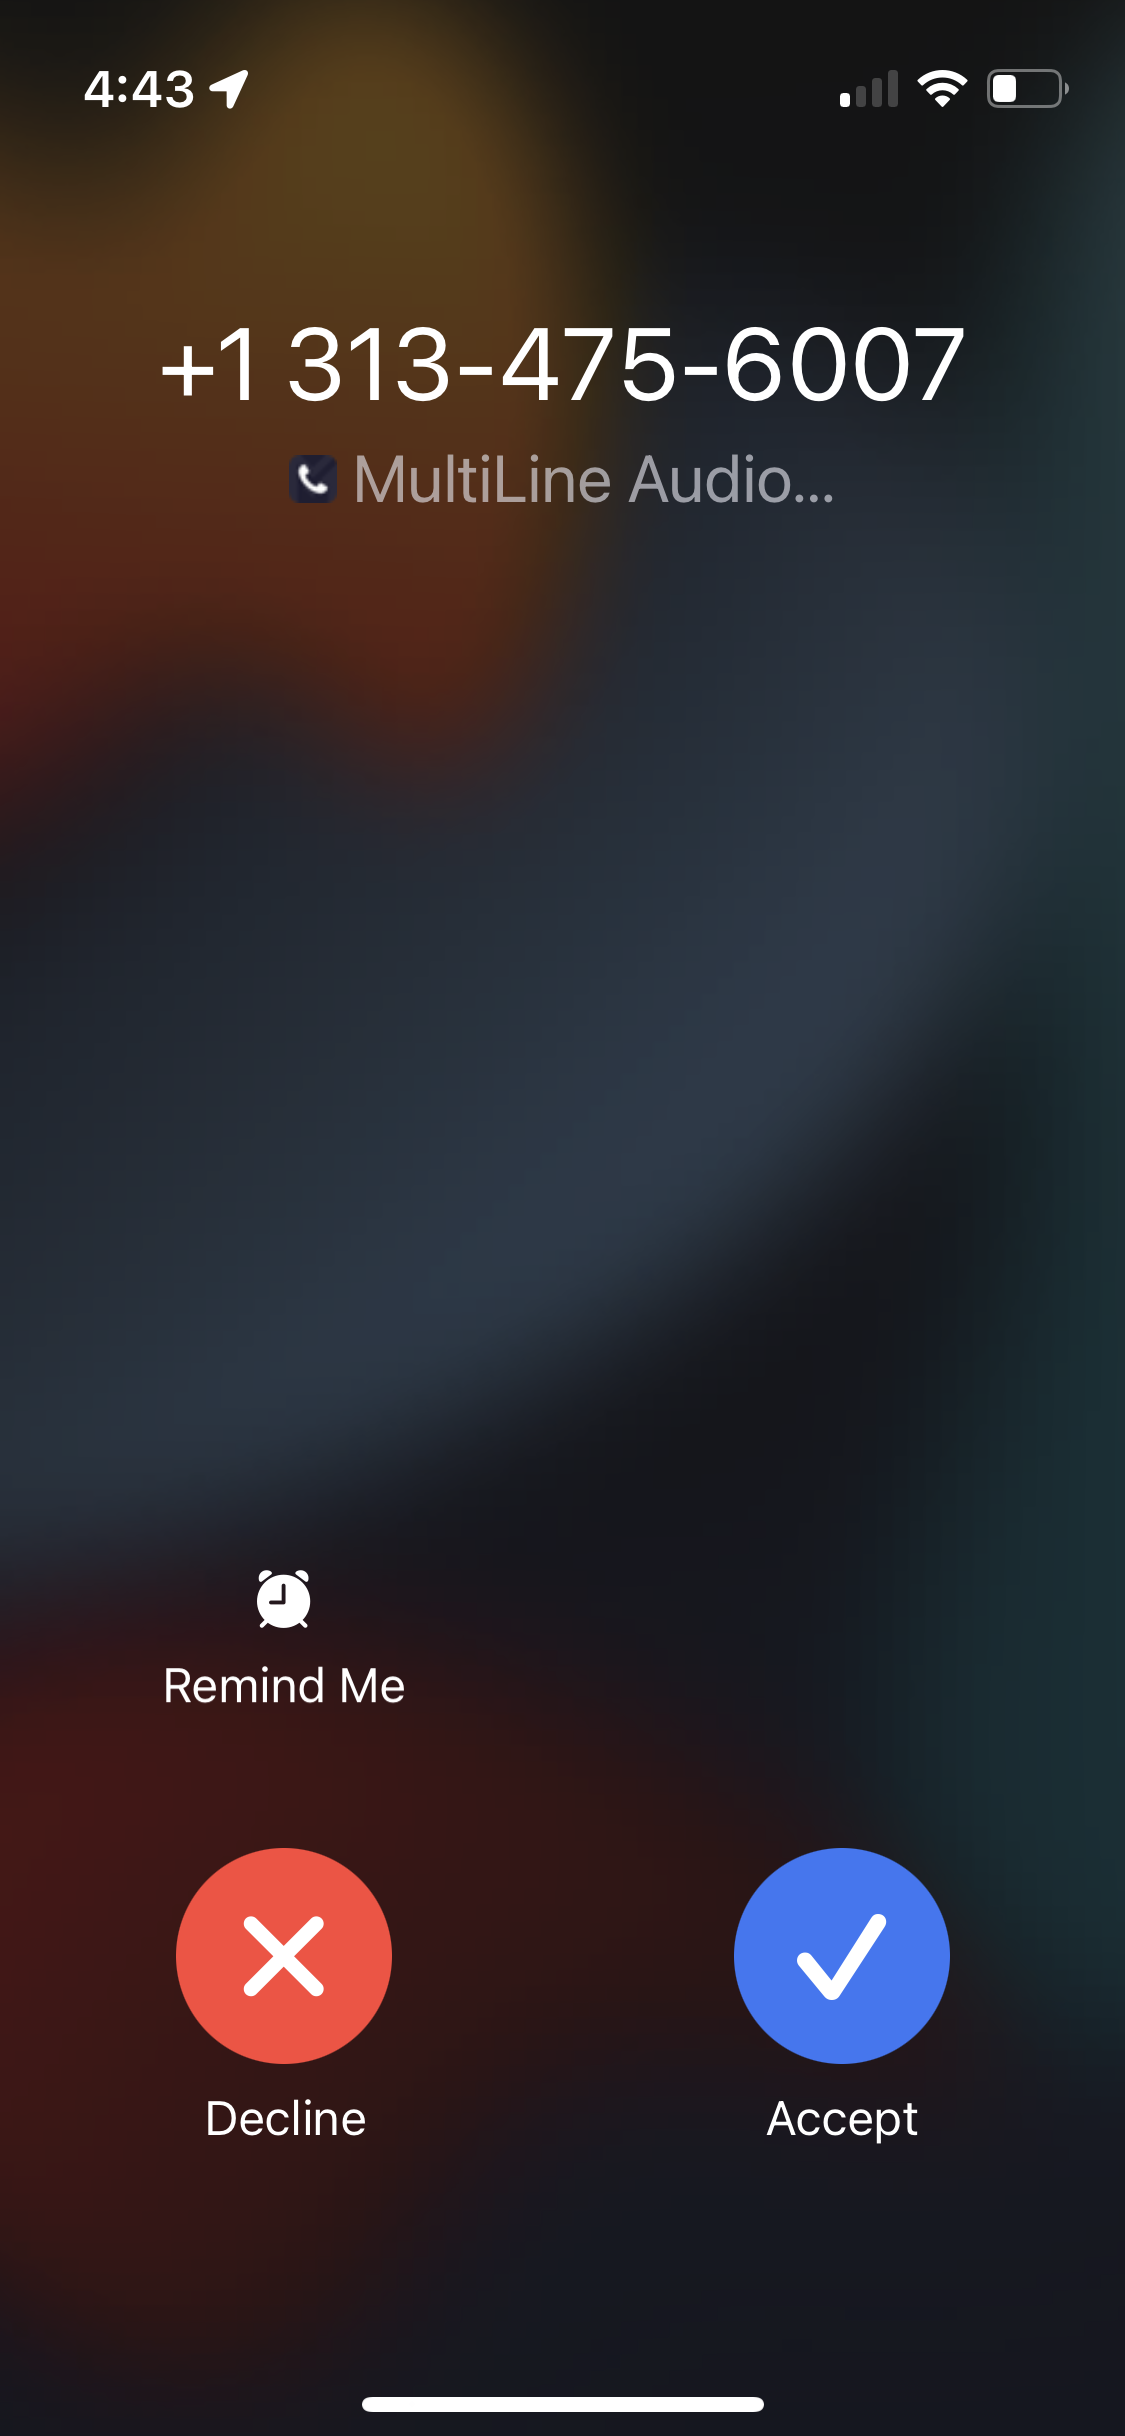
Data mode
When using Data mode, if a client calls you while you do not have the number saved, the MultiLine interface will appear as this:
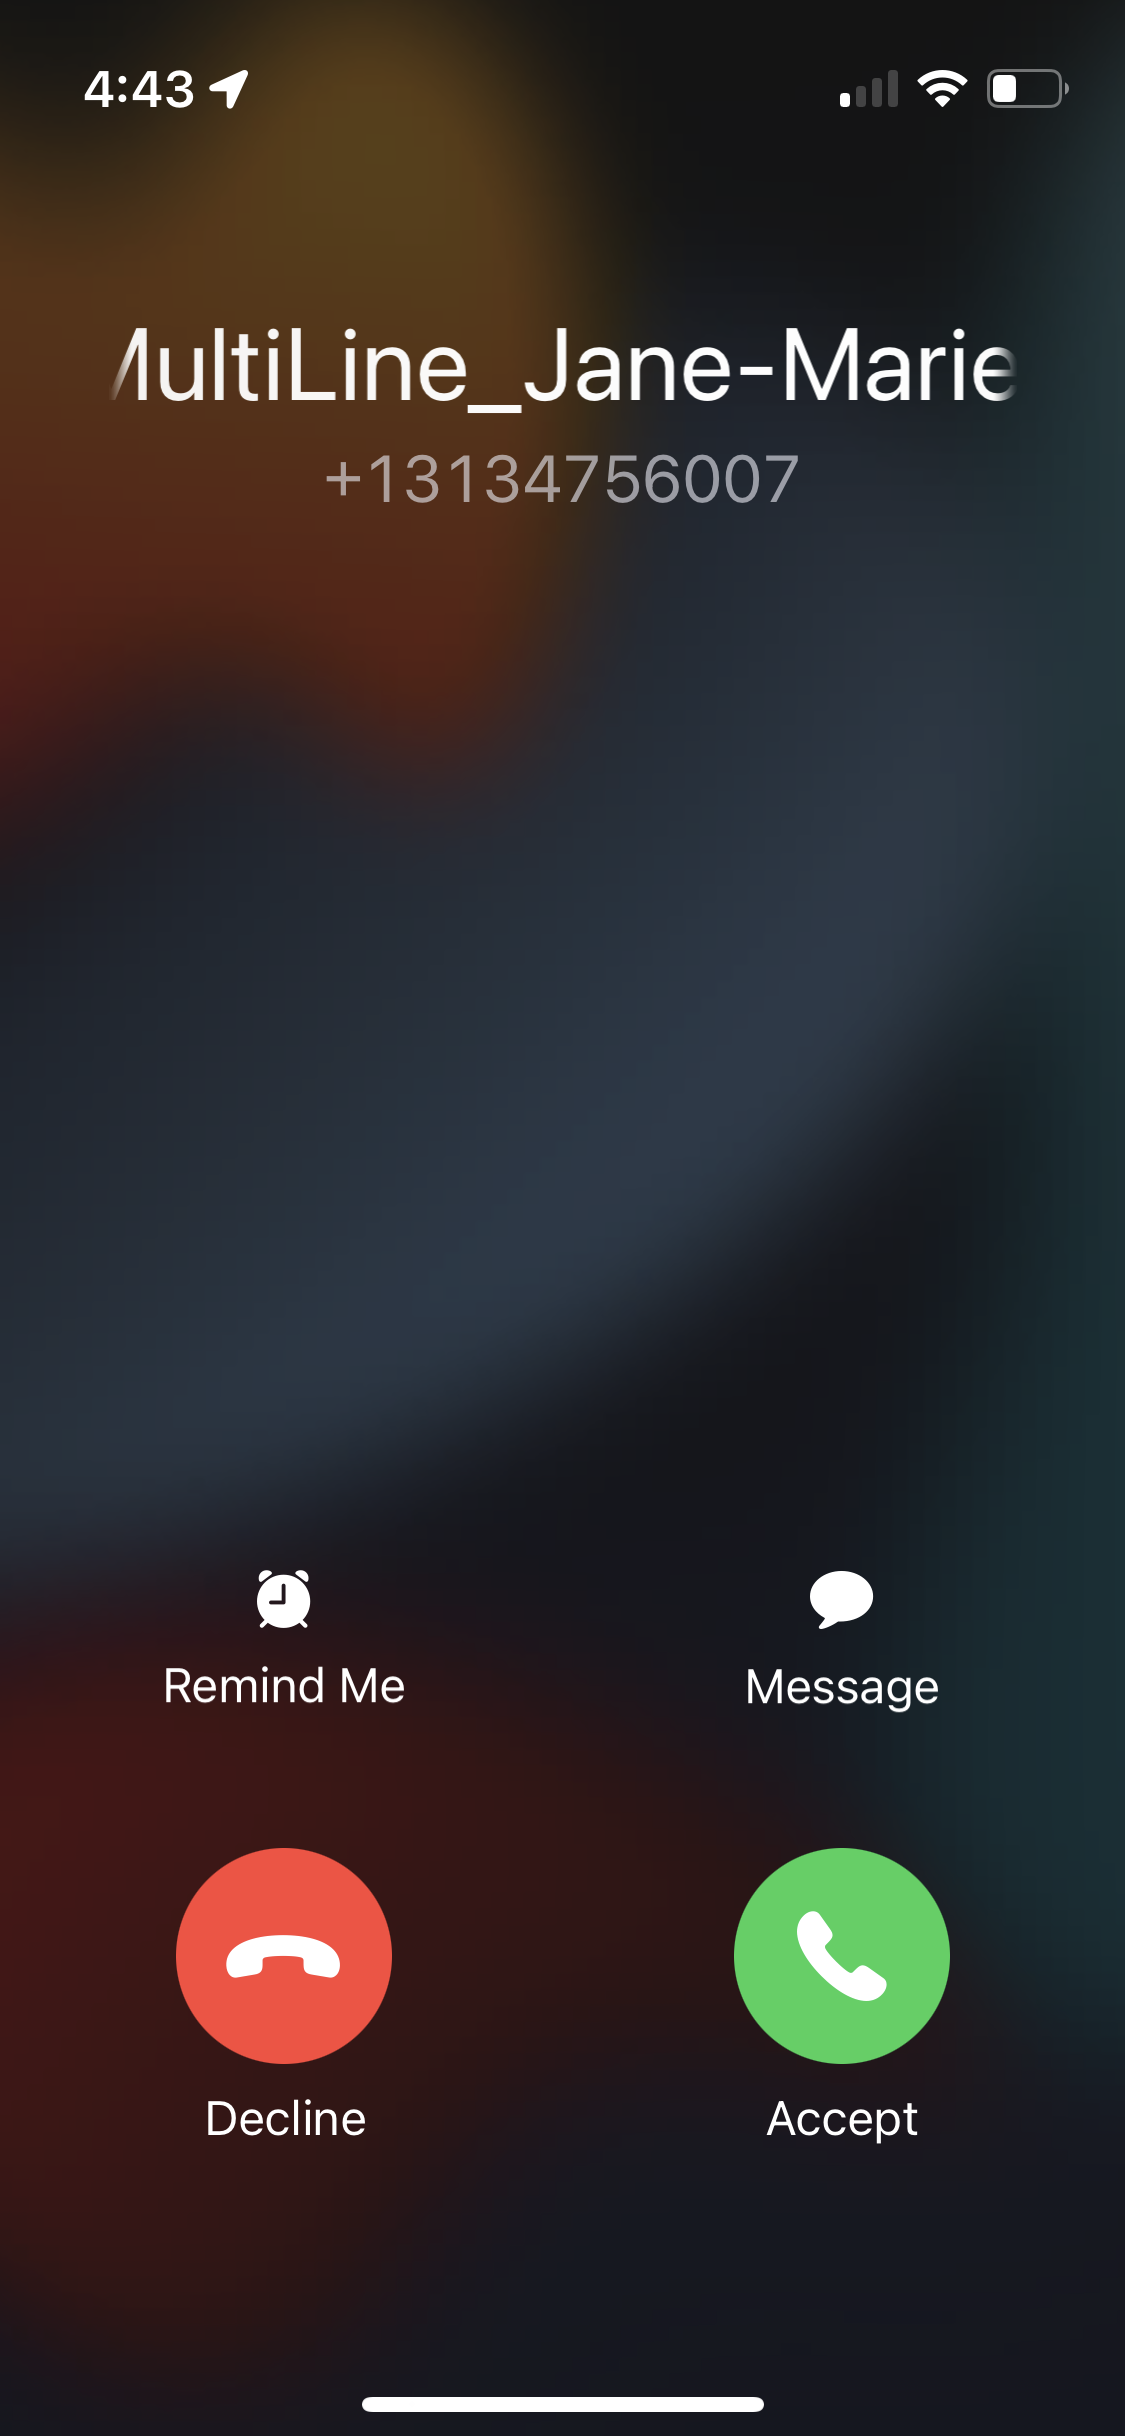
Minutes Mode
When using Minutes mode, if a client calls you while you do not have the number saved, the MultiLine interface will appear as below. Notice that your name is on top in white.
How to set your Caller ID as anonymous for outgoing calls
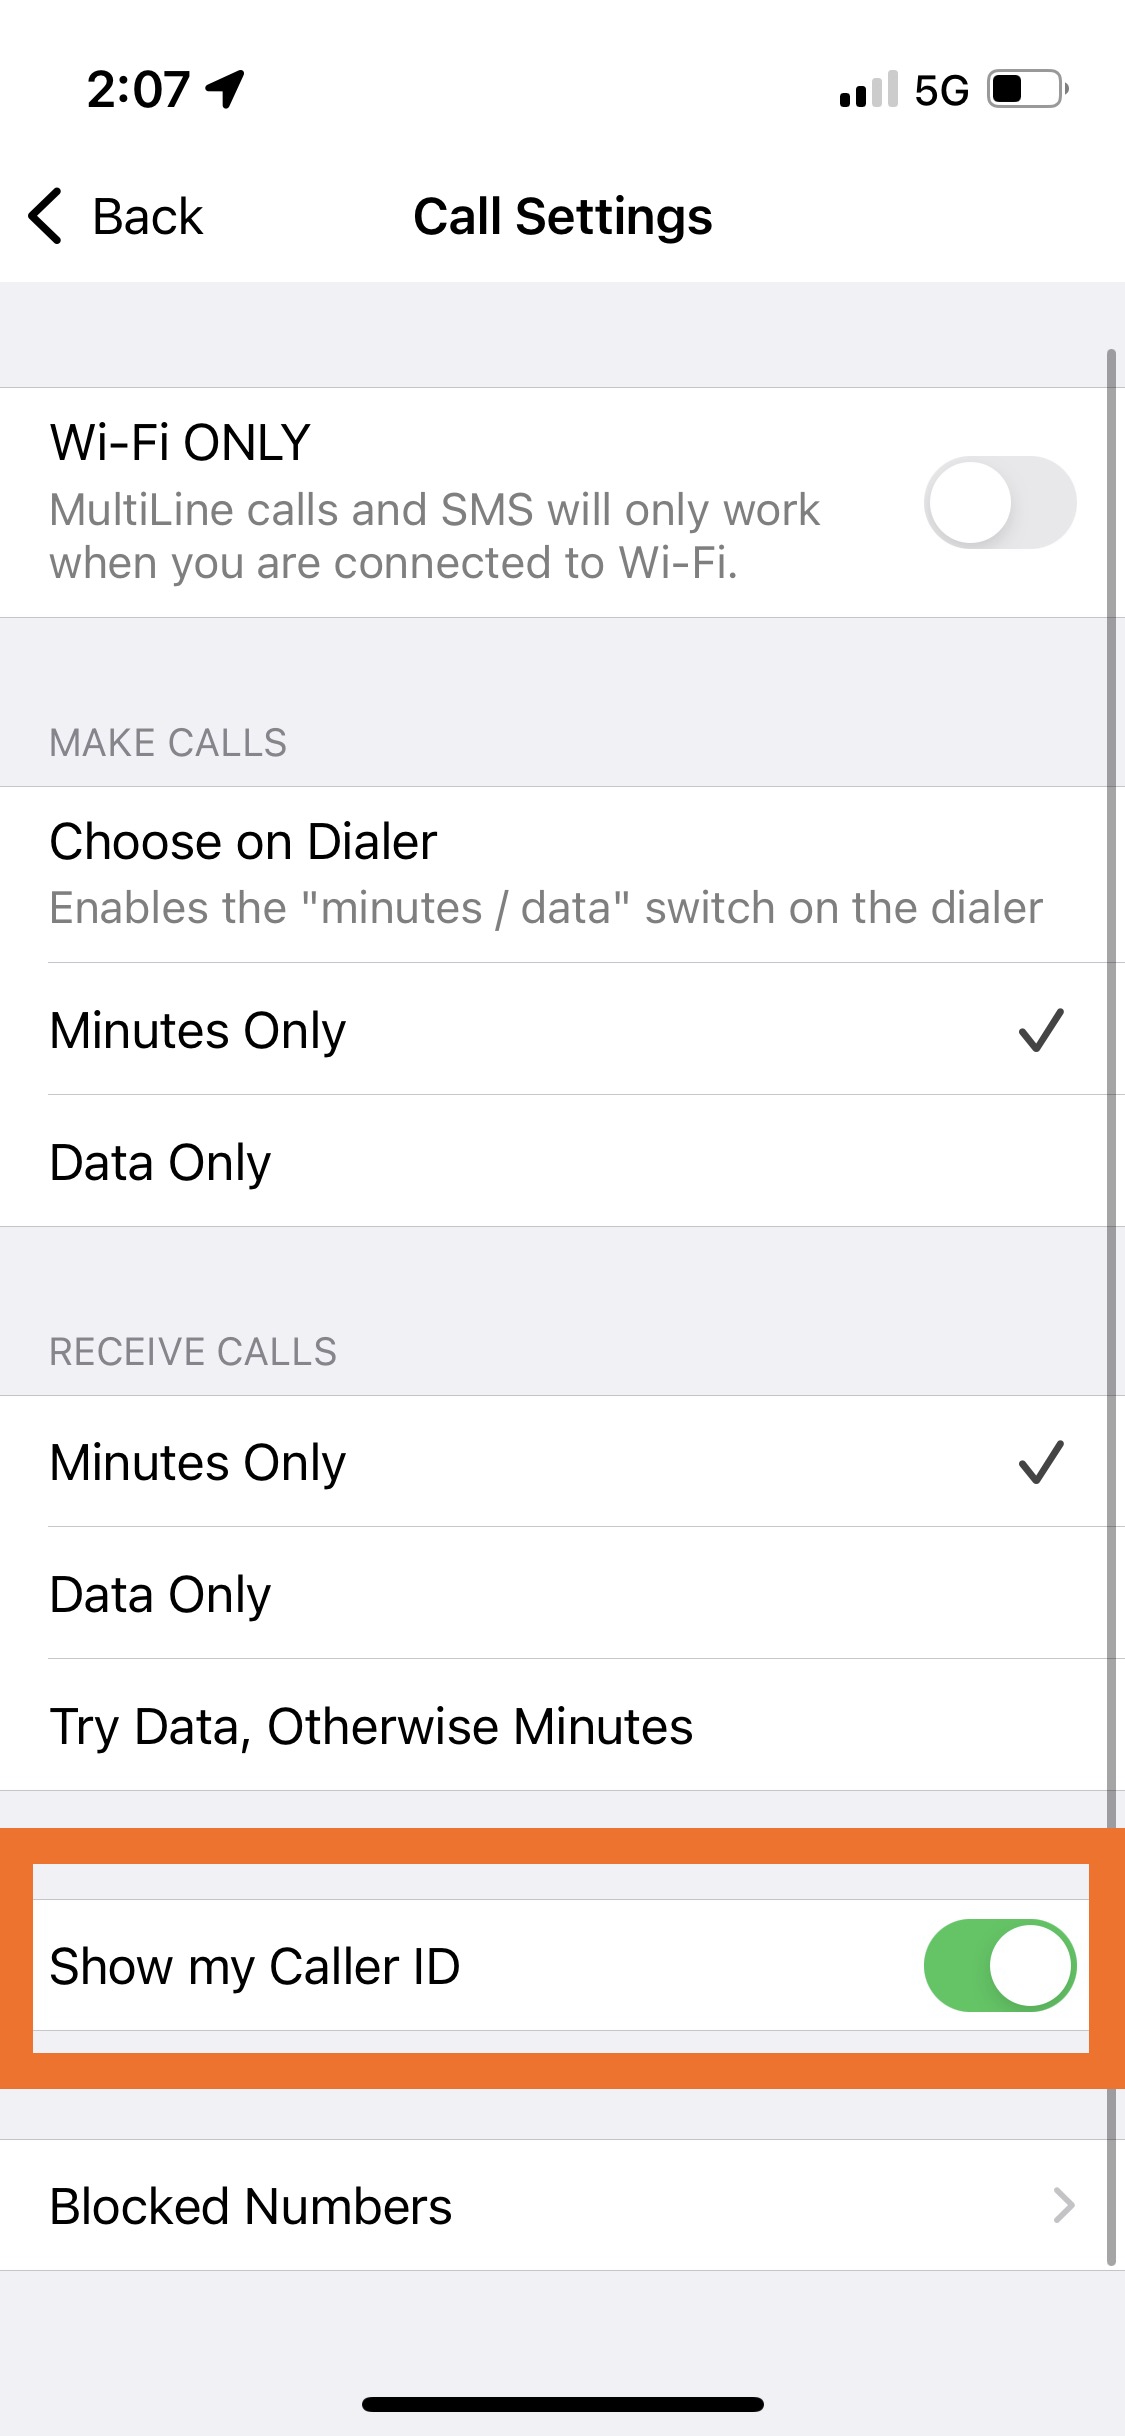
You can choose whether people can see your MultiLine number or not using "Show your Caller ID" setting. If the toggle is on, users will see your MultiLine number or whatever they have stored for you in their Contacts app. If the toggle is off, you'll show up as a Private or Restricted number.
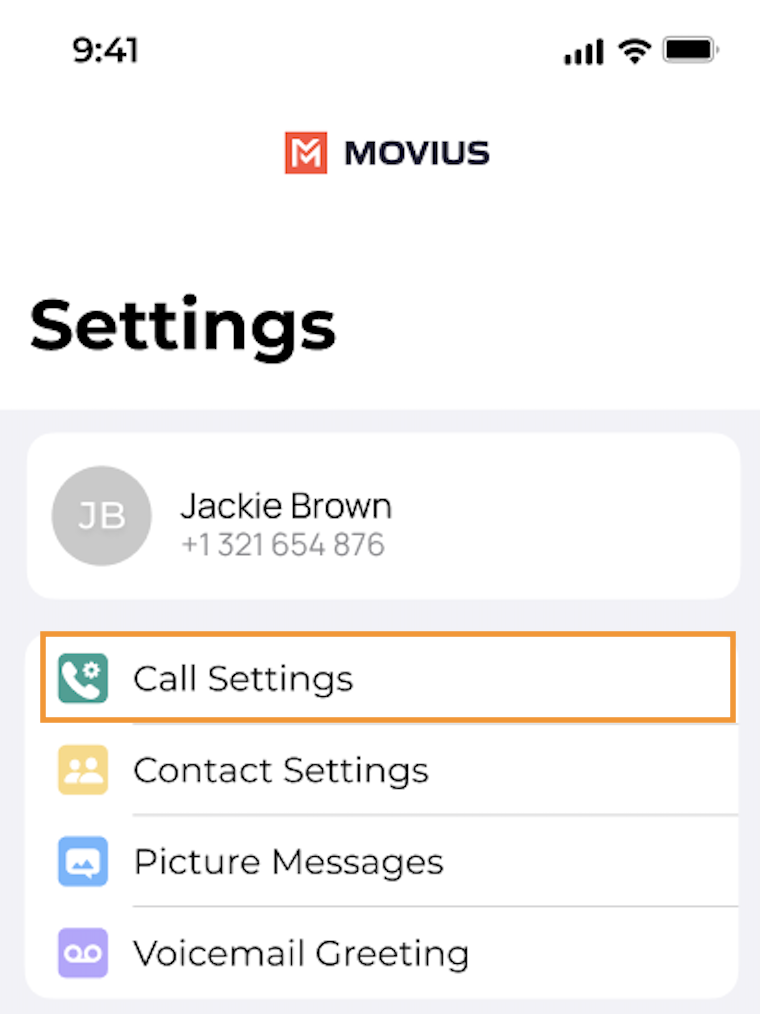
- Select Settings, then Call Settings.
- Set the toggle for "Show Caller ID" to off.

Messages and Voicemail
Sending and replying to SMS
Read on to learn about sending SMS messages in the MultiLine iOS app.
Overview
There are two ways to message in MultiLine: from the Messages screen and Contact details.
Before you start
- Your organization can enable or disable certain functions, including:
- Messaging, group messaging, or picture messaging
- Required opt-in messages
- Message filtering
- If you have questions about what functions are enabled, contact your IT group for assistance.
How to compose a new SMS
From the Messages screen, you can see your conversation history and compose new messages.
- Go to Messages.
- Click the New Message icon.
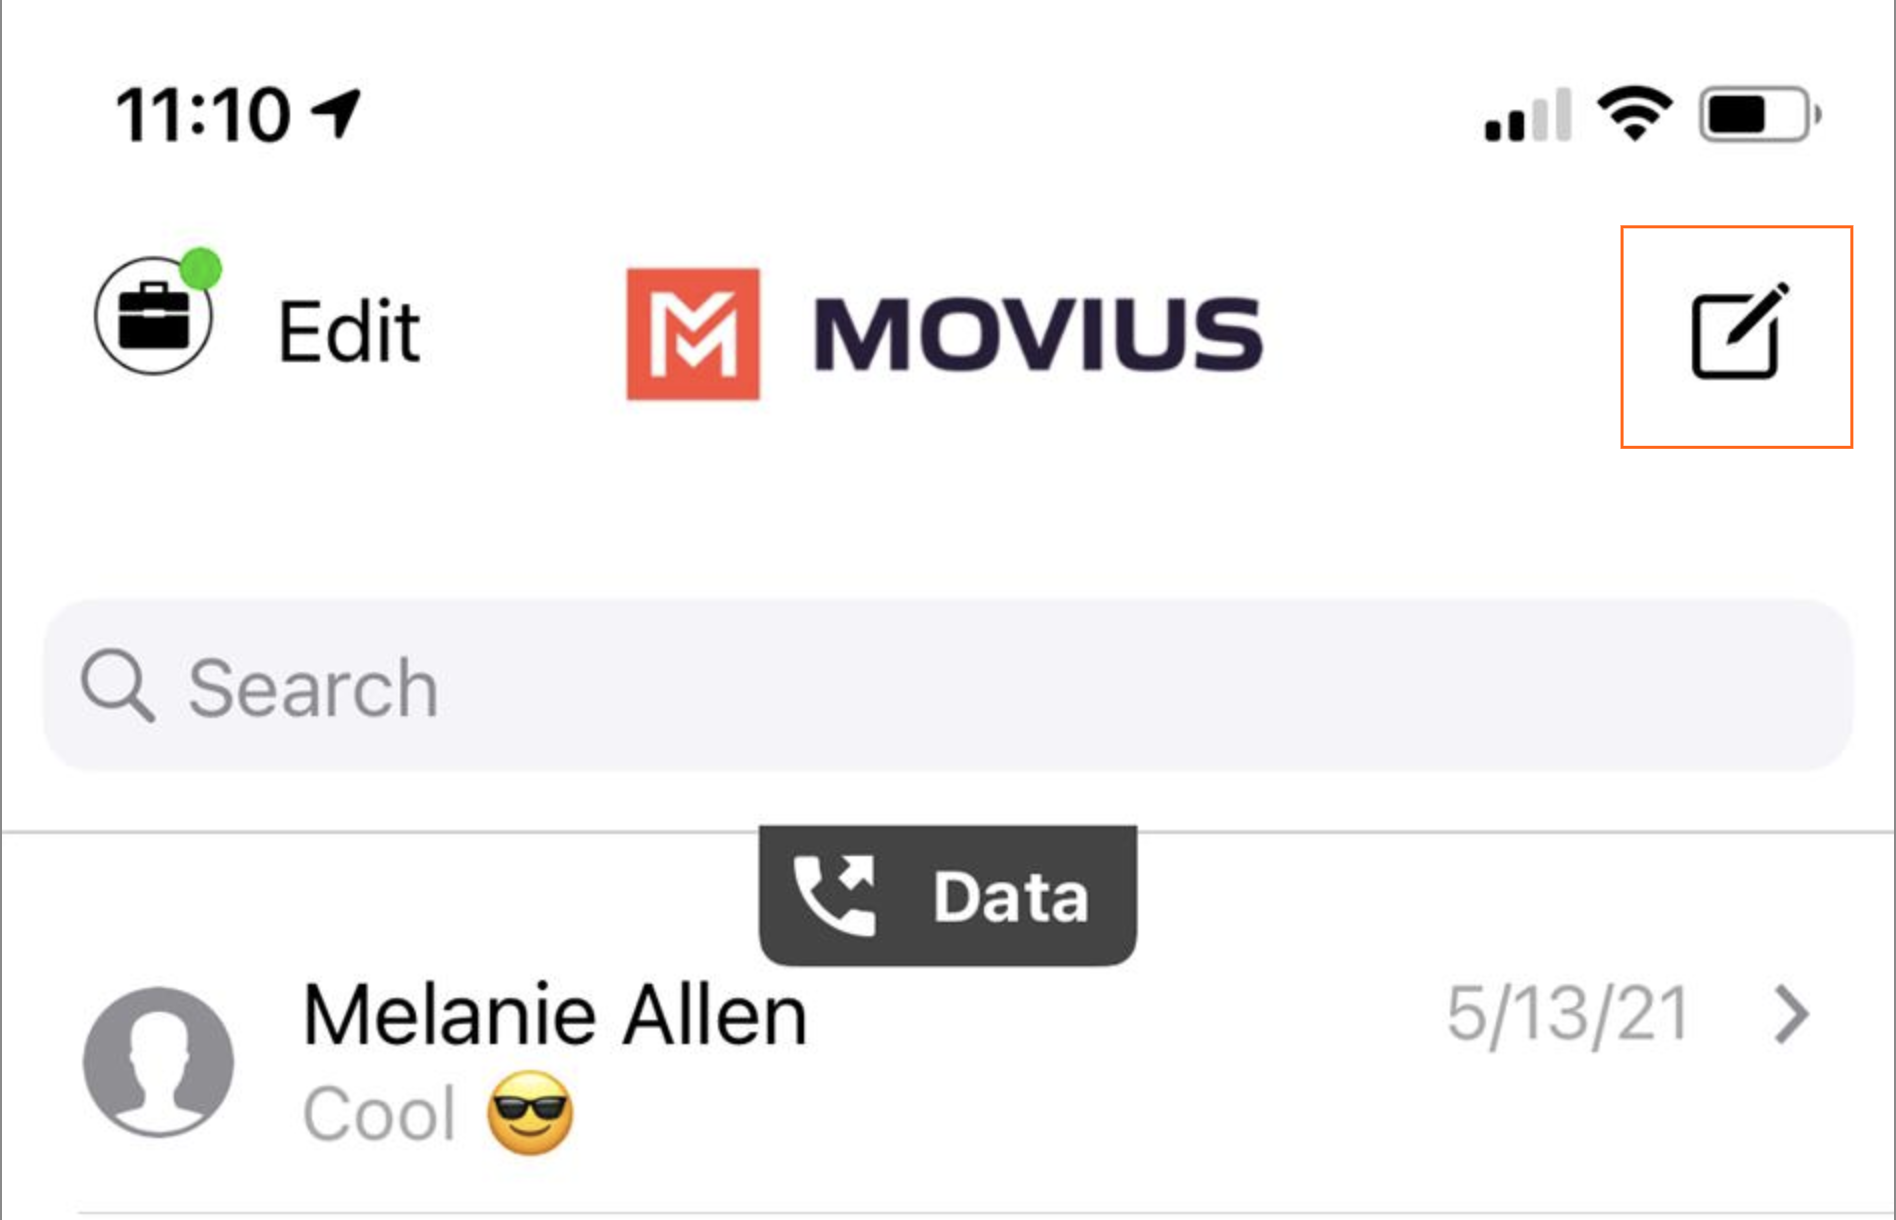
- Enter a number manually, or type the name of an existing contact
Note: You must type at least 3 numbers or characters before results will appear. Tap a result to send start a conversation with that contact.
Note for Exchange Contacts users: This will not find all the contacts in the GAL, only ones that are stored in the app, or saved as a contact in Exchange. - The conversation screen with the contact appears. Note: If you have never messaged with the contact, this screen will be blank. Later you'll see all the messages exchanged between you and them on your MultiLine number.
- Enter your message in the field and tap the Send
 icon.
icon.
How to reply to SMS
- Go to Messages.
- Click anywhere on a message to reply.
- Enter your message in the field and tap the Send icon.
Sending picture messages
Read on to learn about sending picture messages in the mobile application.
Overview
You can send picture messages by attaching a file or taking a photo with your camera. Note: If you take the photo with your camera, this photo stays entirely within MultiLine and does not save to your camera roll.
Before you start
- Currently, picture messaging is only available to US and Canada users. If picture messages are sent to users outside the US and Canada, both users will receive an automated message letting them know the picture message could not be sent.
- Your organization must allow you to use picture messaging for this feature to be available.
How to send a picture message
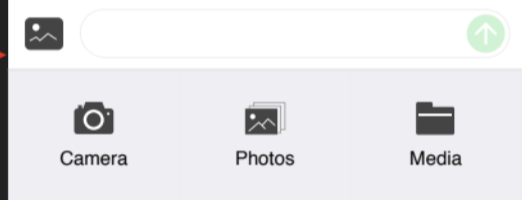
1. Click the Picture Message icon.
2. When you send a picture message for the first time, you will need to tap Allow at the permission prompts.
3. Tap your option for how you want to send the picture message.
- Camera allows you to take a photo to send
- Photos allows you to select from your camera gallery
- Media allows you to use pictures from other folders on your device
Contacts
Read on to learn how to set up your Contacts list in the Movius for BlackBerry app.
Overview
- The Movius for BlackBerry MultiLine app provides you a separate contact list to use to make your business calls. We offer three options for starting your Contacts list: Exchange Contacts, Native Contacts, and Local Contacts, described below.
- Once you set up your Contacts list, any contacts will appear on the Contacts screen. You can:
- Tap a contact to see options for calling and messaging them.
- View, add, and update contacts.
Before you start
- If your organization chooses to restrict the type of Contacts setting you can use, you may not see certain Contact Source options.
- Most Movius for BlackBerry users will use Exchange Contacts. If your organization has not enabled Exchange Contacts, please see Using MultiLine Contacts list.
Turn on Exchange Contacts
You have options for sourcing, sorting, and displaying contacts. You'll need to choose your Contact Source in Contact Settings before you begin adding contacts.
- Tap the menu icon ⋮ in the bottom right (iOS) or upper right-hand corner (Android).
- Tap Settings.
- Tap Contact Settings.
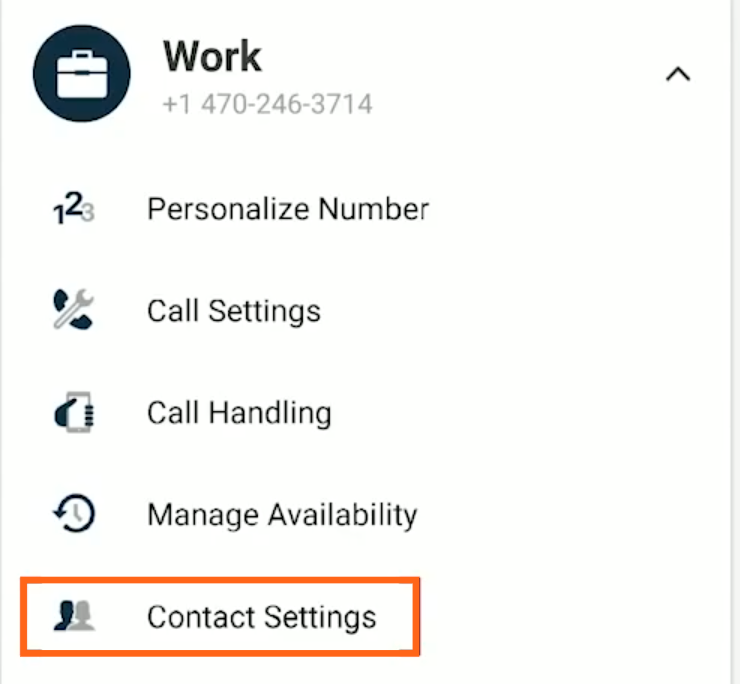 Contact Settings in the Settings menu
4. Select Exchange Contacts. Exchange Contacts Selected
The sync will begin automatically. When you return to your Contacts list, you'll be able to search your BlackBerry Exchange Contacts list.
Using Exchange Contacts
- Using the Exchange Contacts option allows Movius for BlackBerry to sync with your BlackBerry Exchange or Outlook Contacts.
- Any changes made to the corporate exchange (adding, renaming, deleting, etc.) will automatically be reflected in Movius for BlackBerry and vice versa.
- You'll be able to search for any contact from the Global Address List (GAL), your company’s list of all employees. However, the full GAL will not show up in the list of contacts for performance reasons.
Add a contact
- Before adding a contact, you need to have selected your Contact Source as Exchange Contacts.
- You can add contacts from the MultiLine App, MultiLine Desktop, or by adding them in Exchange.
It's easy to add contacts in the Movius for BlackBerry application. You can add a contact from the contact screen or from your recent calls.
Adding a contact from the Contact screen
iOS
- Go to Contacts.
- Click the Add Contact button.
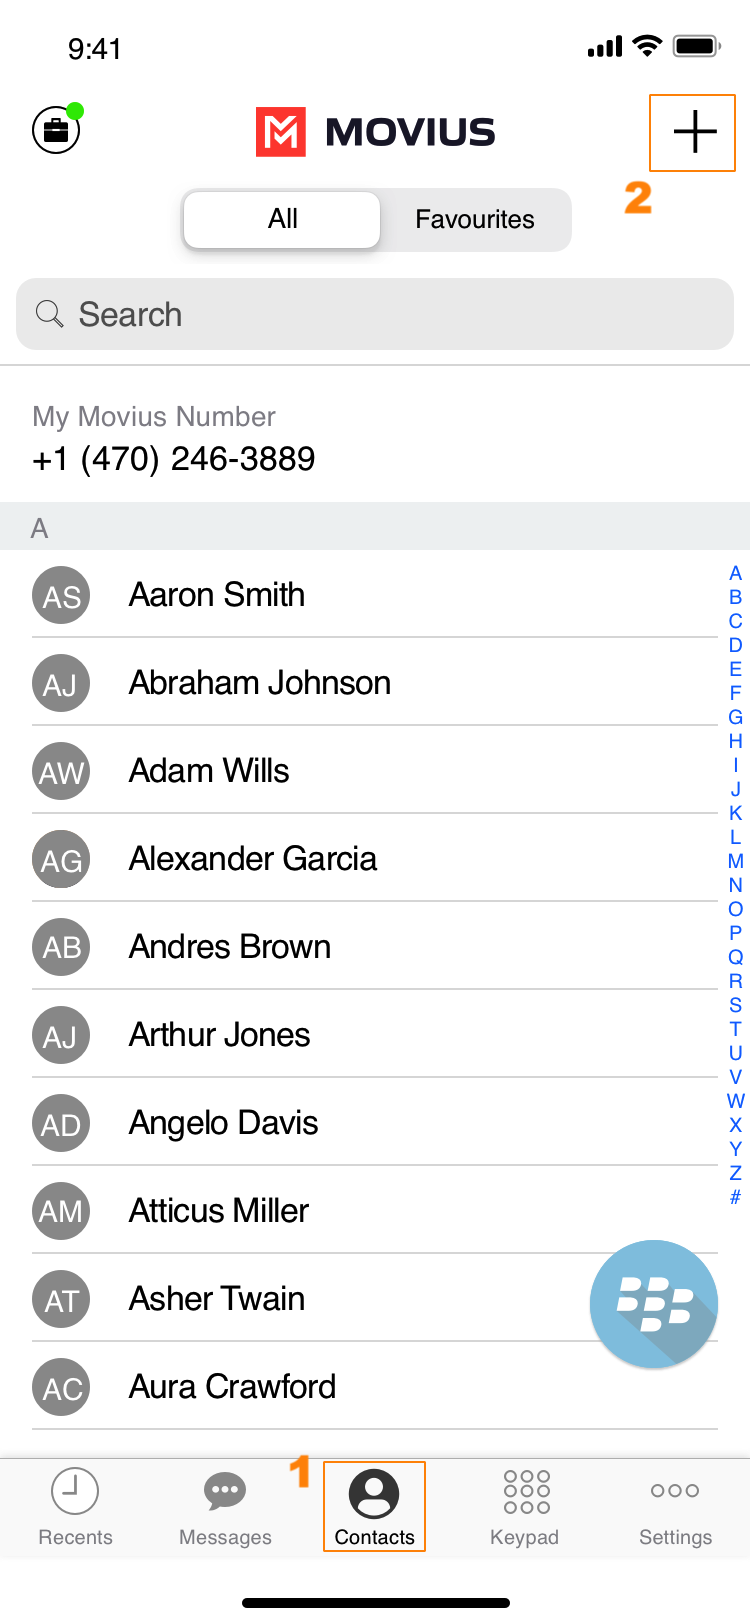 Add a contact from Contacts screen
 - Create your contact using the available fields on the Edit Contact screen.
- First name
- Last name
- Company
- Job Title
- Department
- Contact photo
- Number
- Add additional numbers
- Add additional emails
- Address
- Add additional addresses
- Delete Contact
- Save and exit
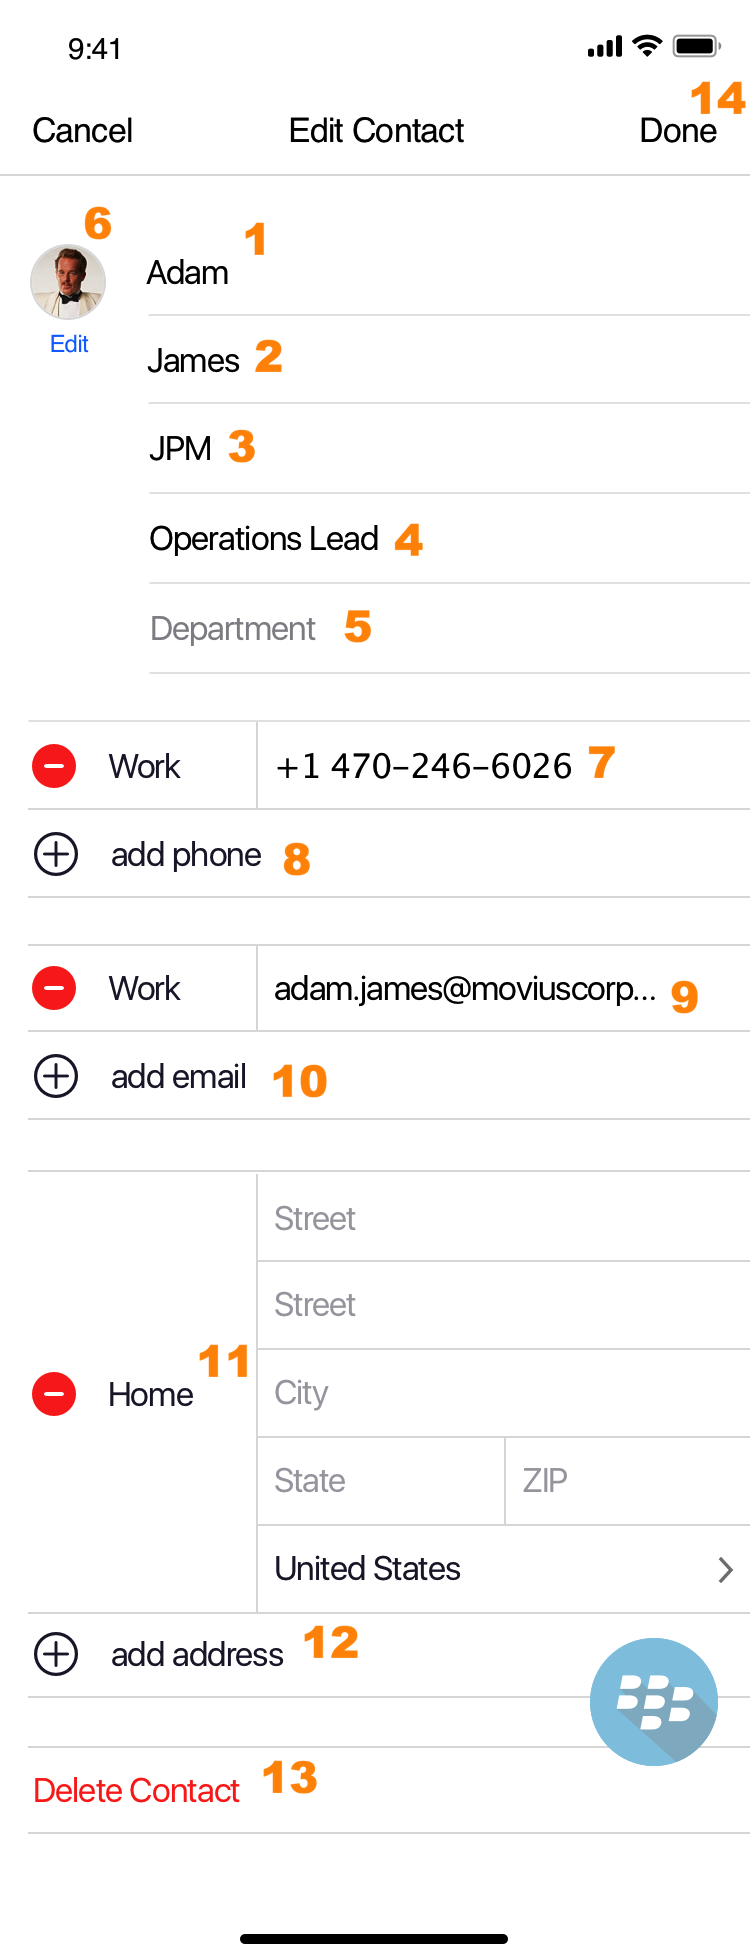 Contacts Edit screen
Android
- Go to Contacts.
- Tap the Add Contact button.
 Add a contact from Contacts screen
 - Create your contact using the available fields on the Edit Contact screen.
- First name
- Last name
- Company
- Job Title
- Department
- Contact photo
- Number
- Add additional numbers
- Add additional emails
- Address
- Add additional addresses
- Delete Contact
- Save and exit
 Create a contact
Adding a contact from your recent calls
- Go to your recent calls.
- For iOS users, click the blue info icon. For Android users, tap the call once to access options.
- Tap Add Contact.
Update contact with a new number
If you have a contact that calls you from a new number you can update that contact with the new number.
iOS
- Go to Calls.
- Tap the blue information icon for the unknown number.
- Tap Update.
- Enter the name or number of the existing contact you want to update.
- The new number will be added.
- From this screen you can change the label, if desired.
- If you need to delete the previous number, tap the x and confirm.
- Tap Save.
Android
- Go to Calls.
- Tap the down arrow for the unknown number.
- Tap Update.
- Enter the name or number of the existing contact you want to update. Note for Exchange Contacts users: this does not search the entire GAL.
- The new number will be added.
- From this screen you can change the label, if desired.
- If you need to delete the previous number, tap the x and confirm.
- Tap Save.
View, search and edit contacts
To view, edit, delete, or message contacts, you must add at least one contact.
iOS
1. The Contacts screen displays all contacts in alphabetical order by default. Note: The next set of instructions will teach you how to change this setting if you like.
2. Start entering the number or name of your contact into the Search bar to narrow the list to a specific contact. Note: The Search bar will not display until you begin scrolling.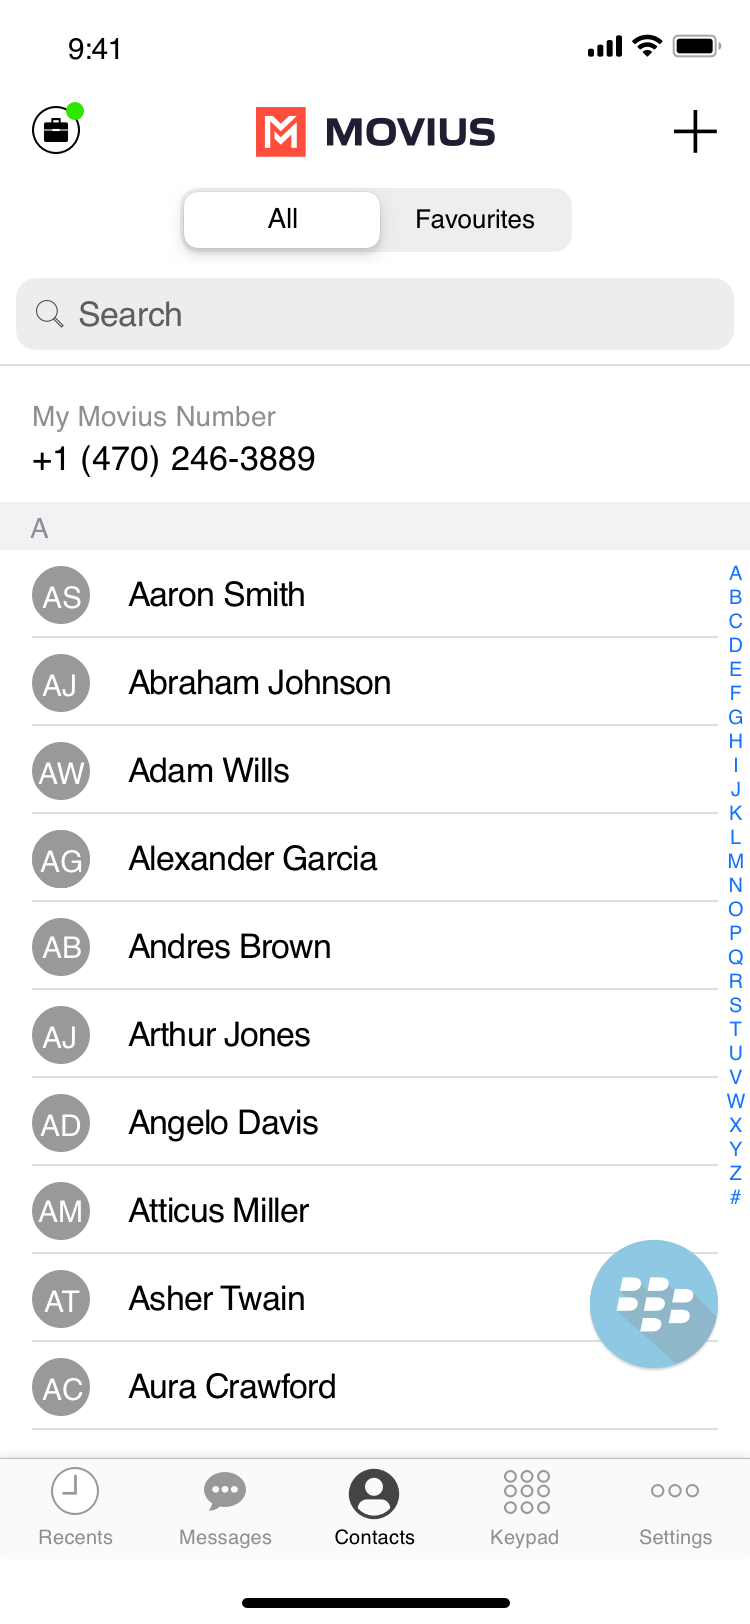 iOS Contacts Screen
3. Clicking on any contact will bring you to that contact's information page, where you can call, message, favorite, or block the contact.
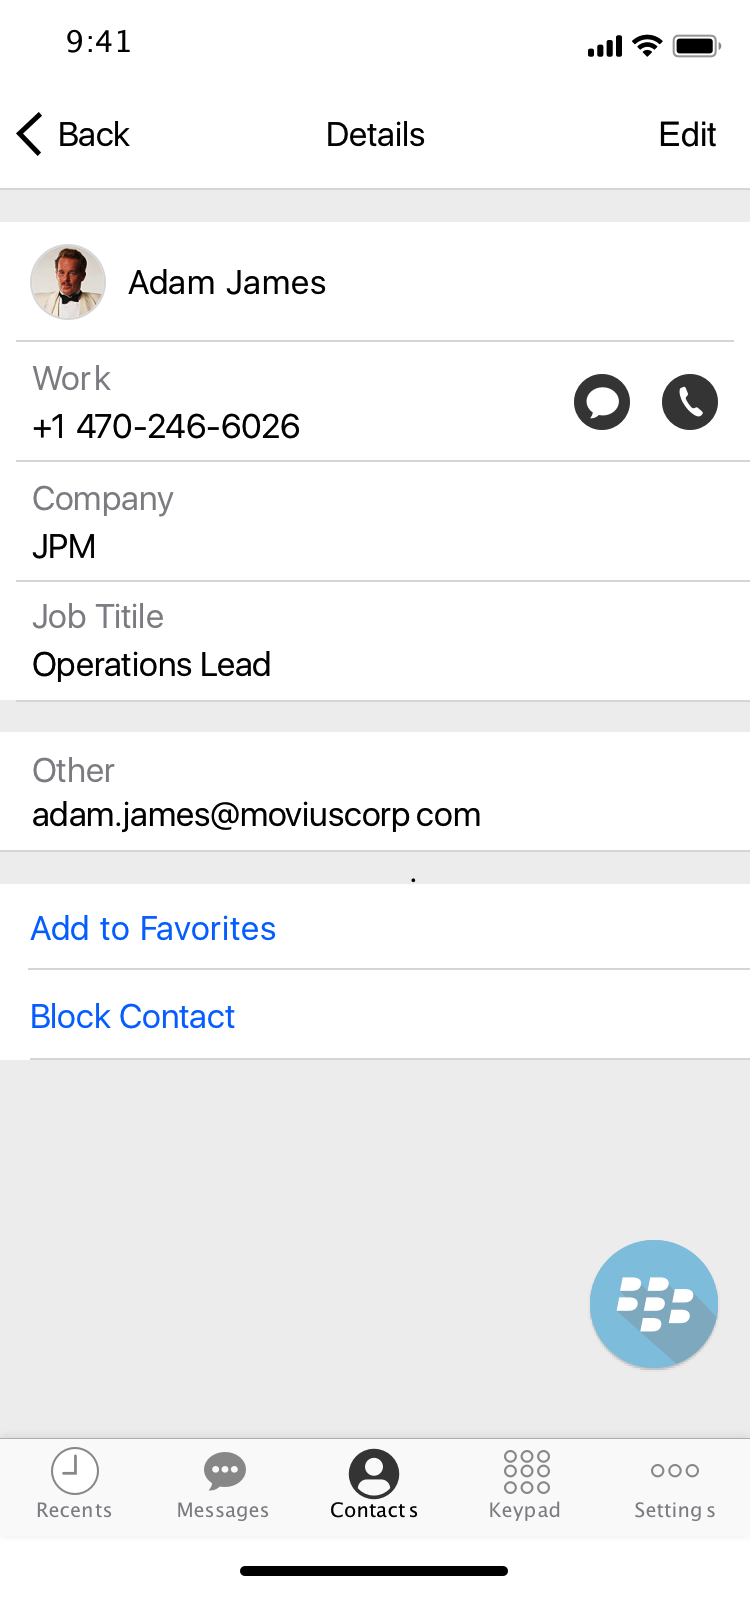
4. Clicking on the Edit button in the top right-hand corner allows you to choose to delete or edit, the selected contact.
Android
1. The Contacts screen displays all contacts in alphabetical order by default. Note: The next set of instructions will teach you how to change this setting if you like.
2. Tap on Search name/number to begin typing the name or number to narrow down the list to a desired contact. Note: The search field will not display until you begin scrolling.

2. Clicking on any contact will bring you to that contact's information page, where you can call, message, favorite, or block the contact.
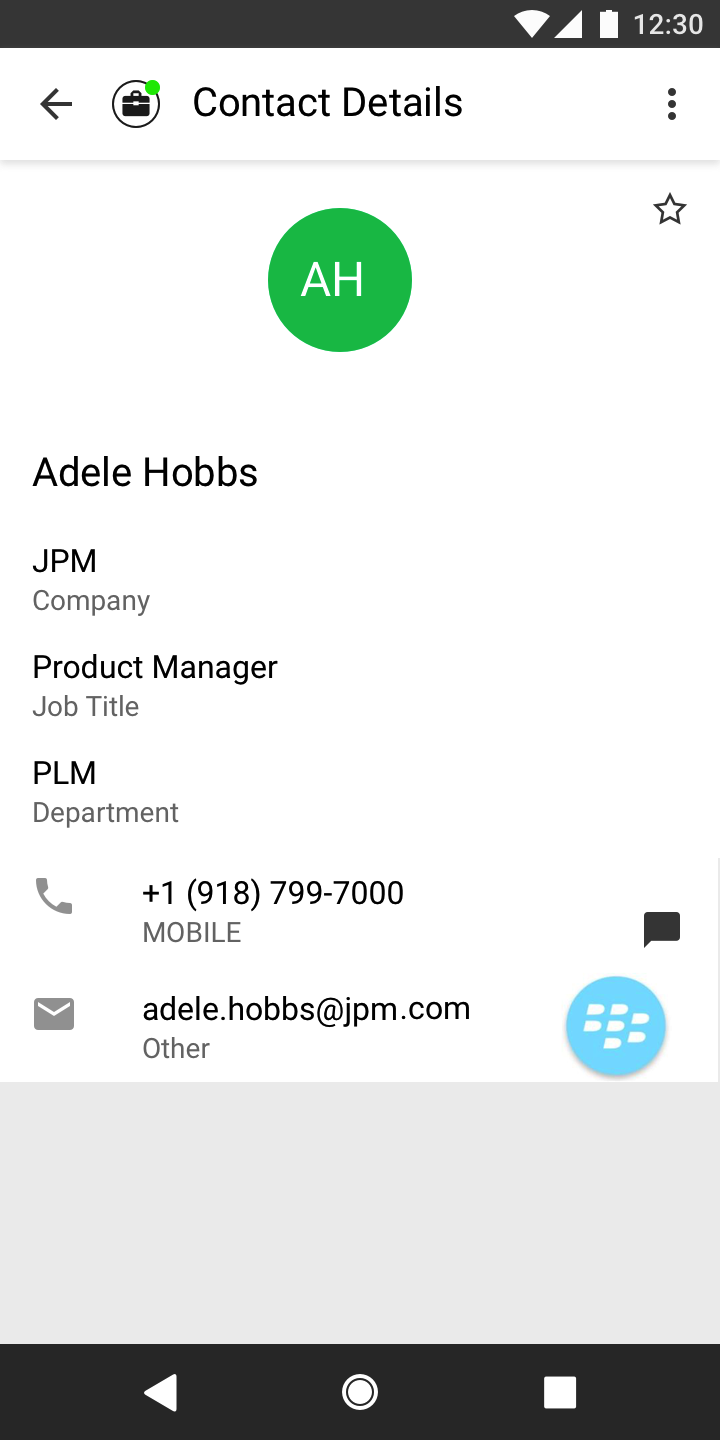
3. Clicking on the Settings menu in the top right-hand corner allows you to choose to delete or edit, the selected contact.
Change the Contacts list display and order
- Tap the menu icon ⋮ in the bottom right (iOS) or upper right-hand corner (Android).
- Tap Settings.
- Tap Contact Settings.
- You can sort by first or last name
- You can display first name or last name first
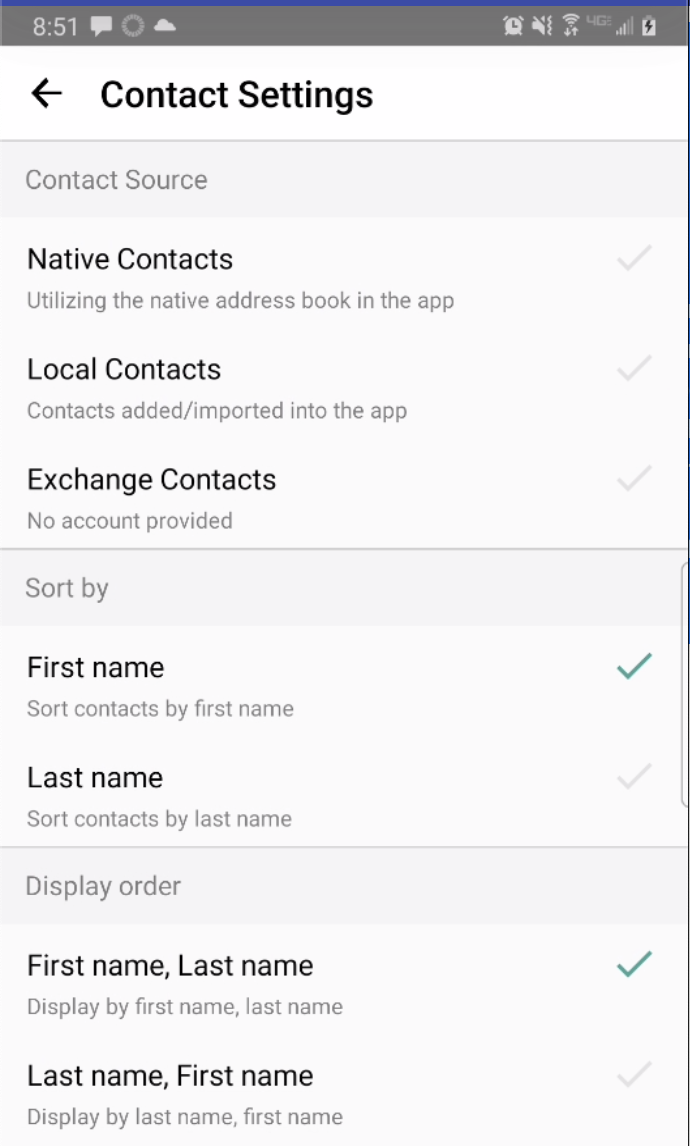 Contact Settings screen
- When complete, you can exit the menu and your Contacts list will be in the chosen Sort by and Display order settings selected.
Add a Favorite contact
You may want to add contacts that you're in touch with more frequently to your favorite contacts. This makes it easier to start new calls or messages with them.
iOS
- Go to the Contacts screen.
- Tap your contact to open the Contact details.
- Tap Add to Favorites.
Android
- Go to the Contacts screen.
- Tap your contact to open the Contact details.
- Tap the Star in the upper right-hand corner.
How to search and store a contact from Exchange (Android Only)
When you're using Exchange contacts, you'll be able to search for any contact from the Global Address List (GAL), your company’s list of all employees. However, the full GAL will not show up in the list of contacts for performance reasons. Therefore, you may want to store the contacts you contact often.
This feature is only available in the Android version of MultiLine applications.
- To search for a contact, tap the Search icon and enter the name or number of the contact you want to look up.
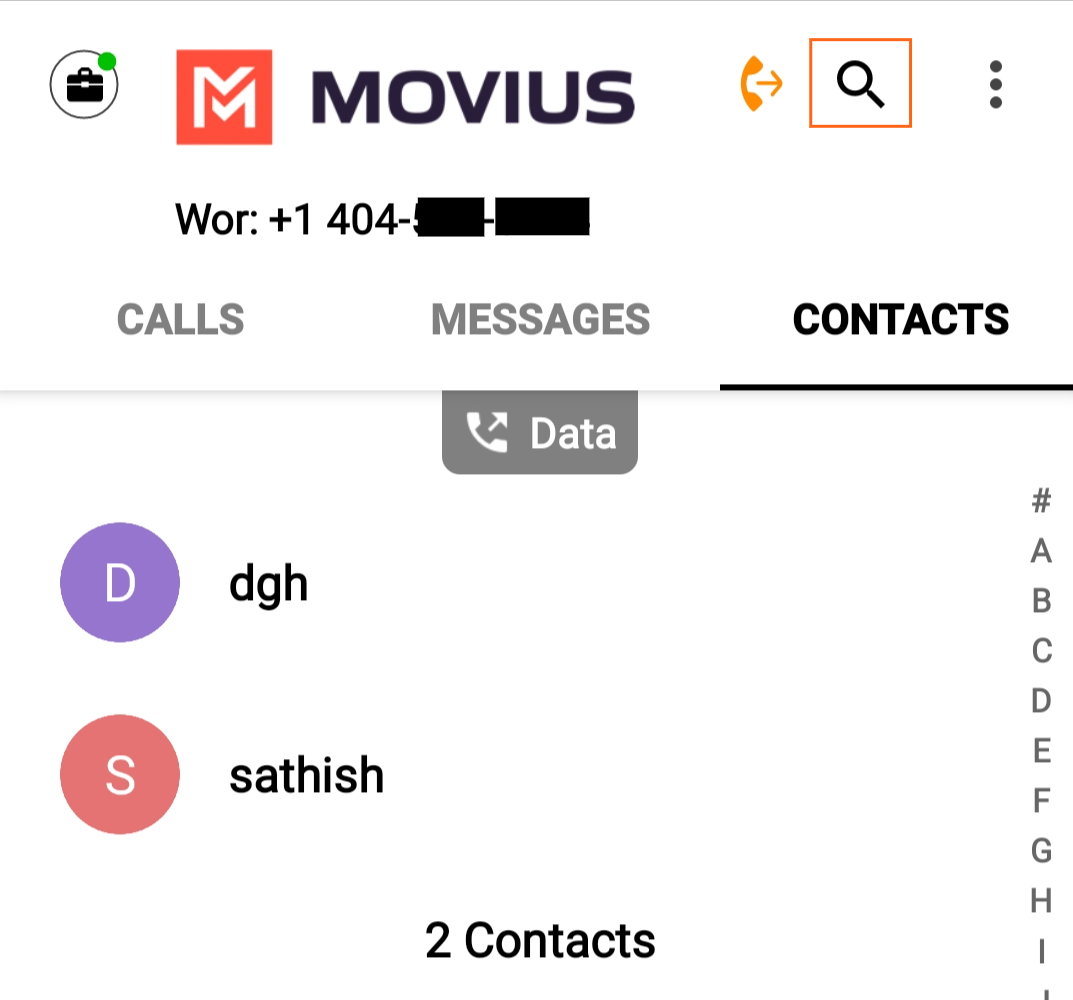
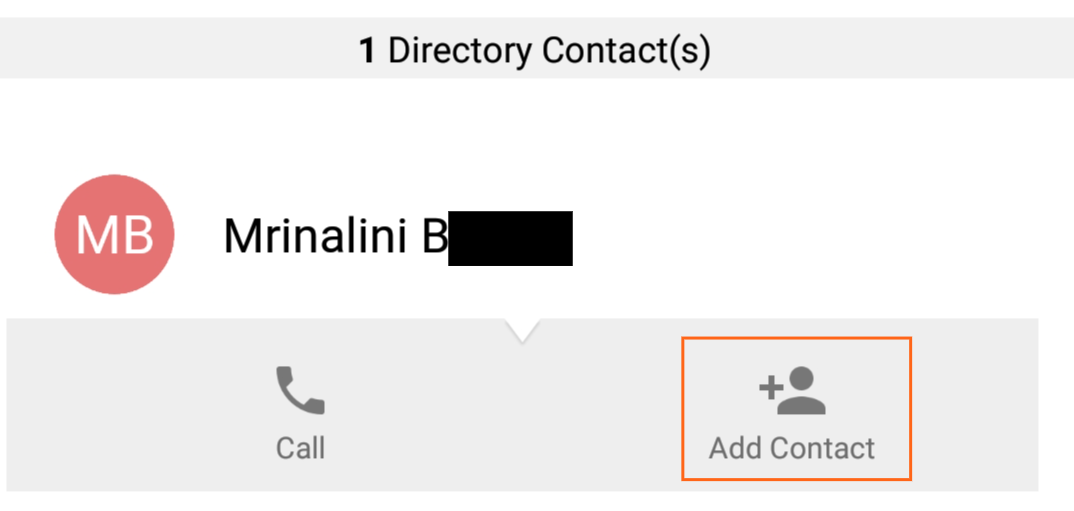
- Your result will be displayed in two categories Stored Contacts and Directory Contacts. To store the directory contact, tap the result.
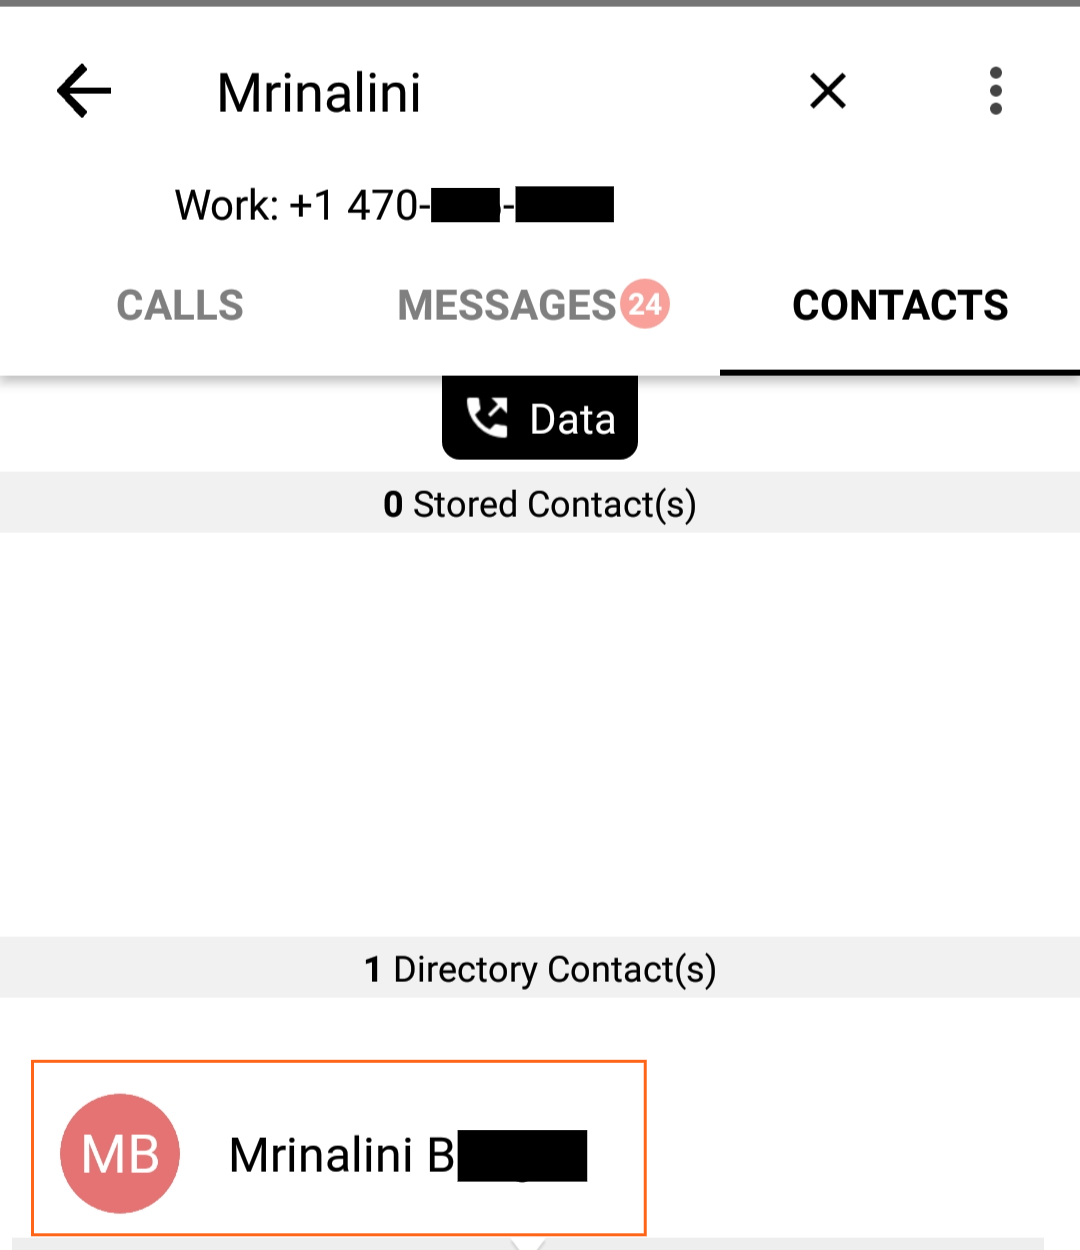
- Tap the Add Contact button. Now this contact is a Stored Contact and will appear in the Contacts tab.


 icon to reveal details about that call.


 icon.
icon.


