Read this guide to learn how to set up your MultiLine organizations in the Management Portal.
Overview
This article is intended for administrators that are overseeing or participating in the initial setup of Management Portal.
Part 1: Set up Organization
Step 1 - Manage organizations
Read on to learn how to create, edit, or delete organizations.
Overview
Organizations contain your user and admin accounts.
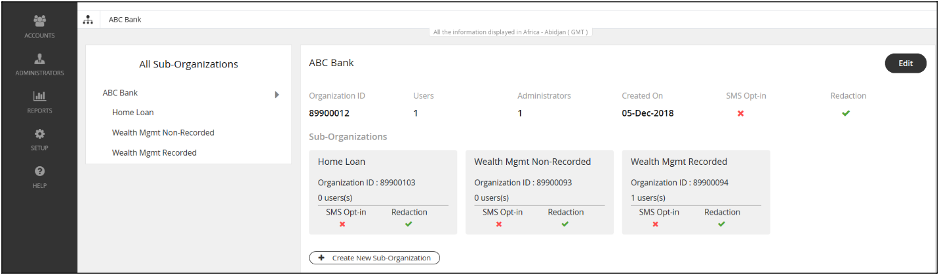
You can set up the MMP to reflect your organizational structure where you can create an organization (root node) with the name of your Enterprise. Each node or branch of the tree represents a department. Each department can have its own administrator with well-defined roles and privileges.
Consider the example below:
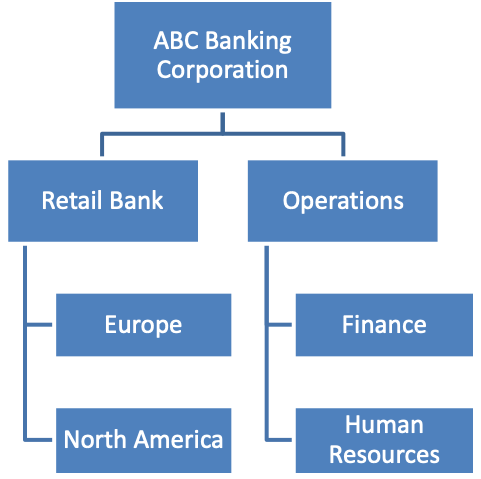
You can create one or multiple organizational levels or just create one organizational level below the root node. This structure is flexible enough to manage your employee base.
You can have as many organizations and sub-organizations in the portal as needed.
Before you start
- You need the "Profile" Privilege in your Role to perform these instructions. See What Roles are in the Management Portal?
Create Organization
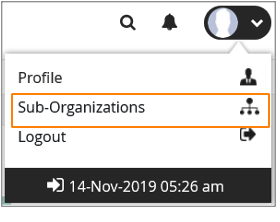
- Click the profile menu icon
 .
. - Click Sub-Organizations.
- Click Create New Sub-Organization.
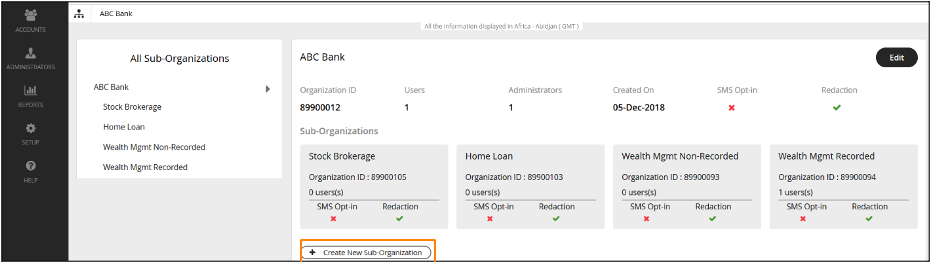
- Fill out the details and click Create.
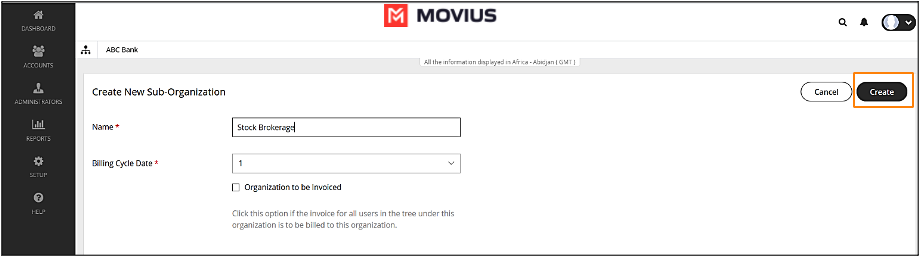
 .
.


Edit Organization
- Click
 .
. - Click Sub-Organizations.
- Click Edit to make changes to the parameters within the organization.
 .
.
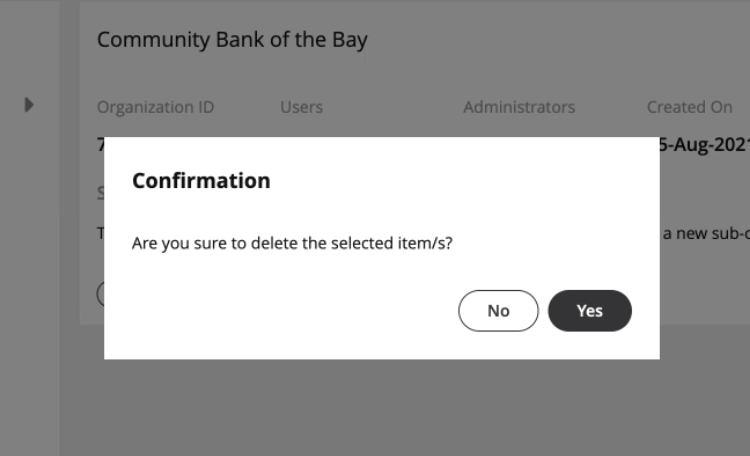
Delete organization
In order to delete an organization, the organization or any of its sub-organizations must not contain any users or administrators.
1. Once you have deleted or moved all the users and administrators, the delete button becomes available.
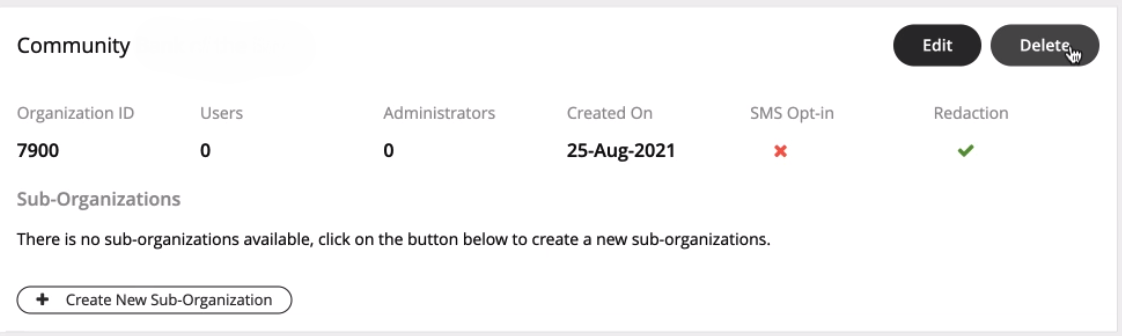
2. Click Yes to confirm deletion.
Your organizations are ready!
Now administrators can invite administrators and users to the organization.
Step 2 - Customize mobile app
Read on to learn how to add your Enterprise branding and help information to the MultiLine app.
Overview
You can edit your Enterprise's Mobile App look and feel under Branding in the Setup tab. You can customize:
- App Theme: Add logo and branding colors
- About Us screen: Add logo and social accounts
- FAQ screen: Add your own questions and answers with information your MultiLine users may need
- Customer Care screen: Add your IT team's phone number and email address so that user's can get help from you
Before you start
- An admin must have "Setup" Privilege in their Role in the organization to do these instructions. See What Admin Privileges are in Management Portal?.
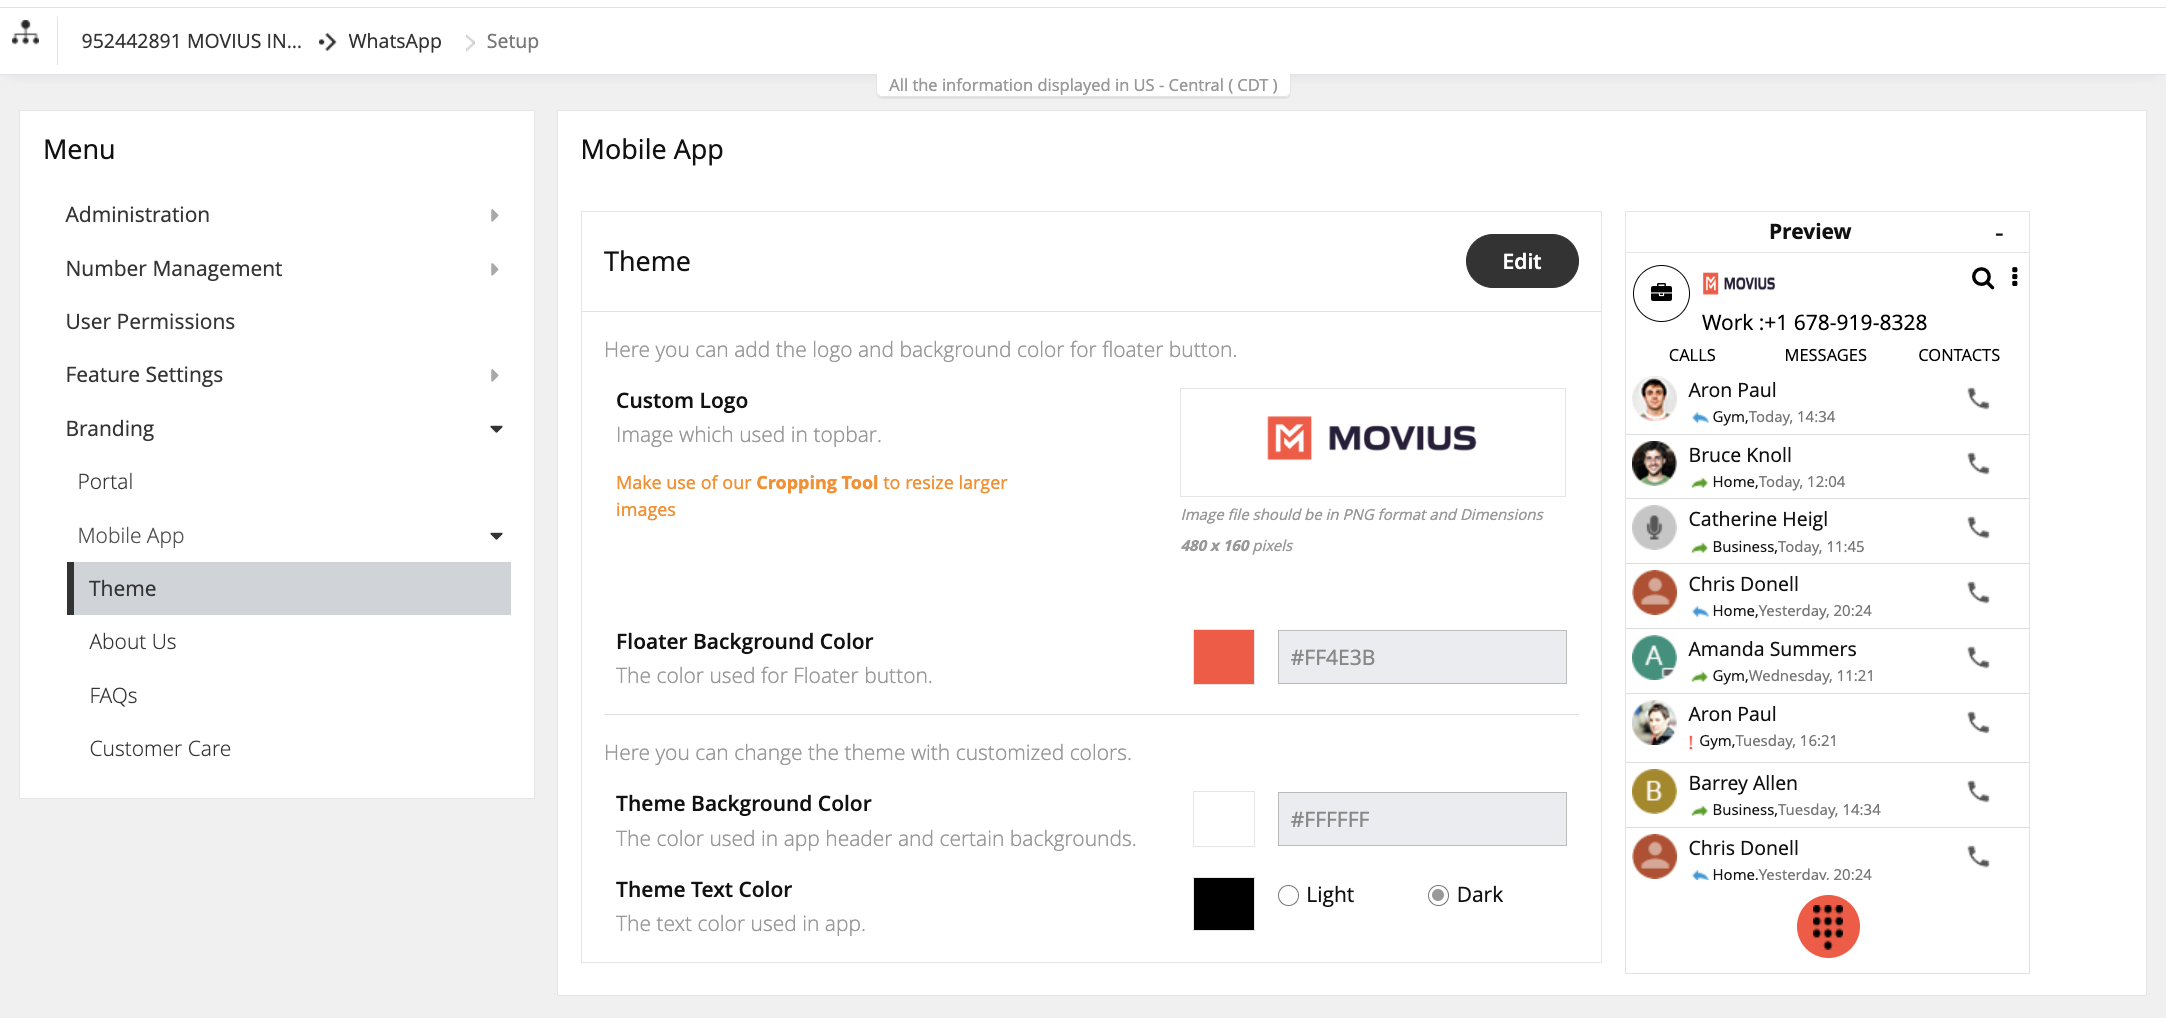
Customize theme
To edit your Mobile App Theme, customize the parameters of the following settings:
- Theme Background Color
- Customizes the background color of the app screens
- Floater Background Color
- Customizes the background color of the dialpad floater
- Theme Text Color
- Customizes the color of the text/dialpad floater's 'digits'
- Custom Logo
- Must be 480 x 160 pixels. If your logo is larger than 480 x 160 pixels, you will be prompted to use the in-app image cropper to fit the logo to size. If you logo is below 480 x 160 pixels, you will be prompted to select a larger image.
Customize About Us screen
To customize your About Us Page, edit the parameters of the About Us tab under Branding.
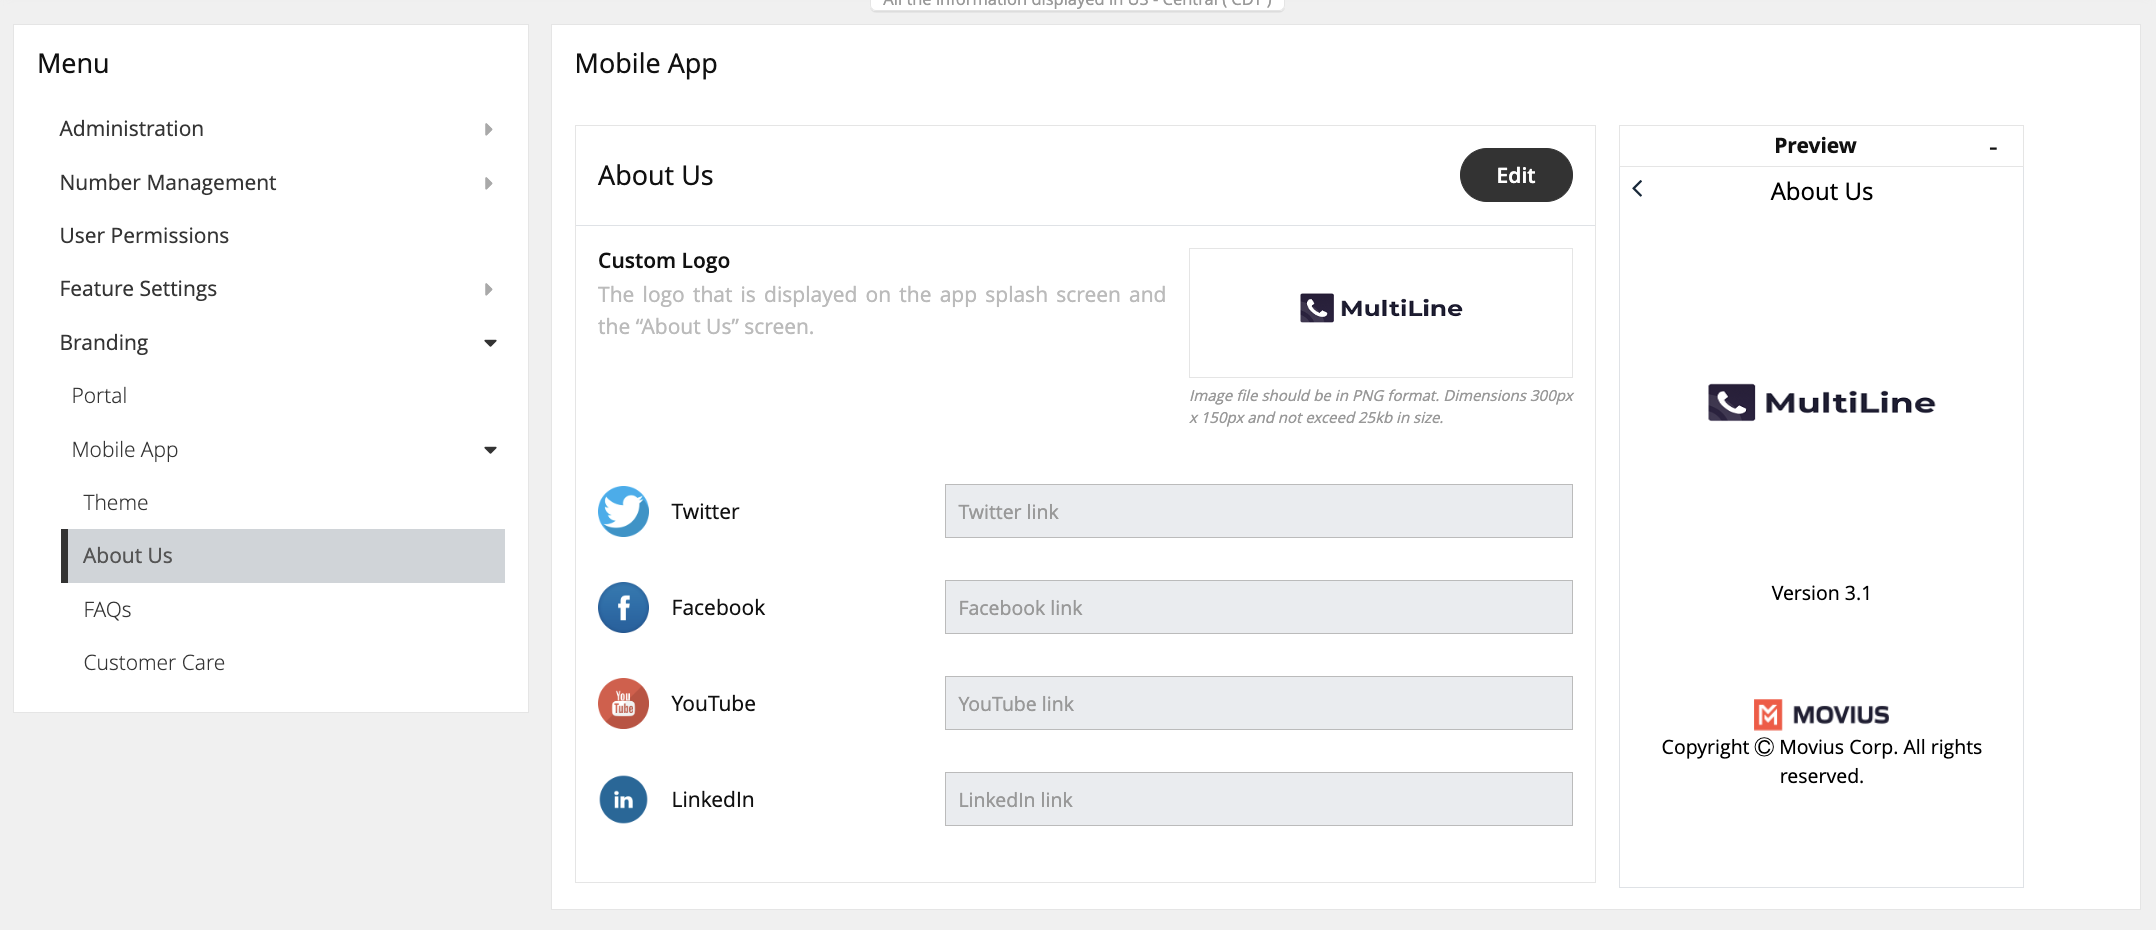
- Logo must be 300 x 150 pixels.
- If your logo is larger than 300 x 150 pixels, you will be prompted to use the in-app image cropper to fit the logo to size.
- If you logo is below 300 x 150 pixels, you will be prompted to select a larger image.
- File cannot be larger than 25kb.
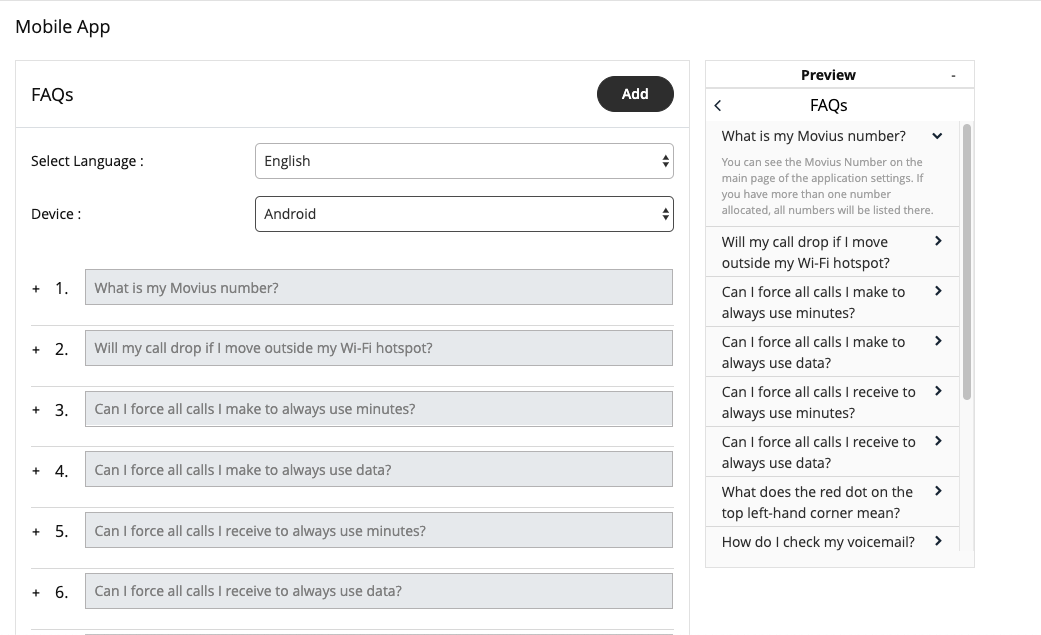
Customize FAQ screen
Edit questions or answers
- Edit the default 'fill-ins' for both the Question, and the Answer fields of the questions you would like to change under the FAQs page under Branding.
- Click the + icon next to a question to view its respective answer.
Add questions
- Click the ovular ADD button on the top right.
- Toggle the Language and Device OS to identify the fields you want to edit.
You can see a Preview of the screen on the right of the MMP.
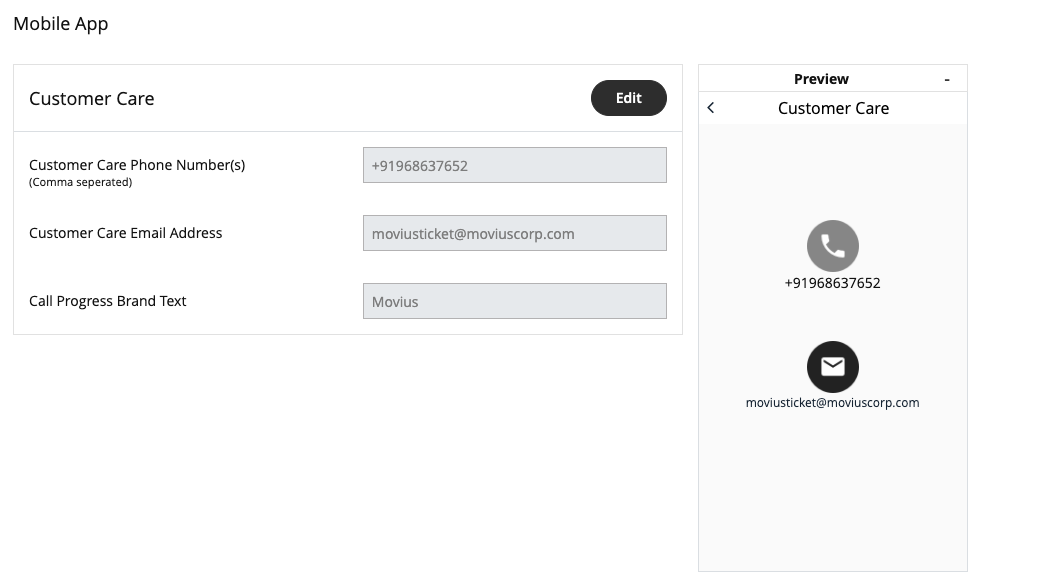
Customize Customer Care screen
To customize your Customer Care Page, edit the contact information in the Customer Care tab under Branding.
This information will show in the Help section of the Mobile and Desktop applications. See How do I contact support?.
Step 3 - Customize invite
Administrators in the Management Portal can customize email invitations. We provide a default email invitation with the required information which you can edit according to the needs of your organization.
Overview
Users receive MultiLine invitations when you add them to an organization. These invitations contain the information users need to download and activate MultiLine and credentials for activating mobile and desktop apps. Some organizations may want to change the default invitation we provide to add their own content or formatting.
Before you Start
- An admin must have "Setup" Privilege in their Role in the organization to do these instructions. See What Admin Privileges are in Management Portal?.
How to edit the email invitation template
You can use the editor to add content and formatting to the email.
- Go to Setup > Administration > Invitation Templates > Email
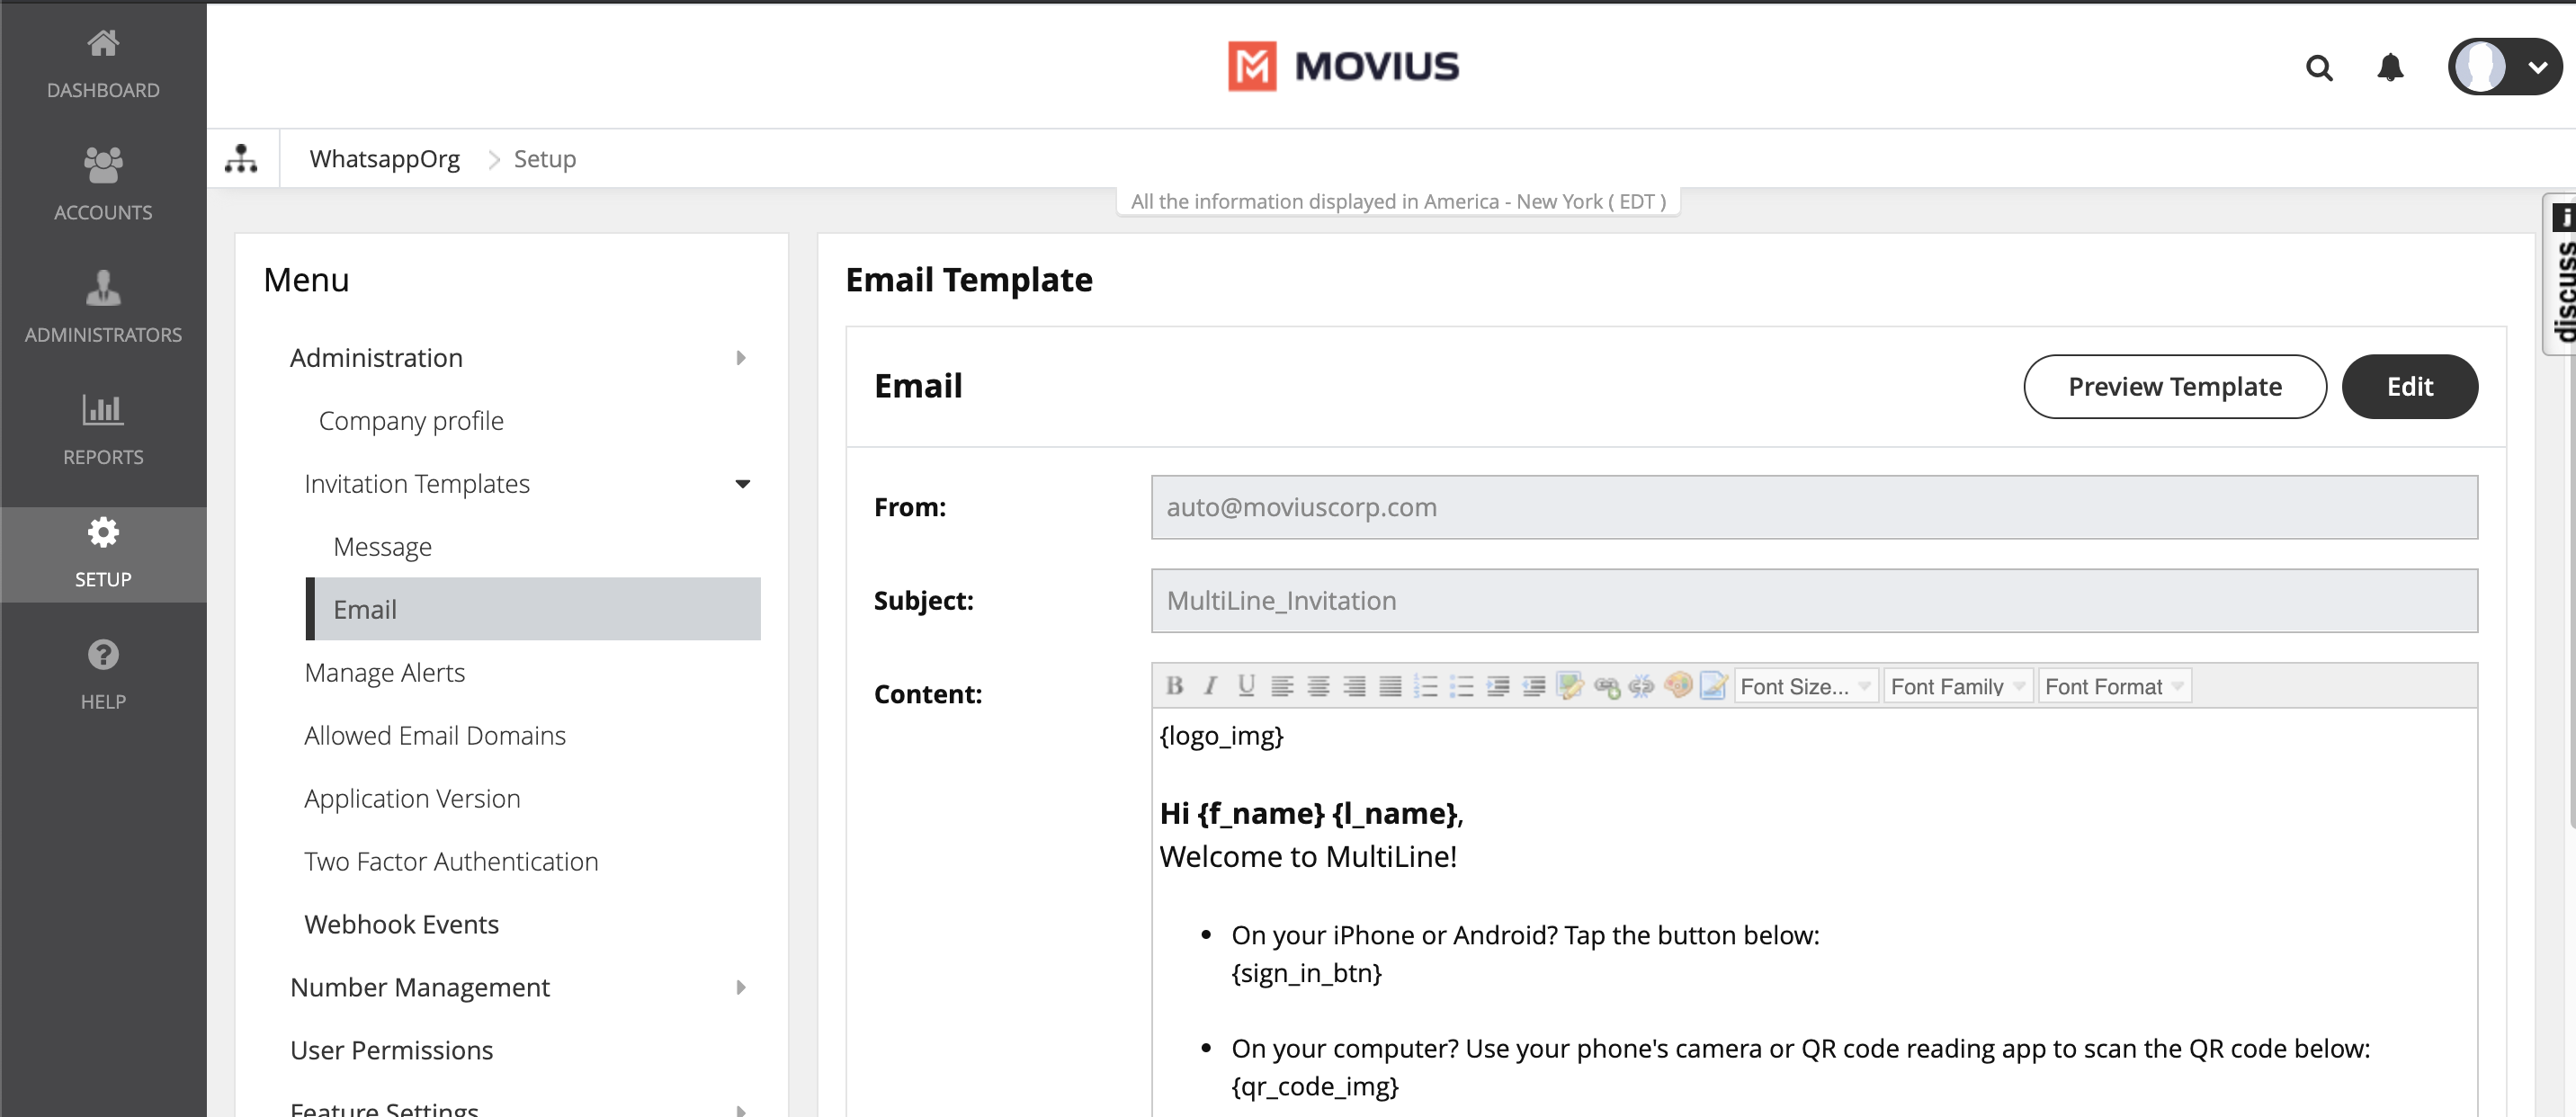
- Click Edit to make changes. Note: You must include required variables. See below for list of variables.
- Click Preview Template to see how edits would look and make sure that parameters are working properly.
- Click Save.

Default template
{logo_img}
Hi {f_name} {l_name},
Welcome to MultiLine!
- On your iPhone or Android? Tap the button below:
{sign_in_btn} - On your computer? Use your phone's camera or QR code reading app to scan the QR code below:
{qr_code_img} - To manually activate, click this {app_download_link} to download the app and enter the credentials below during onboarding:
Company Id : {market_code}
UserName : {u_name}
Password : {pwd} - To access MultiLine Desktop, click this {web_app_link} and enter the username and password above during onboarding.
Please note that you'll be requested to create a password when signing in to MultiLine Desktop for the first time.
Thanks,
Team Movius
List of invitation variables
| Variable Name | Description | Required? |
|---|---|---|
| {f_name} | First name of the invited user | No |
| {l_name} | Last name of the invited user. | No |
| {app-link} | App link configured by the system administrator. Tapping app link redirects the user to download the app. | No |
| {qr_code_img} | This is the QR code. Users scan the QR code to automatically download the app (if not already downloaded) and begin activation. | Yes |
| {sign_in_btn} | This is the "Download and Activate" button. Users tap the button to automatically download the app (if not already downloaded) and begin activation. | No |
| {u_name} | Email address or mobile number of the invited user. | No |
| {pwd} | System-generated password for the invited users. | No |
| {market_code} | Company or Organiation ID is automatically defined when the organization is defined. | No |
Note: if you do not include {u_name}, {pwd}, and {market_code} variables, your users will not be able to use manual activation.
Tip: Provide help resources to users - It's a good idea to link to our help resources here at https://help.moviuscorp.com. Users can also get to help resources within the application in Settings > Help.
Your custom MultiLine email invitation is ready!
Any new invitations sent will now have your custom content and formatting.
Part 2: Invite Admins
Step 1 - Create admin roles
Roles are a collection of Privileges granted to Admins. Create your Roles before adding admins because selecting the Role will be a part of the Admin creation process.
Overview
Creating Admin Roles allows your organization to have different types of Admins. For example, you can have an Admin who is only able to invite users, and an administrator who is only able to downloading reports.
Before you Start
- You need "Roles and Privileges" Privilege in your Role to perform these instructions.
How to create a Role
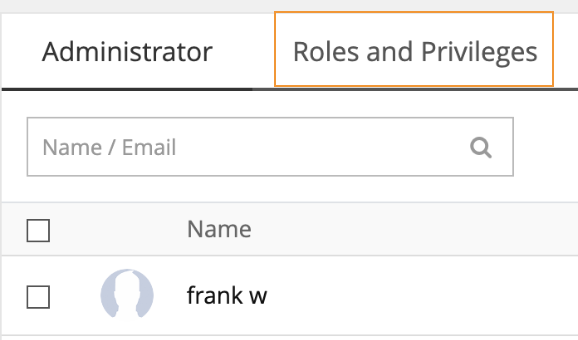
You can create a role in Administrators > Roles and Privileges.
- Navigate to the top-most organization that you want to receive the changes. See Navigating Organizations.
- Click Administrators.
- Click Roles and Privileges.
- Click + Create Role to create a new role.
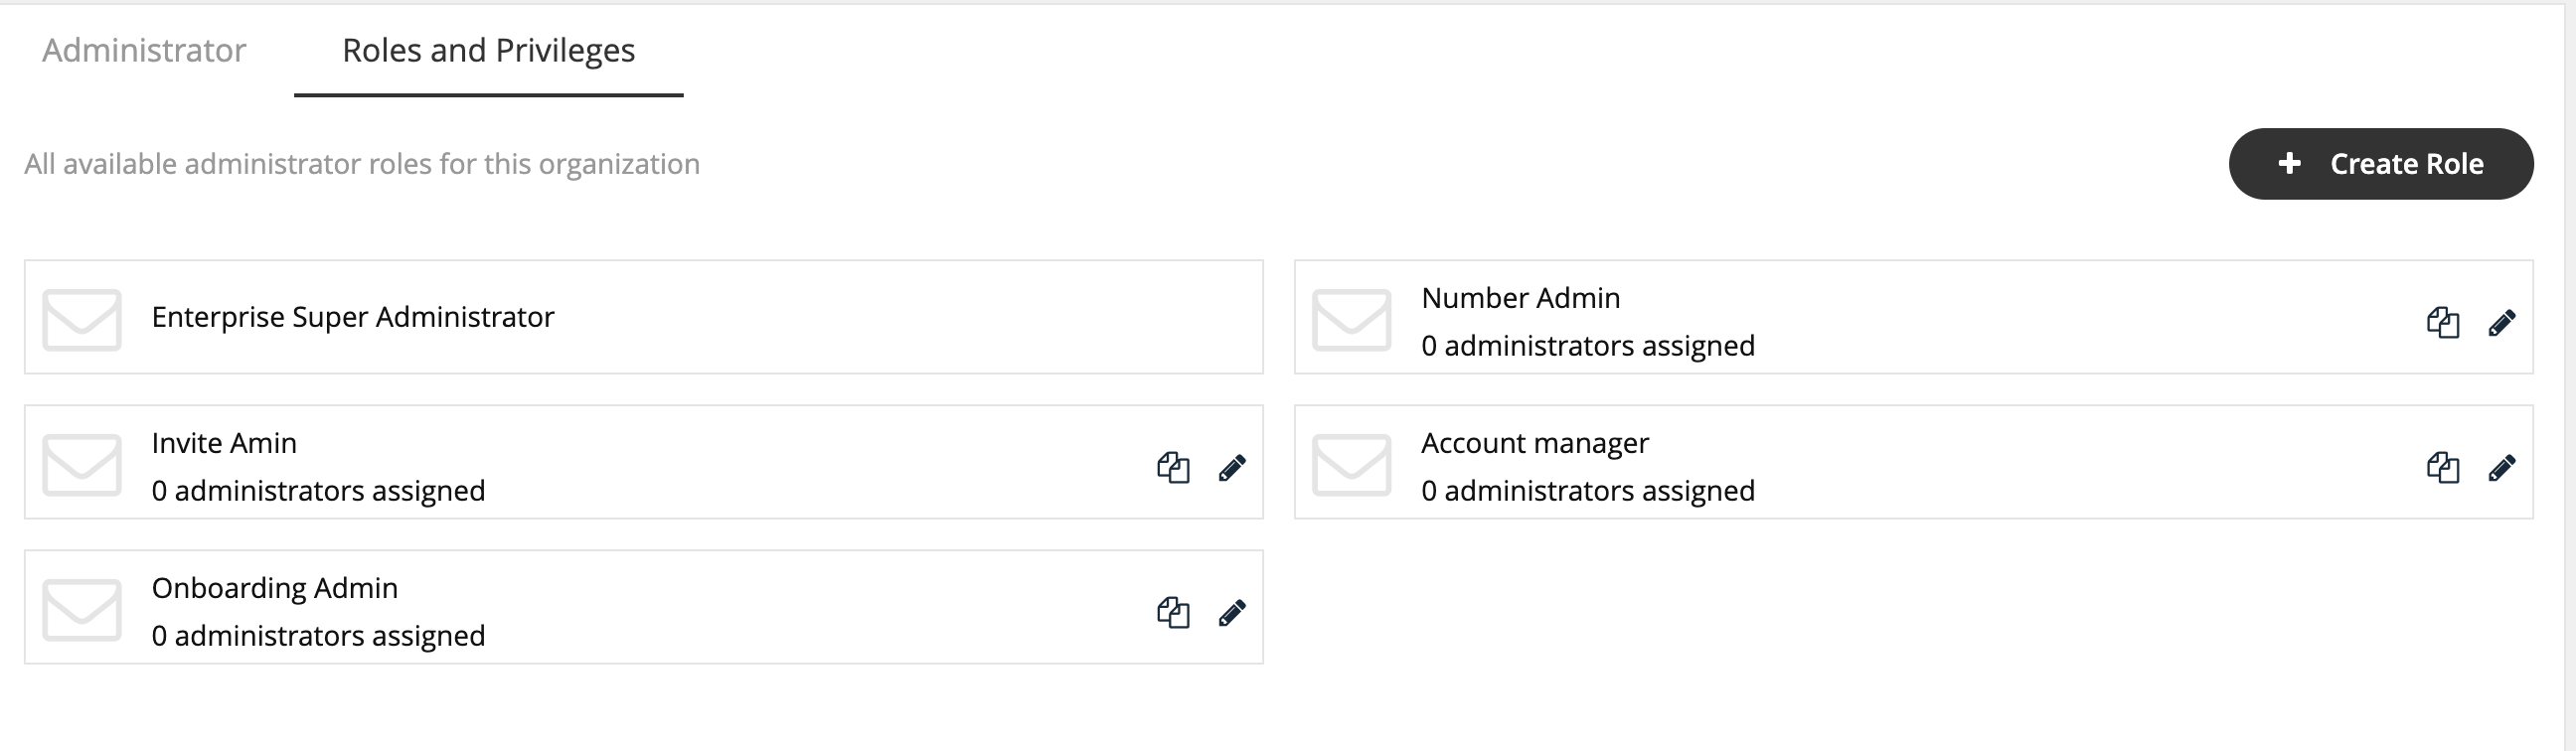


Different privileges can be assigned by checking various features under each section.
- Enter the name of the role into the Role Name field. Note: When you add admins to the portal, you will assign the role based on the Role Name.

- Select the checkbox to assign the privileges.
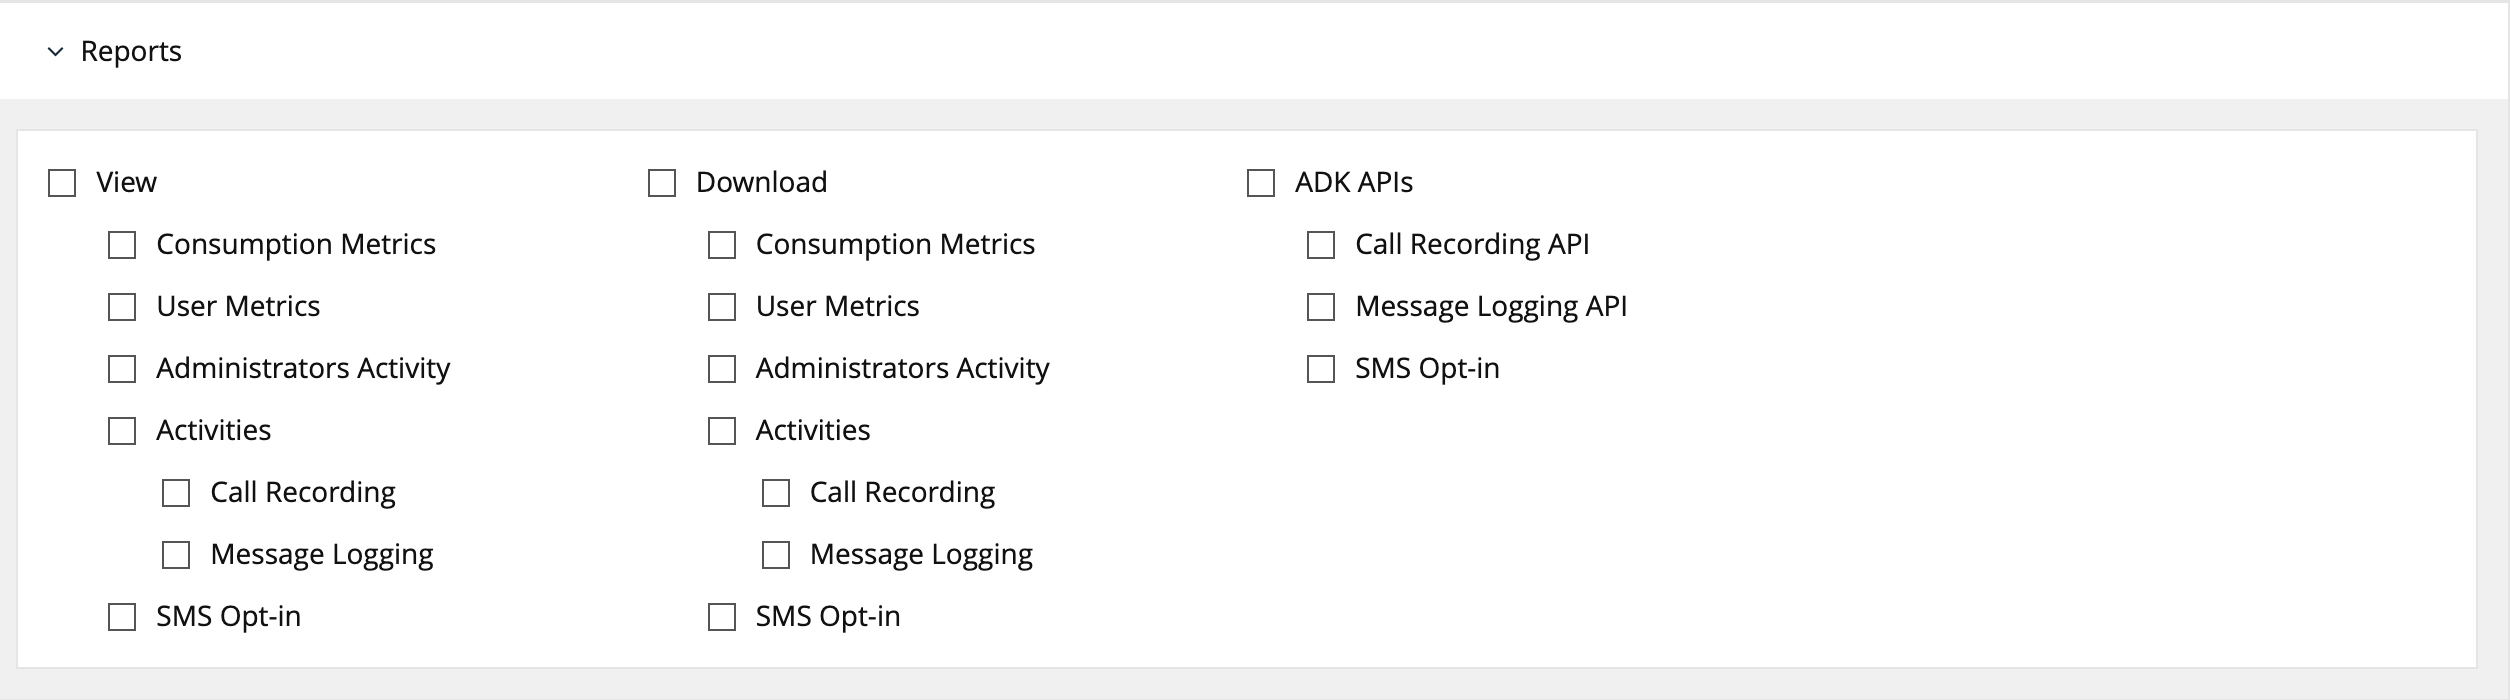 Note: If single or multiple checkboxes of a section are selected, the link for that section will get highlighted in the header link.

 Note: If single or multiple checkboxes of a section are selected, the link for that section will get highlighted in the header link.
Edit Admin Role
1. Click the pencil icon to edit an Admin Role.
Your custom Admin Roles are ready!
Now when you add Admin accounts, you'll be able to assign them with the Role you created that only grants them access they need to perform their function in the Management Portal.
Step 2 - Invite admins
Learn how to add, delete or edit an admin profile in the Administrator section of Management Portal.
Overview
Admin accounts allows people in your organization to access the Management Portal.
Before you Start
- Requires Roles and Privileges Role. See Admin Roles for more information.
- Before you invite administrators to the organization, you should have already created Roles for the administrators.
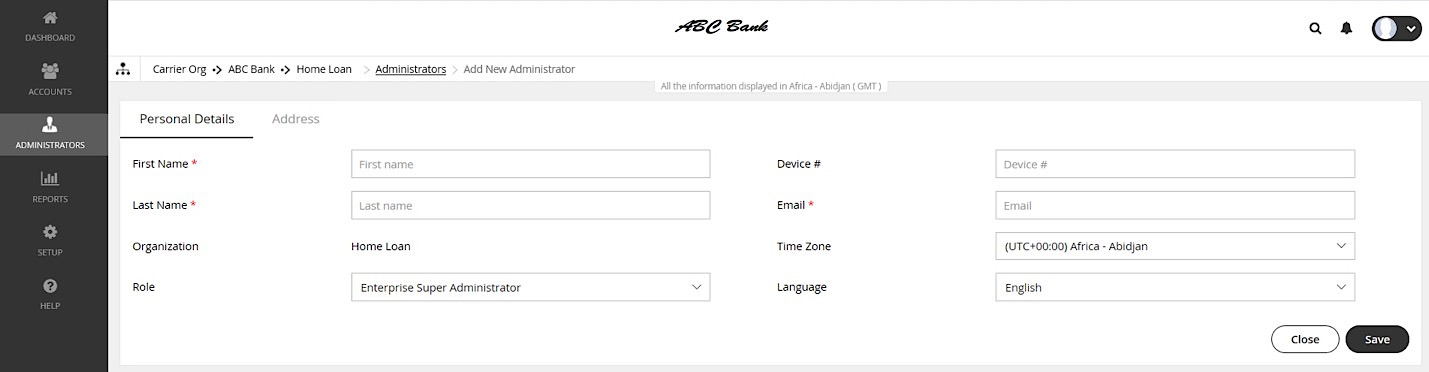
Invite admins
- Go to the organization where you want to perform the action.
- Click Administrator.
- Click Add New Administrator.

- Enter the details for a new administrator.
- Note that the default language is English but can be modified by the administrator when they review their own profile. Movius currently supports English, Spanish, and Portuguese languages.
- Click Save.


You've invited the admins!
An email will be sent to the new admins which will contain their login credentials and a system-generated password. On the first login, the administrator will be prompted to set their own password.
If you want to check whether administrators have onboarded, you can monitor administrator status in Administrator Reports (see Managing reports on MultiLine Admins).
Part 3: Invite users
Step 1 - Create user permissions
Read this to learn how to create custom user permissions that you can apply to Organizations in the Setup tab.
Overview
User permissions define what app features are available to users of the MultiLine app. User permissions are set at the organization level and are inherited by any sub-organizations. If your sub-organization has an inherited user permission, you must edit the user permission at the level it was defined.
Before you Start
- An admin must have "Setup" Privilege in their Role in the organization to do these instructions. See What Admin Privileges are in Management Portal?.
- Default User Permissions will set permissions for users that are not part of a subgroup.
Create new custom permissions
- Go to the organization where you want to perform the action.
- Go to the Setup tab and click User Permissions.
- Click Add New.

- Check the box for a feature to permit it, or uncheck the box for a feature to disallow it.


List of permissions
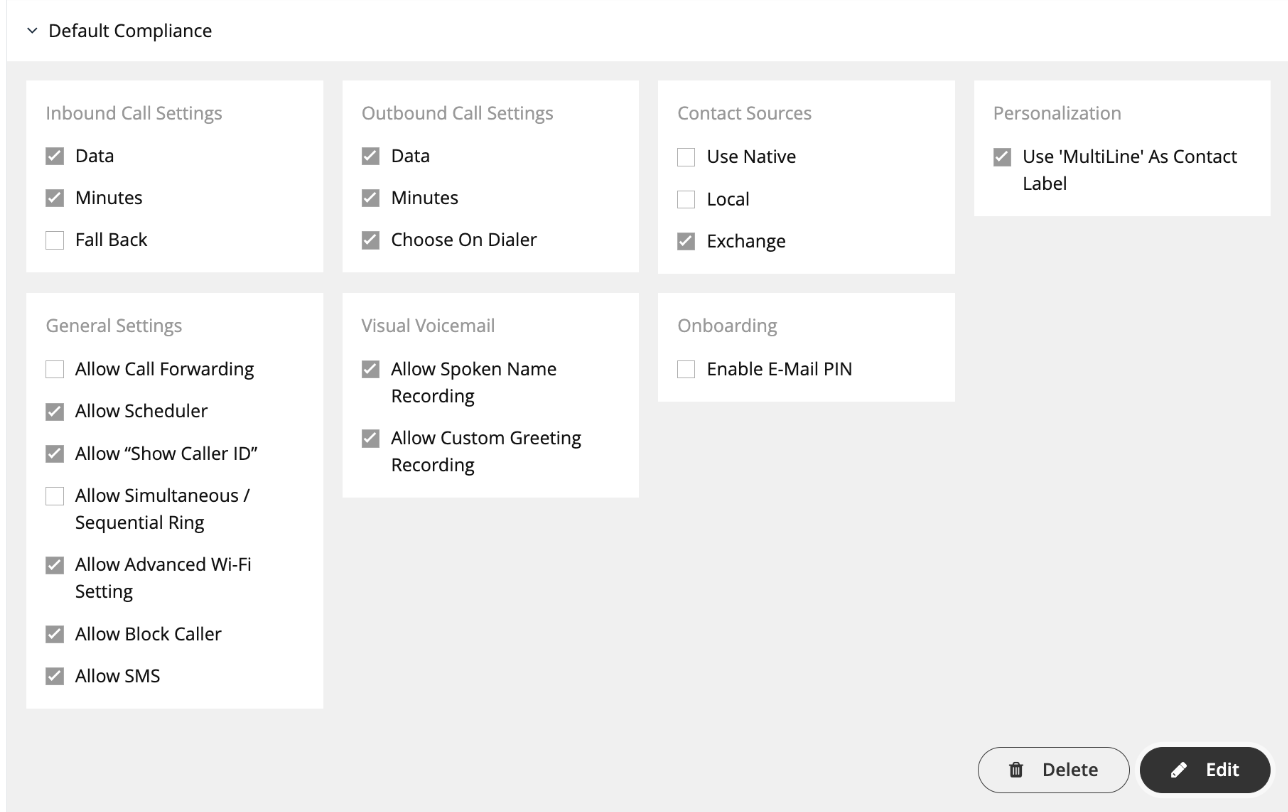
Inbound Call Settings
- Data: Enable/Disable using data to receive inbound calls.
- Minutes: Enable/Disable using minutes to receive inbound calls.
- Fall back: Enable/Disable trying data first, then minutes, to receive inbound calls.
Outbound Call Settings
- Data: Enable/Disable using data to make outbound calls.
- Minutes: Enable/Disable using minutes to make outbound calls.
- Choose on Dialer: Enable/Disable choosing data or minutes from the dialer when making outbound calls.
Contact Sources
Use Native: Enable/Disable using native contacts service in MultiLine.
- Local: Enable/Disable importing native contacts into MultiLine.
- Exchange: Enable/Disable exchanging contacts between native device and MultiLine server.
Personalization
- Allow Personalize Number: Enable/Disable the ability to customize MultiLine number.
- Use 'MultiLine' as Contact Label: Enable/Disable the ability to label a Contact number with "MultiLine".
General Settings
- Allow Call Scheduler: Enable/Disable call scheduler function.
- Allow Scheduler: Enable/Disable scheduler function.
- Allow "Show Caller ID": Enable/Disable caller ID function.
- Allow Simultaneous/Sequential Ring: Enable/Disable simultaneous/sequential ring function.
- Allow Advanced WiFi Setting: Enable/Disable toggling of the Advanced Wifi settings.
- Allow Block Caller: Enable/Disable incoming caller blocking function.
- Allow SMS: Enable/Disable SMS messaging.
Visual Voicemail
- Allow Spoken Name Recording: Enable/Disable spoken-name voicemail greetings.
- Allow Custom Greeting Recording: Enable/Disable custom, personable voicemail greetings.
Onboarding
- Enable Email PIN: Enable/Disable sending the onboarding OTP PIN via email in addition to SMS.
You've created your custom permission
You can assign the permission set when you add users.
Step 2 - Add users
Learn how to add a single user and send an invitation that they use to activate their MultiLine service.
Overview
A MultiLine administrator is responsible for adding users to the Management Portal and sending the users MultiLine invitations. MultiLine invitations give them the required information they need to activate MultiLine.
You can add users directly in the portal, or you can upload multiple users at once using a CSV file. You can also add users and invite them to MultiLine immediately or save the information to invite them at a later time. If you add users without inviting them, you'll need to use the Resend Invite feature to send them invitations in the future.
Before you Start
- An admin must have "Accounts" Privilege in their Role in the organization to do these instructions. See What Admin Privileges are in Management Portal?.
- If you would like to customize the email invitation, you should do this prior to this step.
- If your users need custom permissions, you should create those prior to this step.
- Sending an invitation requires there to be an Available or Reserved number to be assigned to the user account.
Send a Single User Invitation
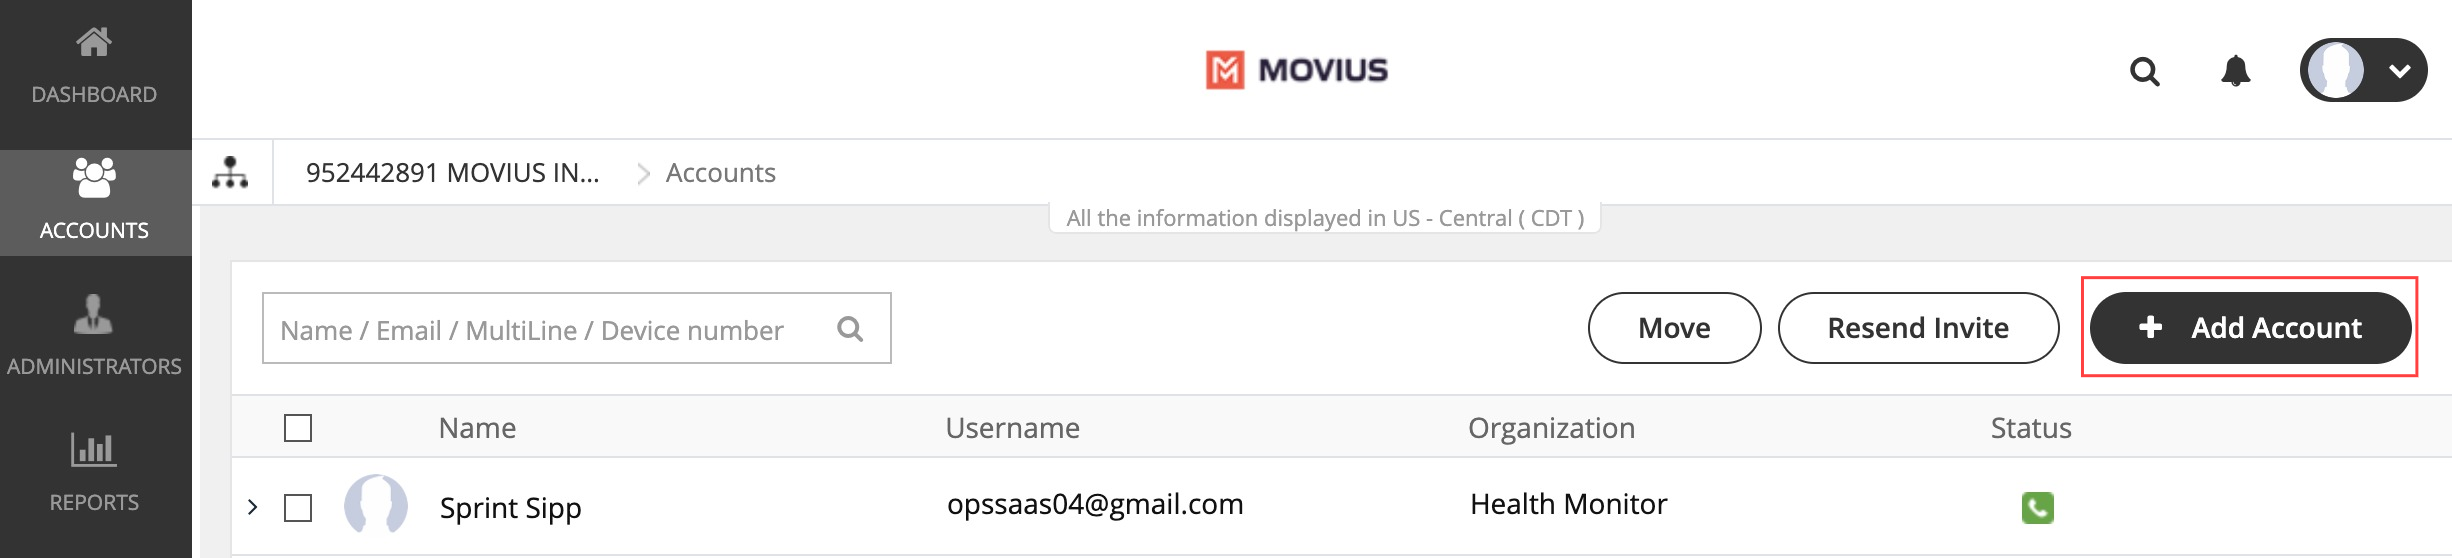
You can add and invite users to MultiLine from the Accounts screen in the Management Portal.
- Go to the Accounts tab, and then click Add Account.
Fill out the fields:

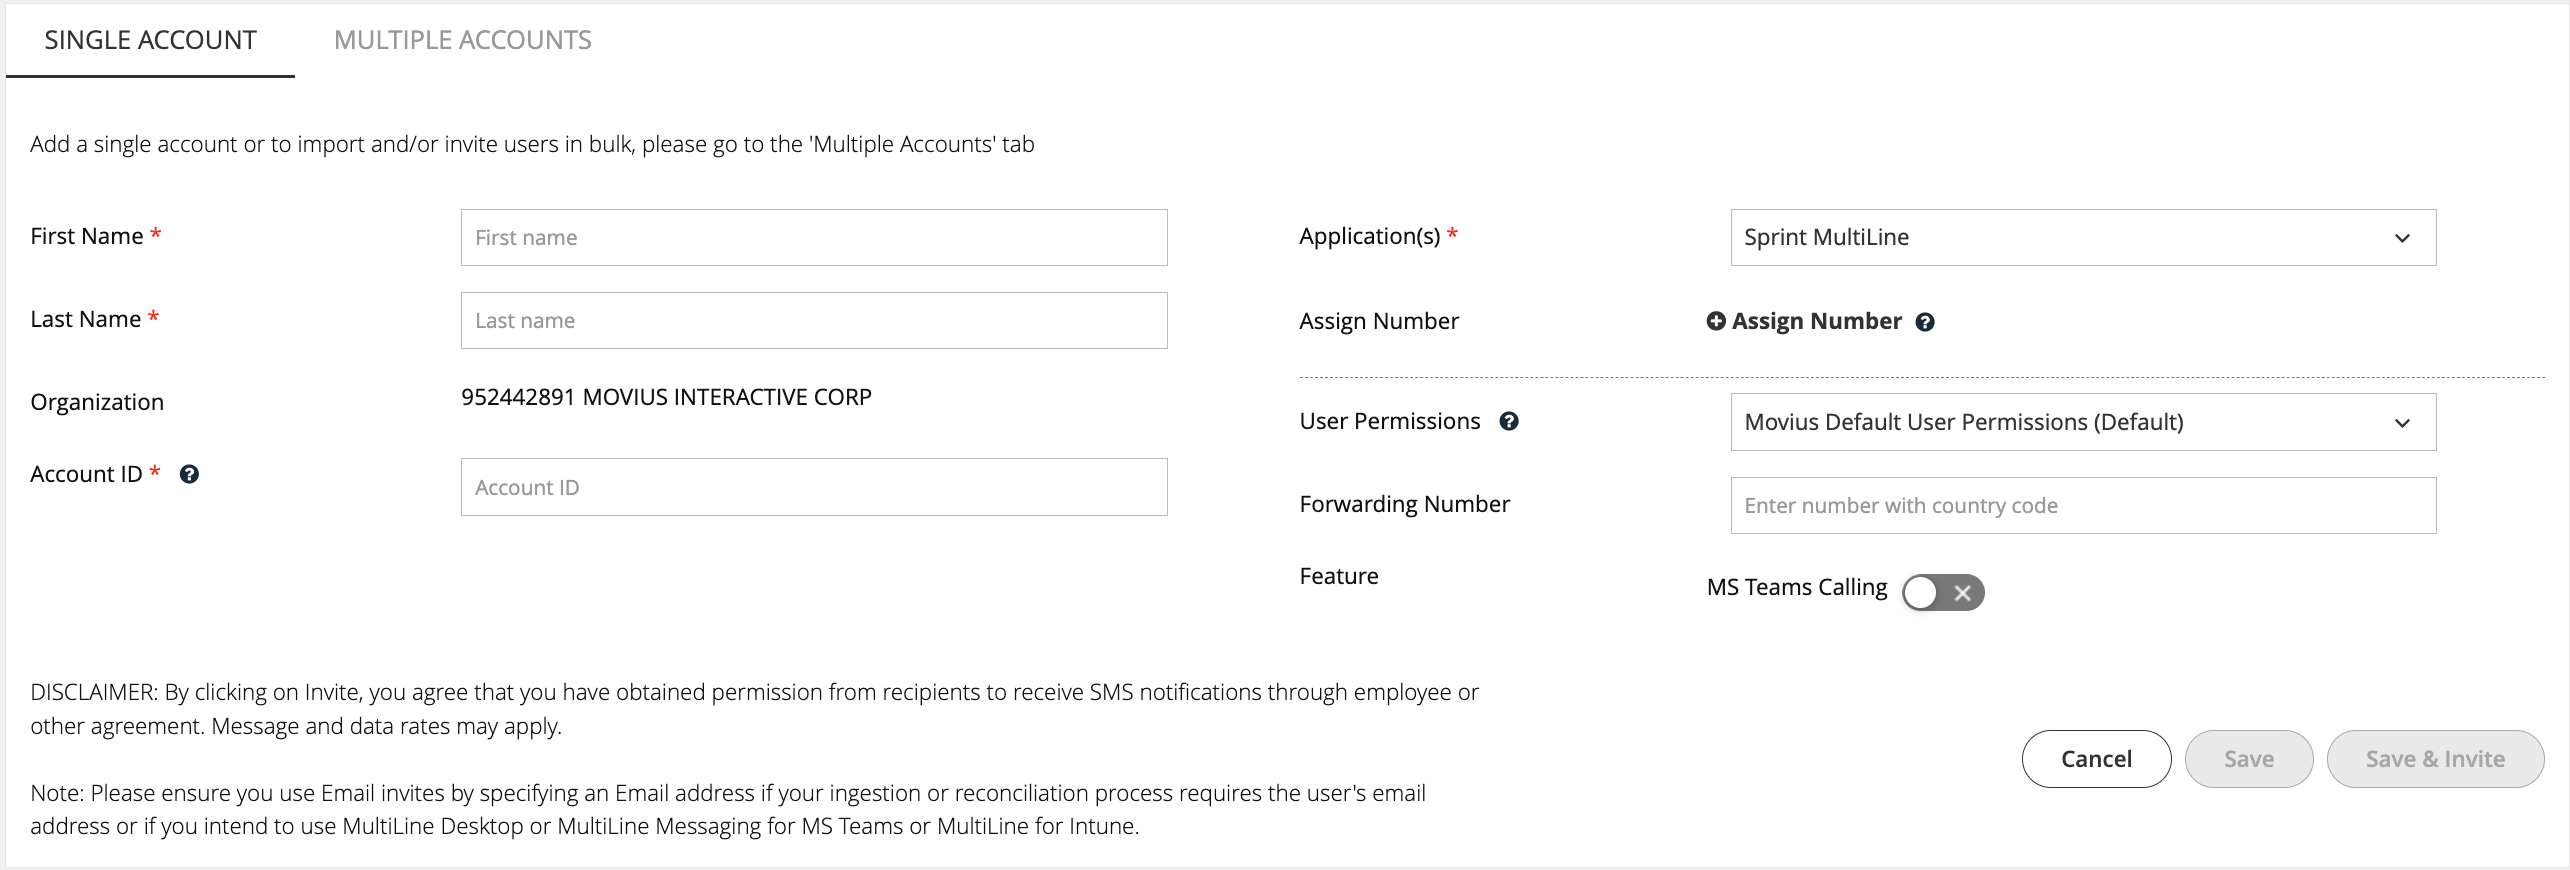
- Enter the First Name and Last Name.
- Enter the Email or Device # that the invitation will be sent to.
- Optional: Click the Assign Number link.
Note: If you do not assign a number, end-users will have the option of to select from a short list of available numbers during MultiLine activation. - Choose a number or tag from the drop-down menu. (Example above: "PORTED")
- Select the User Permissions to which to assign this number. (Example above: "default cos for org 2000")
- Select toggles for any Features to apply to this user account. Note: You will only see toggles for features enabled for your organization.
- You can add the user and invite them to use MultiLine immediately, or add the user and send the invitation to use MultiLine at a later time.
- Select Save to add the user without sending the user an invitation to use the application. Note: You will use the "Resend Invitation" process when ready to invite the user to MultiLine.
- Select Save & Invite to add the user and send the user the invitation to begin using MultiLine.


Note that the available fields on this screen will vary based on your organization's setup.
Part 4: Manage Users
Search users and view Invitation status
Read this to learn how to use the Accounts tab to check whether users have activated MultiLine.
Overview
The Accounts tab tracks invitation status and some usage, which makes it a great place to start checking whether people are onboarding successfully.
Before you Start
- An admin must have "Accounts" Privilege in their Role in the organization to do these instructions. See What Admin Privileges are in Management Portal?.
Check invitation status and usage
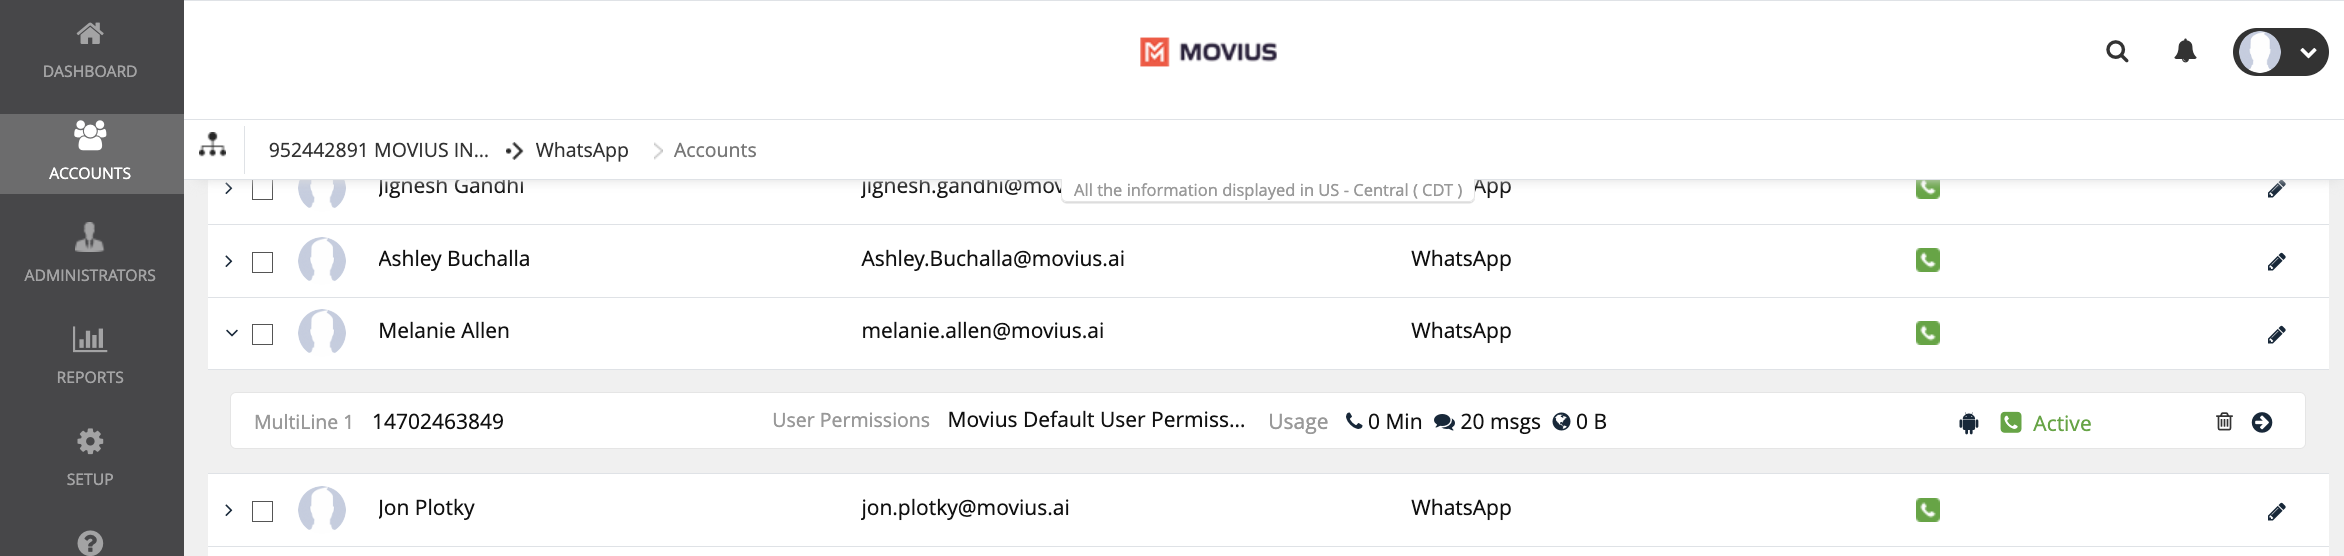
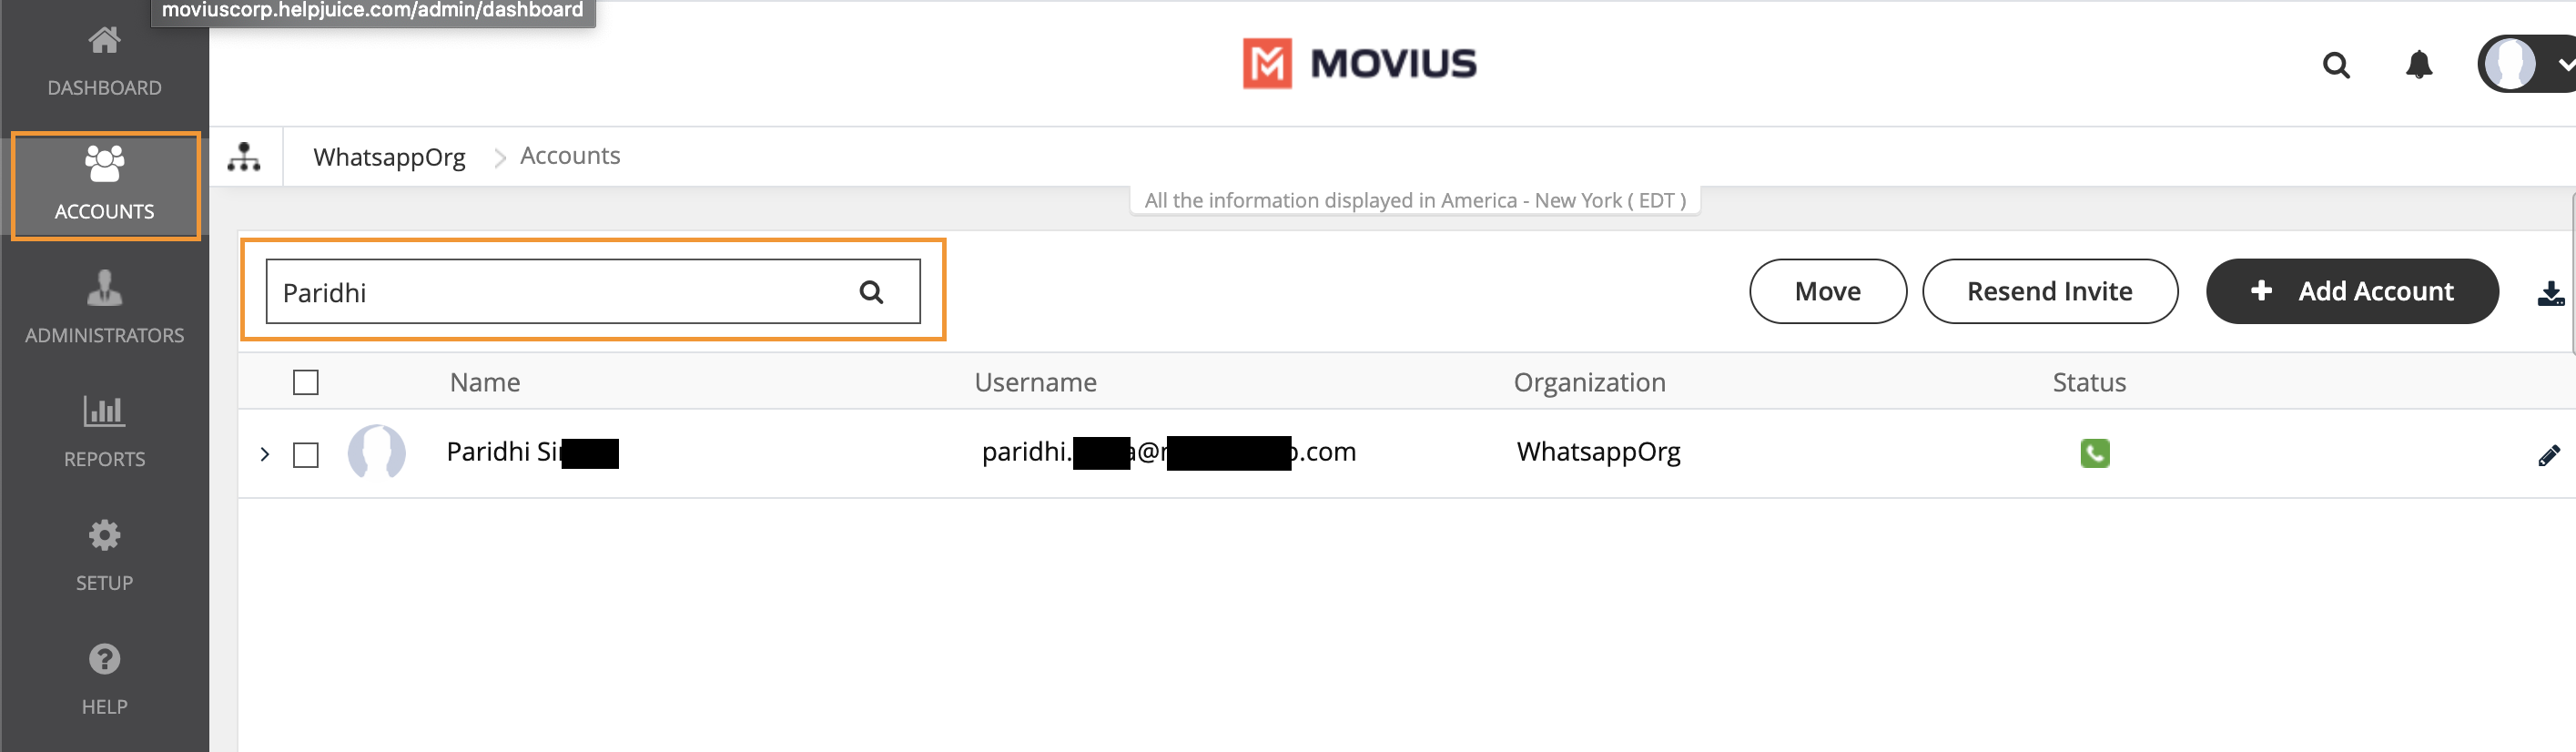
All existing user accounts are visible with the current status of the account on the Accounts tab. You can search for accounts by Name, Email ID, MultiLine Number or Device Number.
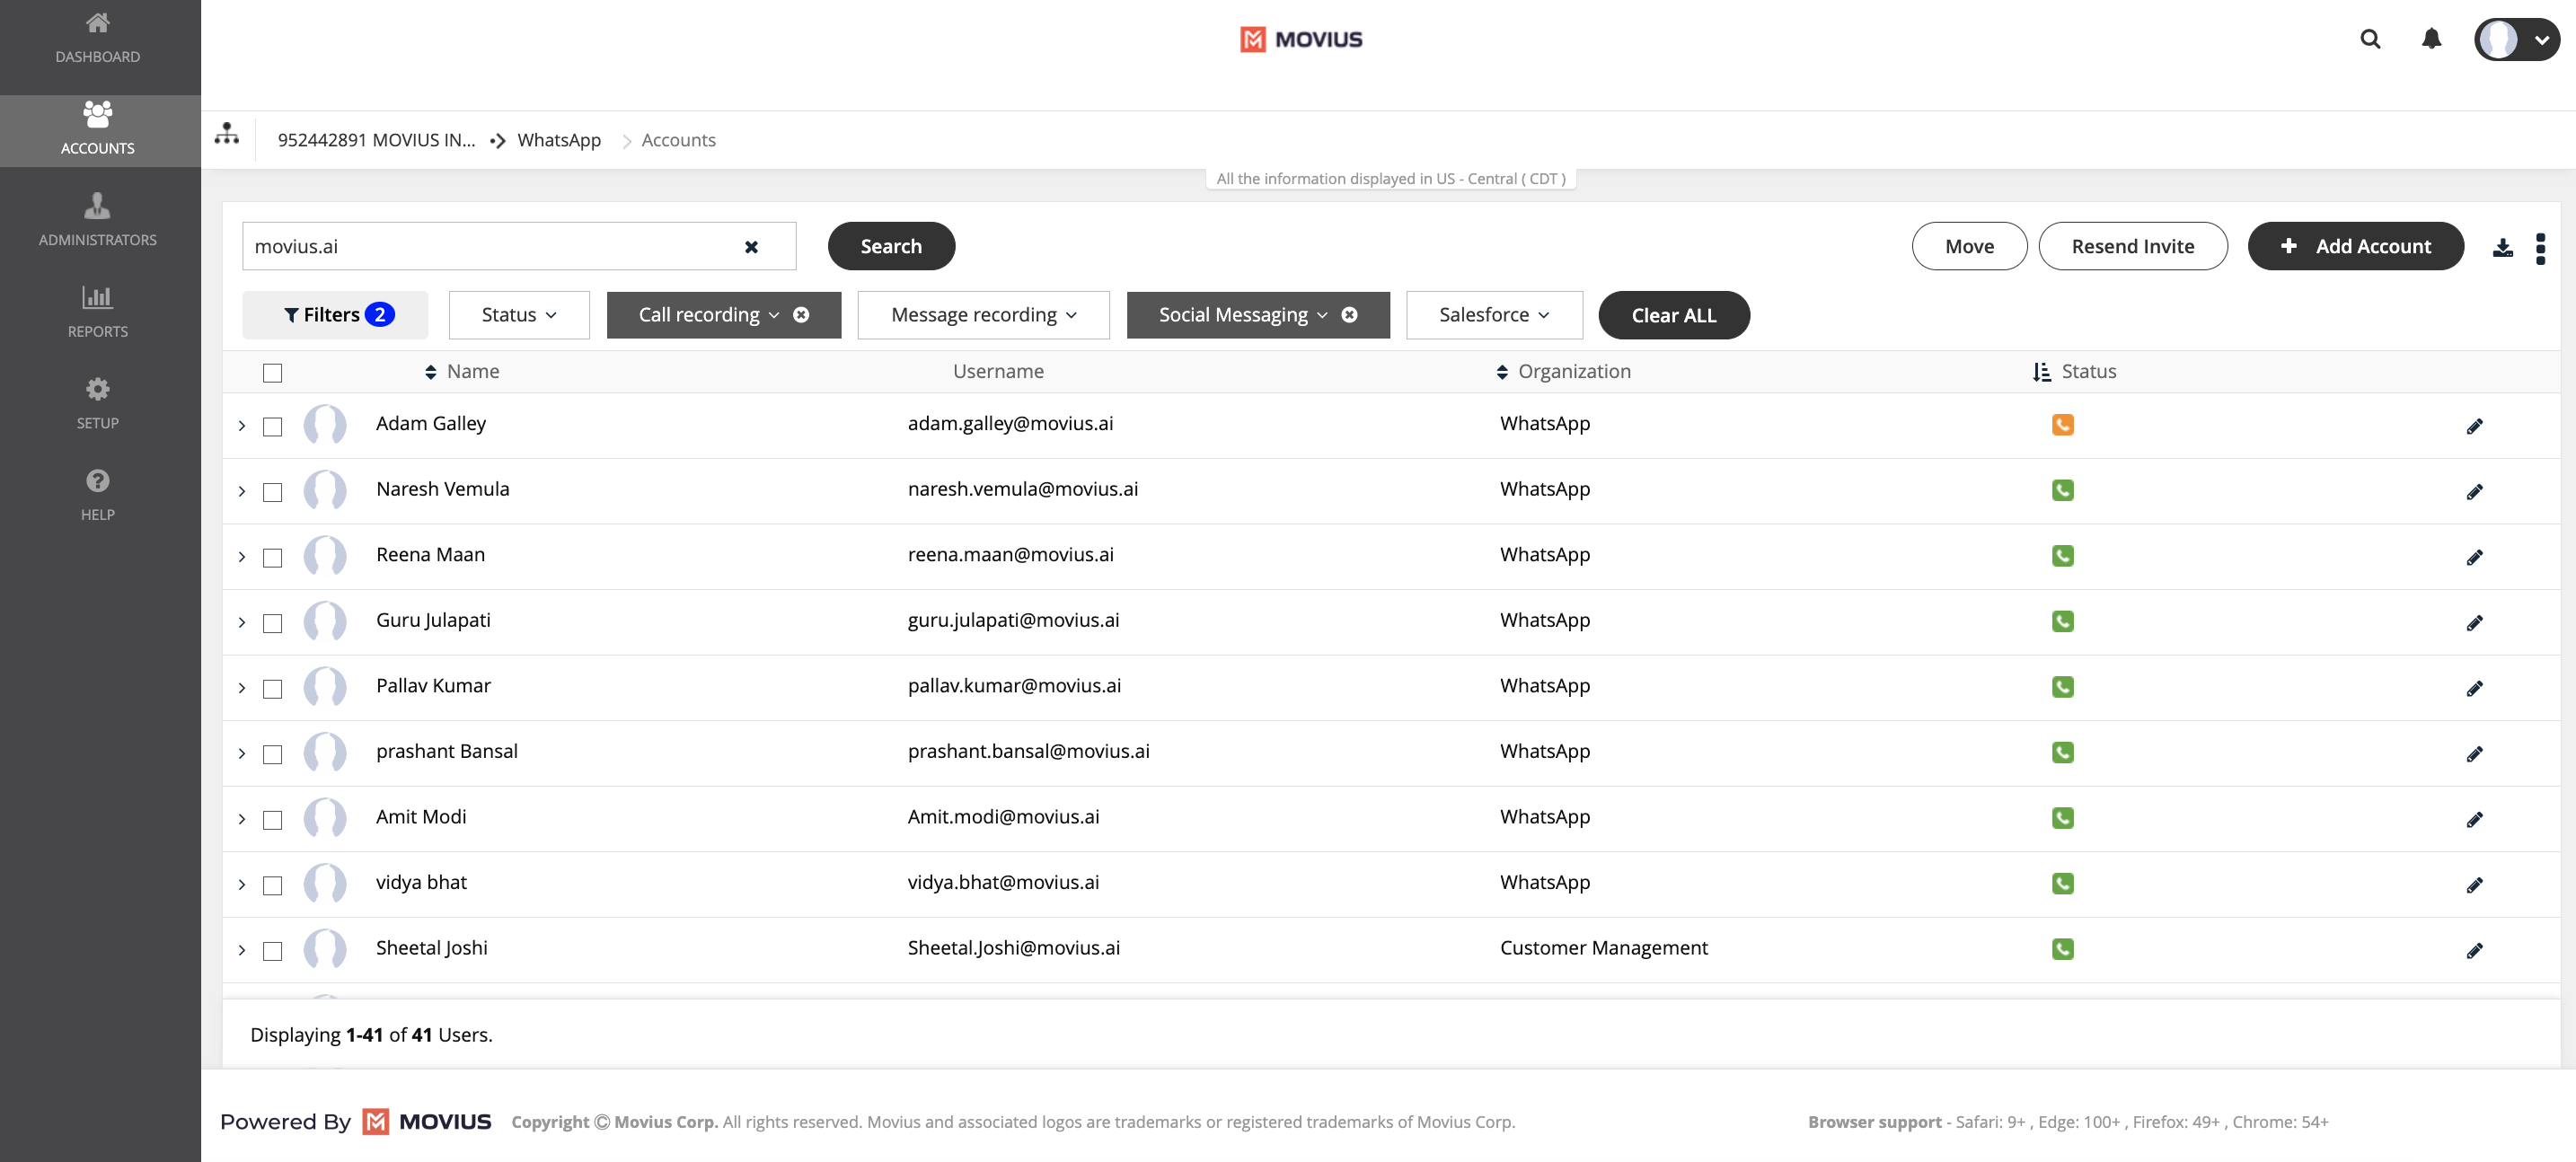
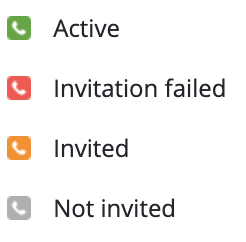
- Hover over the icons under Status to view their current status.
- Invite Status meanings:
- Green: Successfully activated
- Amber: Invitation sent, but user hasn't activated
- Red: Suspended or Blocked
- Grey: Opted Out
- If you sort by Status, the order will be
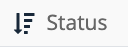 Active > Invitation failed > Invited > Not invited, or for descending
 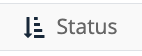 the reverse Not invited > Invited > Invitation failed > Active.
- Invite Status meanings:
- For Active accounts, you can click the side arrow for more information, including

- The assigned number
- Assigned user permissions See Create user permissions.
- Whether the user has started calling and messaging
- The type of device, Android or iOS
- Invite status
- Delete and Edit actions.

 Active > Invitation failed > Invited > Not invited, or for descending
  the reverse Not invited > Invited > Invitation failed > Active.
Move users
Read this to learn how to move an account to a different organization.
Overview
From Accounts, you can move an account from organization to another within your tree (according to the hierarchy). Once the user is moved, the user will be reset to the default user permissions for that destination organization.
Before you Start
- An admin must have "Accounts" Privilege in their Role in the organization to do these instructions. See What Admin Privileges are in Management Portal?.
How to move the user
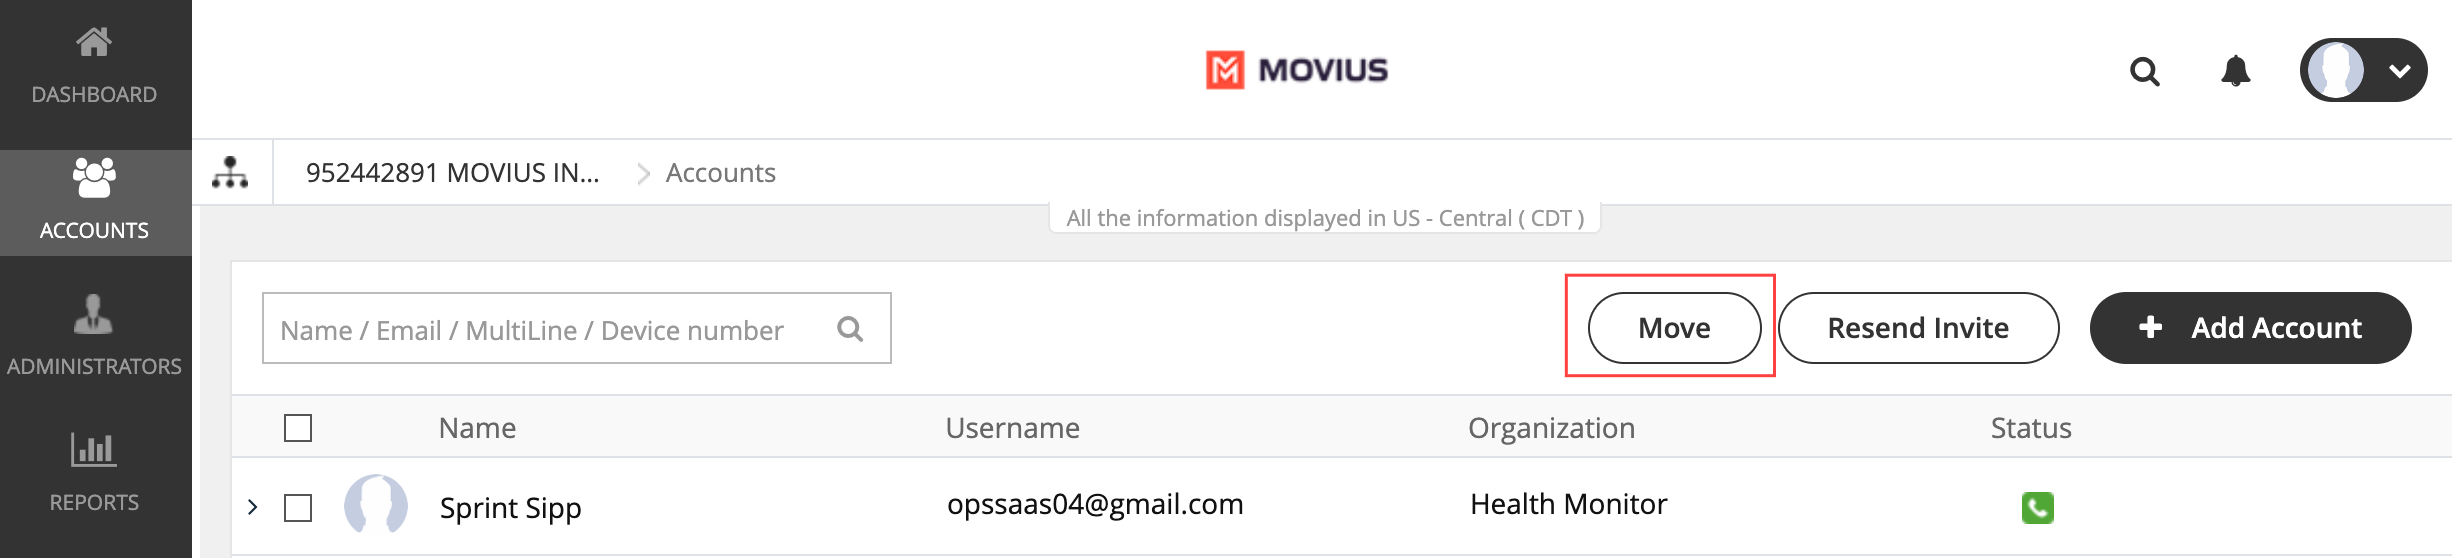
- Go to Accounts.
- Select the checkbox for the account you want to move and click Move.
- Search or select the Organization or Sub-Organization and click Move.
ALERT: Once the user is moved, the user will be reset to the default user permissions for that destination organization.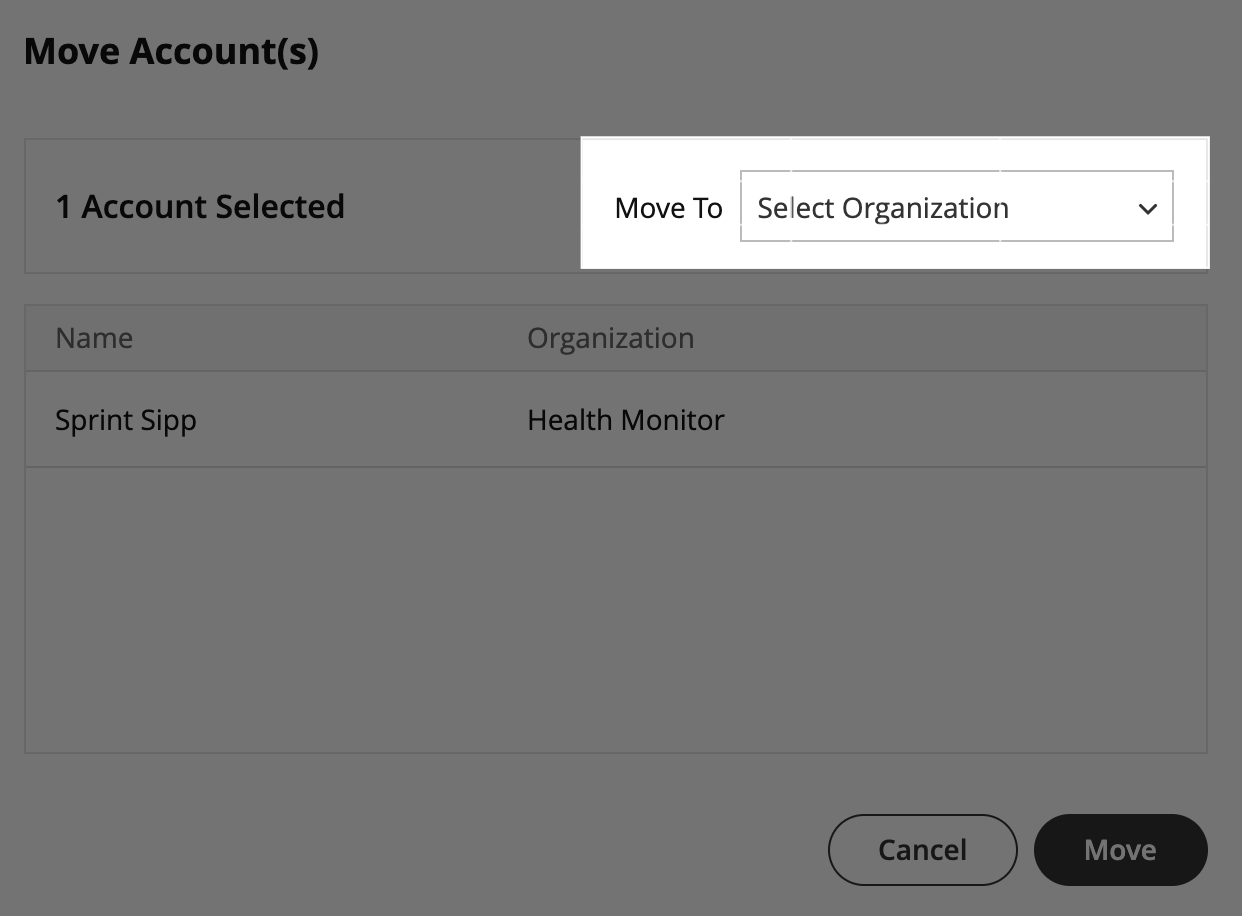
- Click Yes on the confirmation page.
- Click Done.


Delete Users
Read this to learn how to delete a user from the Accounts tab.
Overview
Admins may need to delete users when they leave the company, switch their personal phone numbers, or as a troubleshooting step. After deletion, you can release the number to the Available pool, reserve the number for a specific purpose, or add a forwarding number.
Before you Start
- An admin must have "Accounts" Privilege in their Role in the organization to do these instructions. See What Admin Privileges are in Management Portal?.
Delete a user
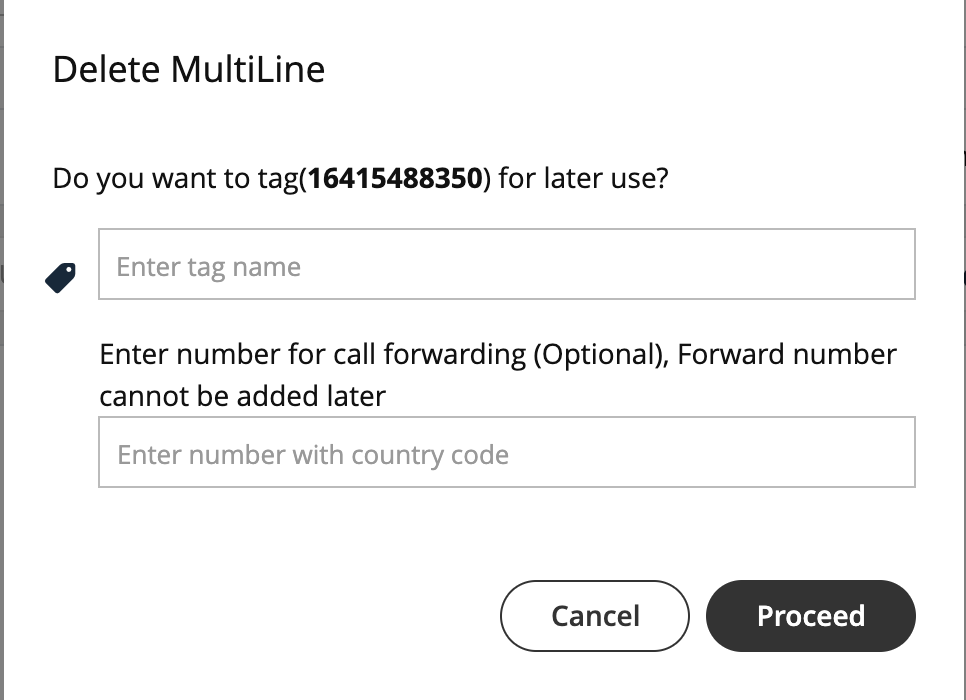
A deleted user will immediately lose access to the MultiLine application.
- Go to the Accounts tab and search for the user by name, MultiLine number, device number, or email ID.
2. Click on the result to expose the dropdown menu, then click the Trashcan icon to delete.

3. A pop-up window will appear asking if you want to tag the number, or enter a number to forward calls to.
- If you do not tag the number, it will enter the Available pool.
- If you tag the number, it will enter the Reserved pool.
- You must tag the number to forward calls. If you do not set the forwarding number at this step, you cannot choose to forward calls later.
- If the deleted number is saved with tag and forward number, than the forward number can be updated later from the Reserved pool in the Setup > Number Management section