To set up the MultiLine integration into Salesforce Lightning, there are steps that must be followed in the MultiLine Management Portal and in Salesforce Lightning. Read this guide to follow the required steps for the Salesforce administrator.
Overview
This guide is intended for Salesforce Lightning admins. We will let you know when there are prerequisite steps that must be taken by the MultiLine admin.
In this guide you will install the package from the App Exchange listing and configure the MultiLine utility and Messages List to appear on Contacts, Leads, and Person Account Records pages for designated Call Center users.
MultiLine Admin Action Needed
Before proceeding, the MultiLine Admin needs to Create an API User for the Salesforce Admin. When completed, you'll receive a "Welcome Administrator" email, with the credentials you need to get started.
Step 1 - Create user in Salesforce
- Go to Setup.

- Type "Users" in the Quickfind box, then click Users.

- Click the New User button.
- Fill in all required information.
- For User License select Salesforce
- For Profile select System administrator

- Click Save.
Step 2 - Set up public site
- Type "Sites" in the Quickfind box, then click Sites.

- Deploy a site.
- Enter a Domain Name according to the requirements of your organization and click Check Availability.
- Check the box to accept Terms and Conditions.
- Click the Register My Salesforce Site Domain button.

- After you are redirected, click the New button.

- Complete the information:
- Site Label: Movius
- Active checkbox: checked
- Active Site Home Page: AnswersHome.
- Redirect to custom domain: unchecked.
- Click Save.
Site Label and Site Name are case-sensitive. Note that the "M" in Movius is capitalized.
For more information, see Salesforce Help [external].
Step 3 - Create Connected App
- Type "App Manager" in Quickfind box and click App Manager.
- Click on New Connected App button.

- Fill out required details.
- Callback URL: https://login.salesforce.com/services/oauth2/success
- Selected OAuth Scopes:
- Manage user data via APIs (api)
- Perform requests at any time (refresh_token, offline_access)
- Require Secret for Web Server: checked

- Click Manage.

- Edit Policies.
- Permitted Users: Admin approved users are pre-authorized
- IP Relaxation: Relax IP Restrictions
- Refresh Token Policy: Refresh token is valid until revoked
- High assurance session required: unchecked

Step 4 - Install MultiLine for Salesforce
Use these steps to install the MultiLine for Salesforce app package for all users.
- Search for MultiLine for Salesforce on AppExchange [external] and select it.
- Click Get It Now and log in with your Salesforce credentials.
- Click Install in Production.
- Enter all required fields and accept Terms and Conditions.
- Click Confirm and Install.
- Click on Install for All Users then Install.
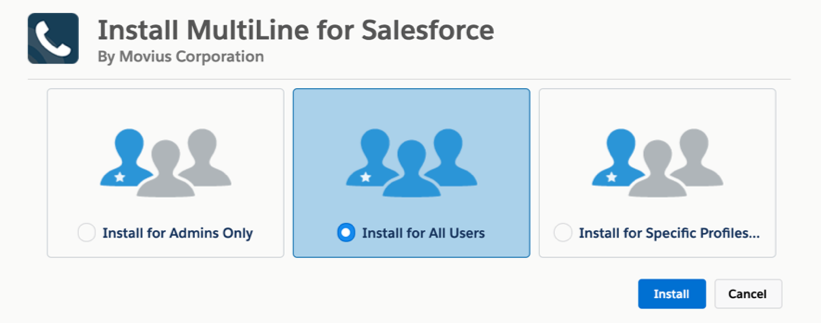
- After the installation the MultiLine for Salesforce application will be listed as MultiLine within Installed Packages.

Note: Users won't have access to MultiLine for Salesforce until you add them to the Call Center at a later step
Step 5 - Register MultiLine
To connect MultiLine with Salesforce you need to configure the webhook that exchanges information between the services.
You'll need to refer to your Welcome email for integration credentials:
- Open App Launcher and open MultiLine Registration.

- In the Configure Site tab, select Movius from the Select Site menu, then click Configure.
 You should see a confirmation message that your site is configured successfully.
 - Click Register Webhooks tab and enter the information in the fields below:
- Endpoint Name: MMP
- Endpoint: https://[MultiLine Management Portal URL]:8021
- The MultiLine Management Portal URL is listed in your "Welcome Administrator" email. Add ":8021" for the port.
- Username and Password credentials from the "Welcome Administrator" email.

- Your Webhook will now display.

Step 6 - Configure MultiLine Messages List
MultiLine Messages View can be added to Contacts, Leads, and Accounts Pages.
How to Add MultiLine Messages List to Contacts page
- Go to the Contacts page and select a Contact.
- Access the Setup menu in the upper right-hand of the screen.

- Select Edit Page.
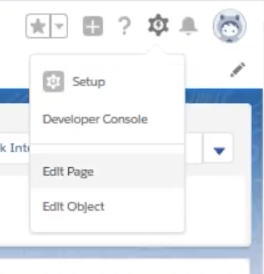
- Click in the tab area. By default you see Related and Details tabs. This will pull up a section in the far right of the screen.
- Click the Add Tab button.

- By default, the new tab will also be named "Details. Click the tab once to relabel it.
- Select Custom tab label and name it "MultiLine"
- Find MultiLine Messages List View under Components in the left-most section
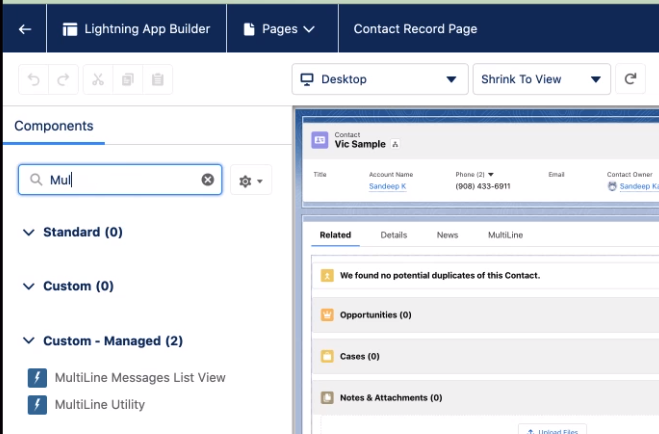
- Drag it under the MultiLine tab.
- Click Save.
- Click Activate.
- Click App Default. Then Assign as App Default.
- Select desired Lightning apps and click Next and Save.

Repeat the steps above for the Lead and Accounts pages.
Step 7 - Enable Open CTI for Salesforce connector
The MultiLine Salesforce Connector uses the Open CTI Softphone utility for integration. Learn more about utilities at Salesforce Help [External].
- Enter "App" in the Quick Find box, then select App Manager
- Select each Lightning app you want to enable with MultiLine
- Select Edit
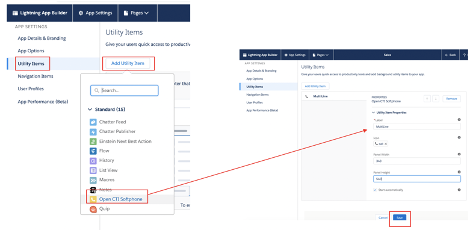
- Select the Utility Items >> Add Utility Item >> Open CTI Softphone
- Rename "Open CTI Softphone" to "MultiLine"
- Set Panel Width to ‘340’ and Panel Height ‘540’
- Make sure Start Automatically checkbox is selected
- Click Save
Step 8 - Enable Out of Office
- Open Developer Console under Setup
- Click Debug and Open Execute Anonymous Window
- Copy and paste the following code in the window as shown below then click Execute to complete
String cronExp = '0 30 * ? * *';
MultiLine.MultilineUpdateOOOStatusScheduler  newSch = new MultiLine.MultilineUpdateOOOStatusScheduler();
System.schedule('Multiline OOO Status Scheduler', cronExp, newSch);
MultiLine Admin Action Needed
Before proceeding, the Salesforce Administrator needs to complete the steps in Configure MultiLine Portal.
Once the MultiLine administrator actions are complete, proceed.
Step 9 - Manage Licenses
- Go to Installed Packages under Setup
- Select MultiLine then click Manage Licenses.
- Click Add User and select your users and click Add to complete

Step 10 - Apply "MultiLine" Permissions set to users
- Search Permission Sets using the Quickfind box.

- Click MML Permissions
- Click Manage Assignments
- Click Add Assignments

Step 11 - Add users to Call Center
- Go to Call Centers under Setup and click Continue
- Select OpenCTI and click Manage Call Center Users
- Click Add More Users
- Select Users and click Add to Call Center
For Bulk User Import, please see Bulk User Import Configuration for Salesforce.
Step 12 - Manage Users
Set Additional Fields to User Layout
- Go to user profile, click on Settings
- Select Advanced User Details. Expand the menu on the right and click Edit Layout.
- Under User Page Layout, drag each of the shown fields and drop into Additional Information section as shown. (Fields to be selected: MultiLine, MultiLine Error, MultiLine Registration Date, Old Desk Phone, SIP PIN, SIP Username)
- Click Save.
Note: we recommend not granting MultiLine users Edit abilities in the Additional Information section.

Re-registering users
If the user sees any error (ex: “WebRTC details not found”) in the MultiLine utility, re-register user using following steps
- Under Setup, go to Users.
- Click user for User details.
- Click Edit.
- Go to Additional Information section.
- Clear MultiLine error field, MultiLine field and MultiLine Registration Date.
- Save the settings.
- Ask user to logout and login again.

De-provisioning users
If the user needs to be deprovisioned from using MultiLine for Salesforce,
- Clear MultiLine and MultiLine Registration Date as shown in the above steps.
- Change the user Profile to the one that doesn't have MultiLine Permissions or remove MultiLine from user’s Assignment
Congratulations!
This completes the configuration of the Salesforce connector for MultiLine. Next time when Salesforce users login into Salesforce, they'll see the MultiLine utility in the bottom left bar.
After accepting the terms and conditions, they'll be able to use MultiLine.
See Using MultiLine for Salesforce for End-User instructions.


 You should see a confirmation message that your site is configured successfully.


