Read on to learn how to interpret the Number Utilization panel.
About Number Utilization
On the Number Utilization panel on the Dashboard, you can view how many numbers you're using and have available.
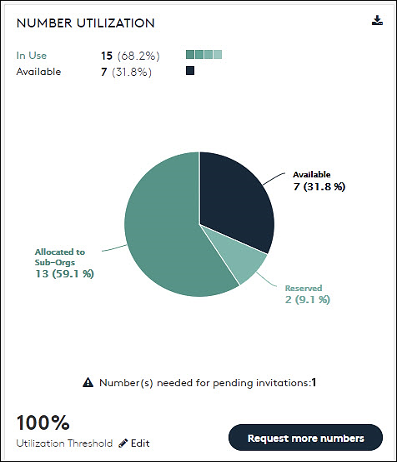
In use: Shows the numbers which are currently in use. In use numbers include assigned numbers, reserved numbers, registered numbers, and numbers allocated to an organization.
Available: Shows the numbers which are unallocated and can be used by the administrator.
Click anywhere on the Pie chart to see the number utilization in detail as below:
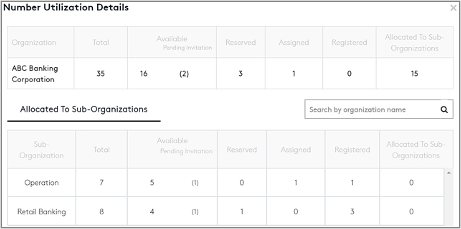
The total quantity of available numbers is divided into 5 categories:
- Available: The numbers which are currently not in use.
- Reserved: The numbers which are tagged for later use.
- Assigned: The numbers which are assigned to a user through invitation, but the user has not on-boarded yet.
- Registered: The user has successfully on-boarded.
- Allocated to Sub-Organizations: The numbers which are allocated to sub-organizations.
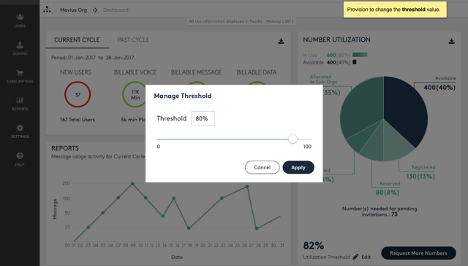
Utilization Threshold: It is the upper limit (in percentage) allocated for notifying the Administrator through an email, that he has utilized the maximum assigned threshold. Every time the administrator assigns a new number till all the available numbers are utilized, an email notifying the same will be sent.
You can edit the Utilization Threshold percentage value to be anywhere between 1 to 100.
Example: In Figure 9 the Utilization Threshold is assigned as 80%. This means, when the Number Utilization percentage reaches 80%, the administrator will receive an email saying that the maximum assigned threshold has been reached.
Request More Numbers: When you get an email notification that you have reached the assigned Utilization Threshold, you can request for more numbers using the steps below:
- Click Request More Numbers.
- A popup with the following message appears:
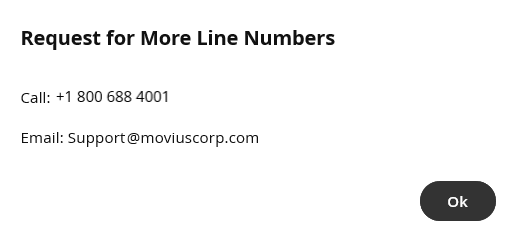
- Click OK.
- Send an email requesting for more numbers to the email address mentioned in the popup.
- You may also call on the number appearing in the popup.
Download Report: Two reports related to Consumption (Voice, Message and Data) and Number Utilization can be downloaded from two separate download icons on this screen. The same can be downloaded by following the below steps:
- Click
 (refer to Figure 4) to download the required report.
 - Choose Open or Save to view or download the CSV file.
 (refer to Figure 4) to download the required report.
Read on to learn about the Number Status and Actions feature
Overview
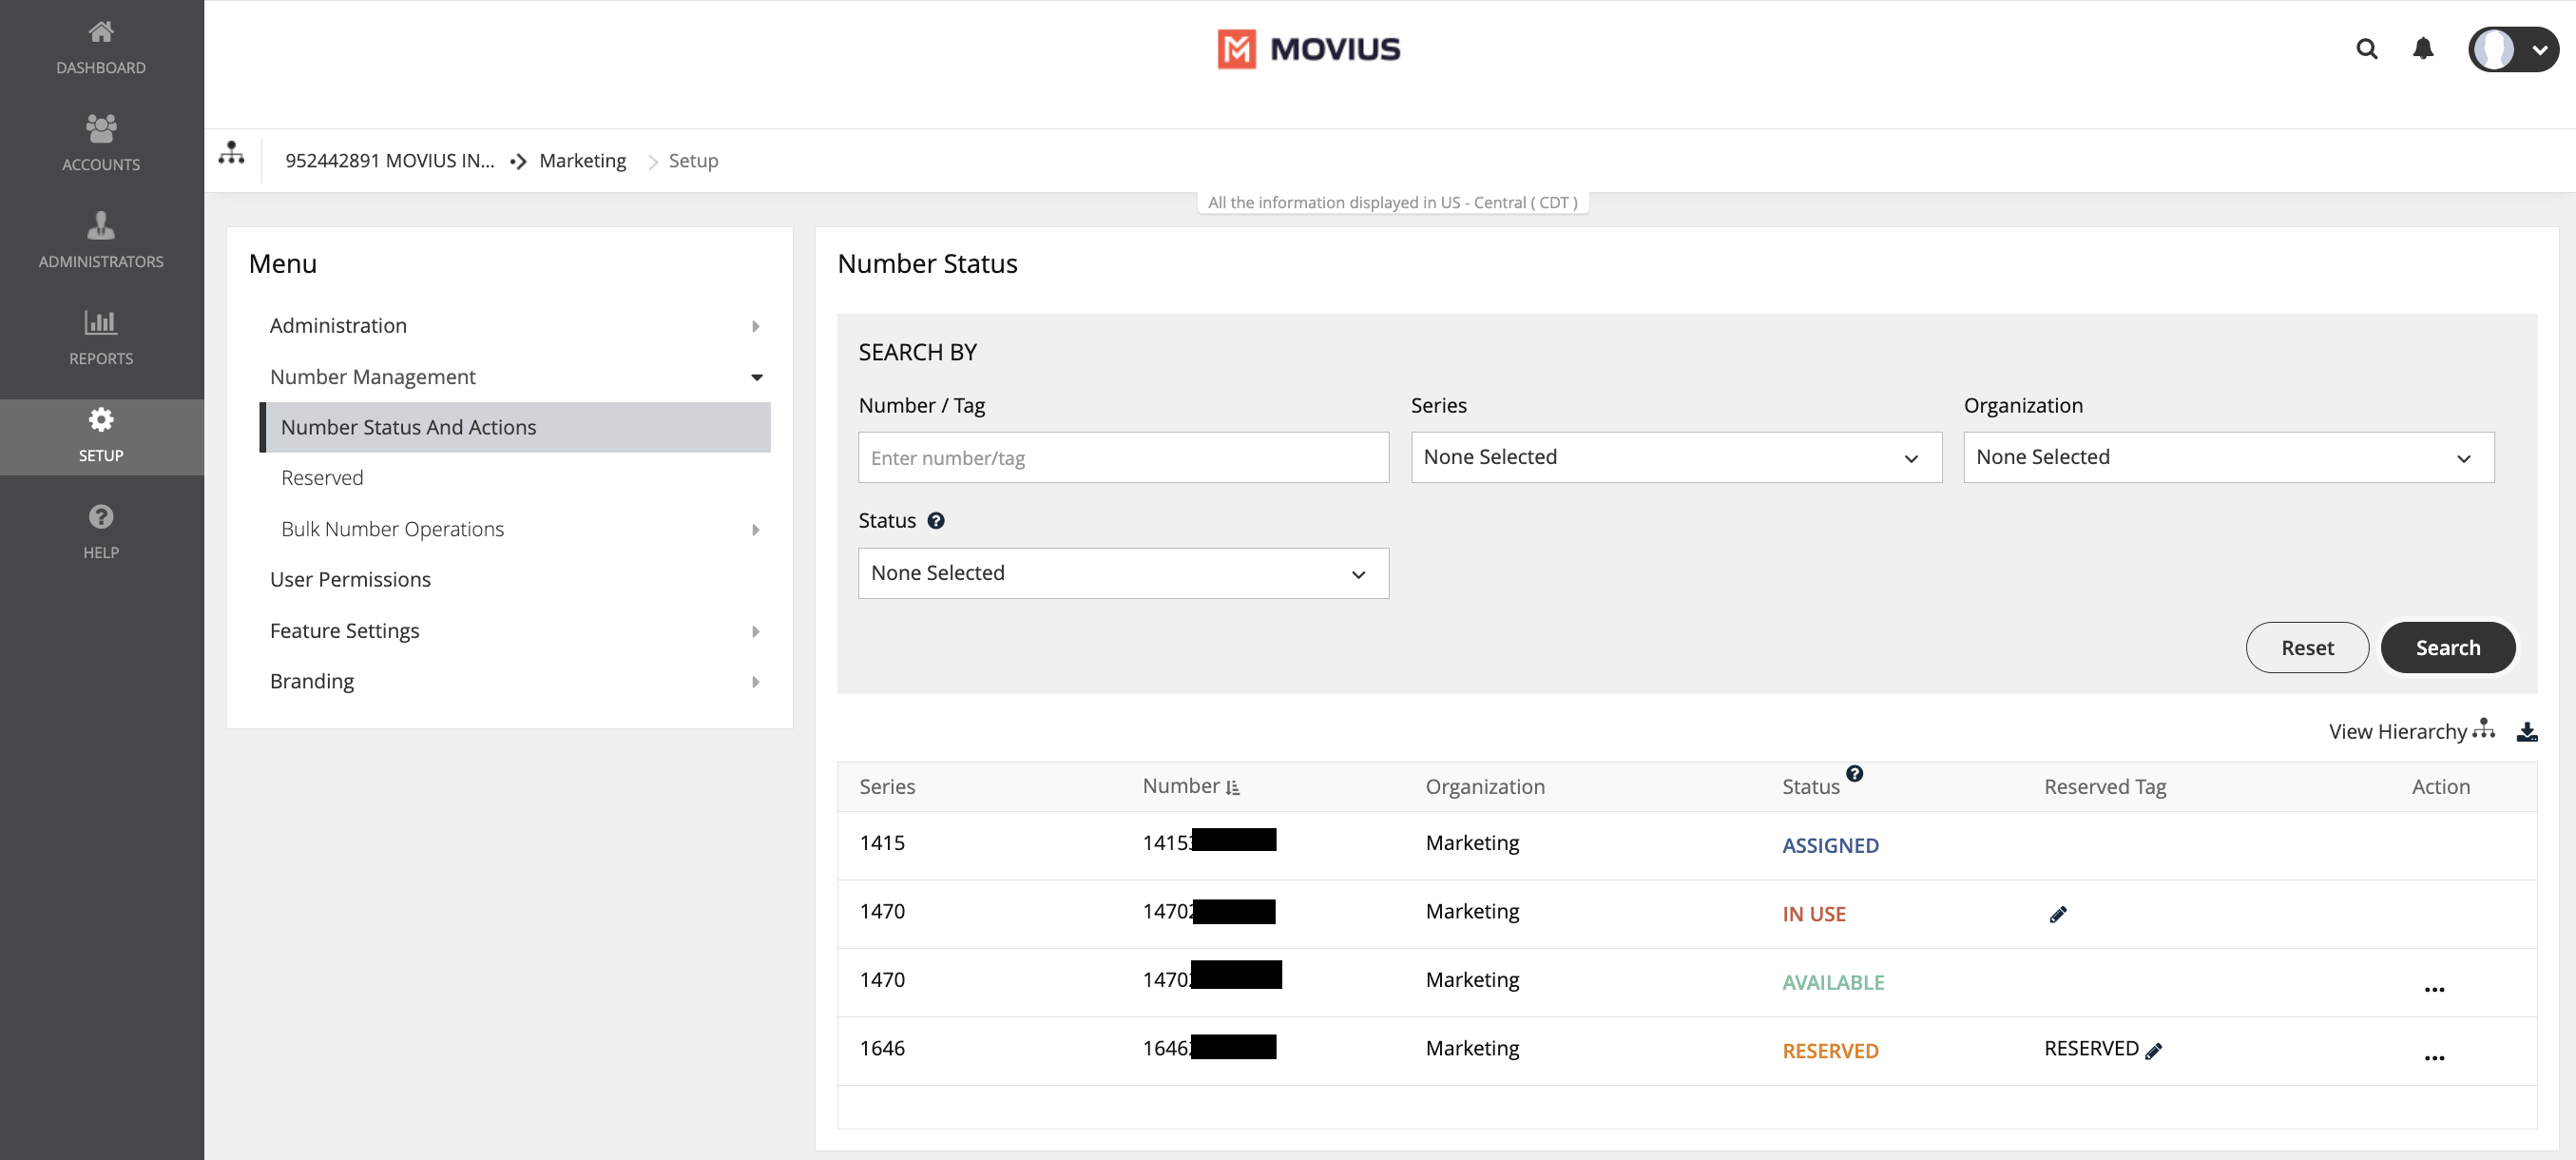
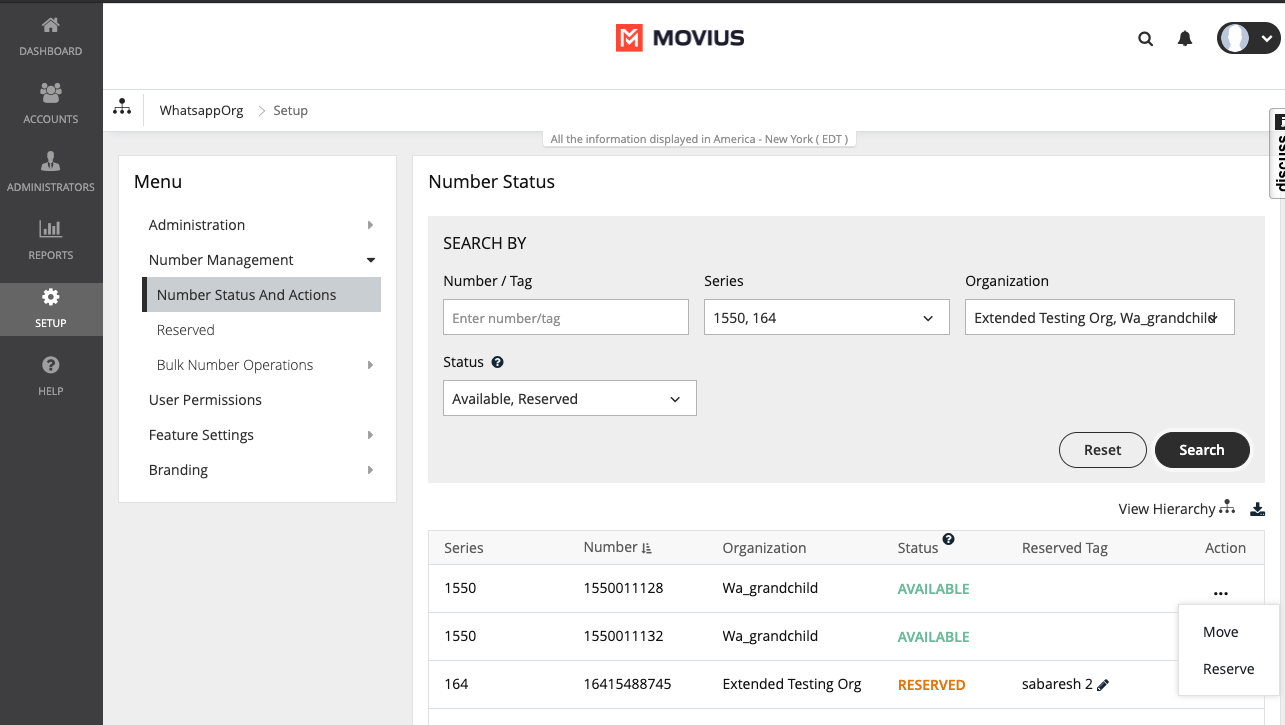
The Number Status and Actions section under the Setup tab has utilities for searching numbers and performing actions.
- You can search numbers by number, tag, series, organization, or status
- You can move numbers and add, edit, and delete reserve tags.
Before you begin
- An admin must have "Setup" Privilege in their Role in the organization to do these instructions. See What Admin Privileges are in Management Portal?.
How to use the Search By panel
Use the Search By panel to refine your results. After making your selections, you will need to click the Search button. To undo your selections, click the Reset button.
- Number / Tag:
- Type into the field either the number you're looking for or a reserved tag
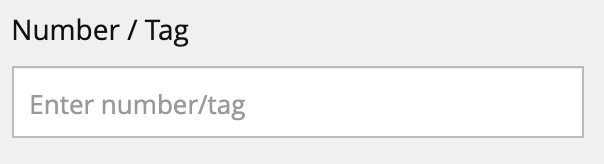
This field will perform partial searches. For example, if you search ‘1418’ and there are numbers or tags that have that sequence as a part of them such as 1418898476, 1876141877, 1478761418, 1418_salestag, sales_14182, all these results will appear.
- Type into the field either the number you're looking for or a reserved tag
- Series:
- Use the checkboxes to restrict your search to one or more number series
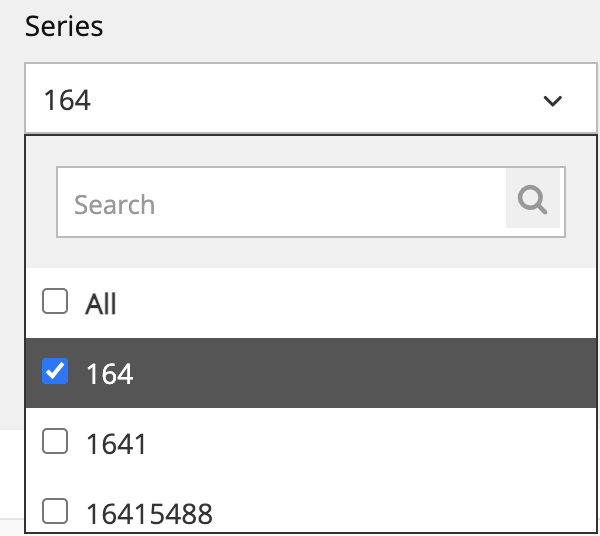
- Use the Search field within the filter to narrow down your options
- Use the checkboxes to restrict your search to one or more number series
- Organization:
- Use the checkboxes to restrict your search to one or more sub-organizations
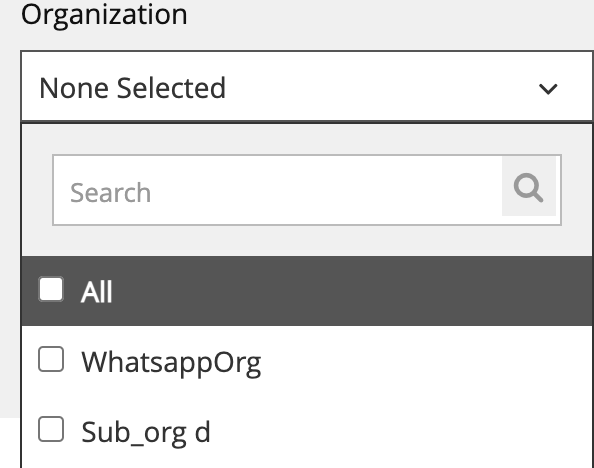
- Use the Search field within the filter to narrow down your options
- Use the checkboxes to restrict your search to one or more sub-organizations
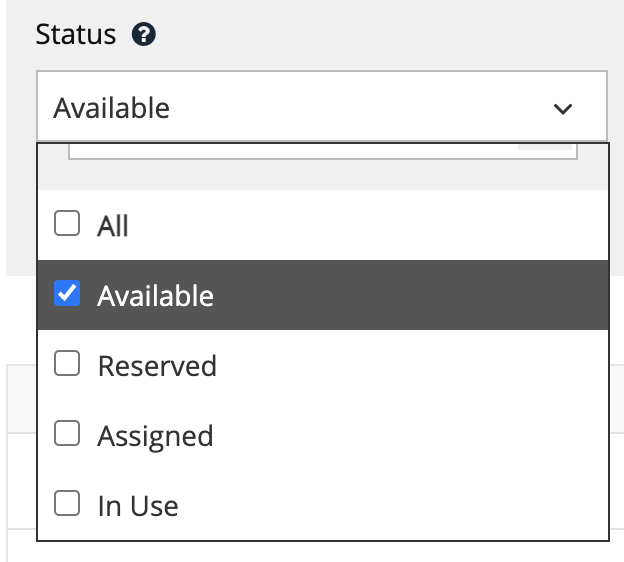
- Status:
- Use the checkbox to restrict your search to one or more statuses including Available, Reserved, Assigned, and In Use
- Hover over the question mark icon for a reminder of the meaning of each status
- View Hierarchy:
- Click View Hierarchy to explore the sub-organizations within your organization
The actions performed by the Admin depends on which organization they have logged into. For example, If a number in a grandchild org must be moved to the parent organization, then this action is not permitted. This is because the access of the grandchild org is within the org and all the orgs below it.
- Click View Hierarchy to explore the sub-organizations within your organization
- Sort:
- Hover over the header row of your results to expose a Sort button
- Click it once to sort results by that column. Click it again to reverse the sort order
- By default, it will display numbers from lowest to highest, characters from A to Z
- Clicking again will display numbers from highest to lowest, characters from Z to A

- Results:
- Results appear displaying Series, Number, Organization, Status, and Reserved Tag

- Results appear displaying Series, Number, Organization, Status, and Reserved Tag


How to move and reserve numbers
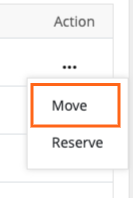
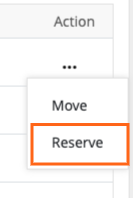
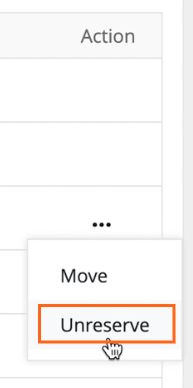
The menu icon in the Actions column will show Move and Reserve options for Available numbers. It will show the Move option for In Use and Reserved numbers.
Move a number
- Click Move from the menu icon in the Action column.
- There are two ways to select the organization you want to move the number to:
- Select an organization to display its sub-organizations and keep selecting until you have selected the organization you want to move the number to.
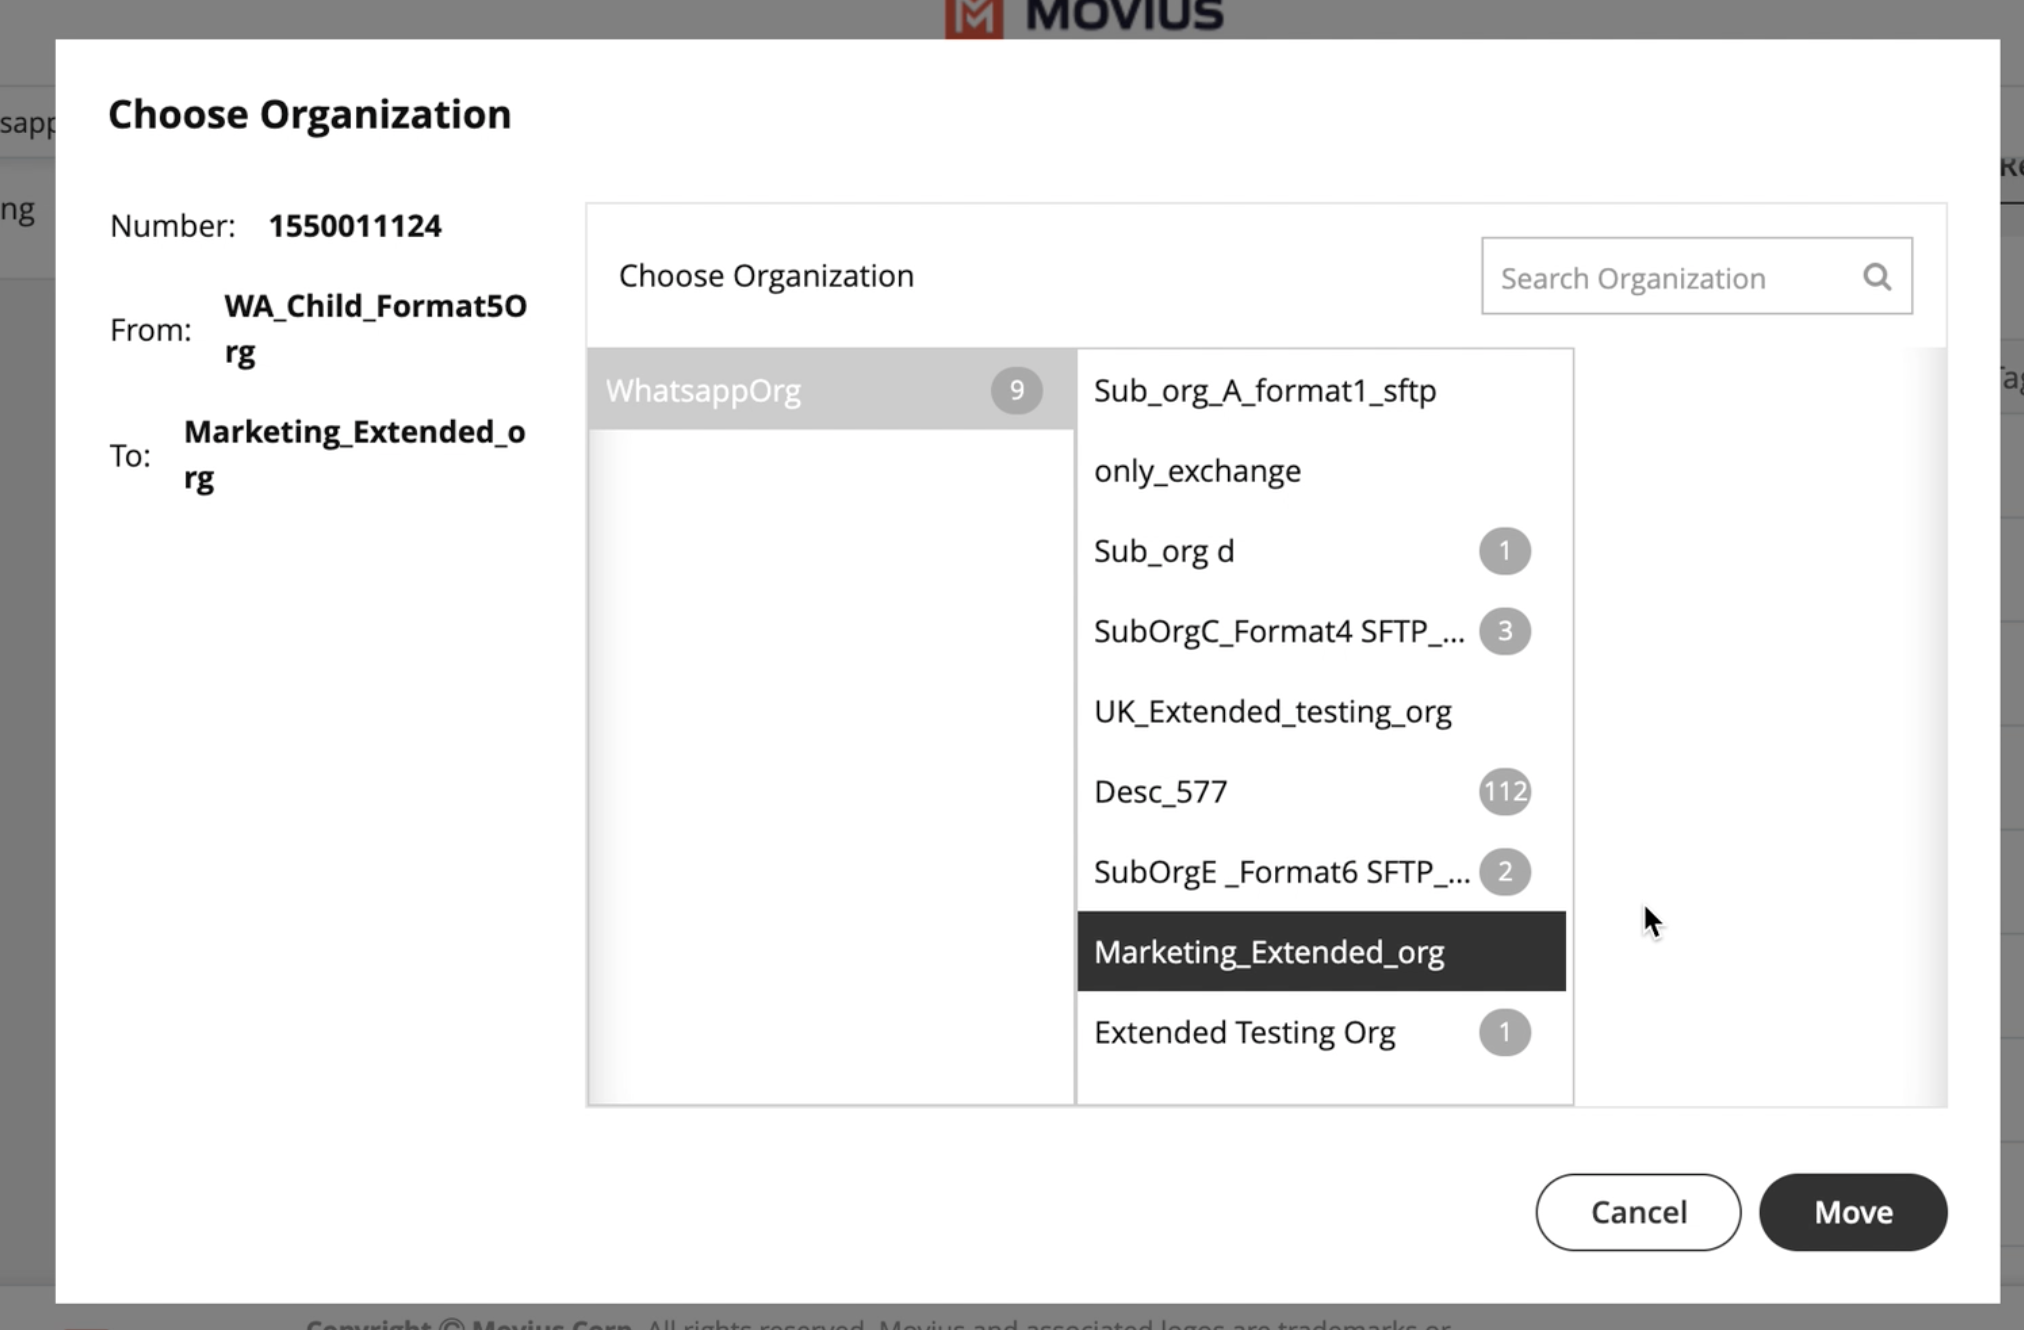
- Use the search field to pull up the sub-organization you want and select it.
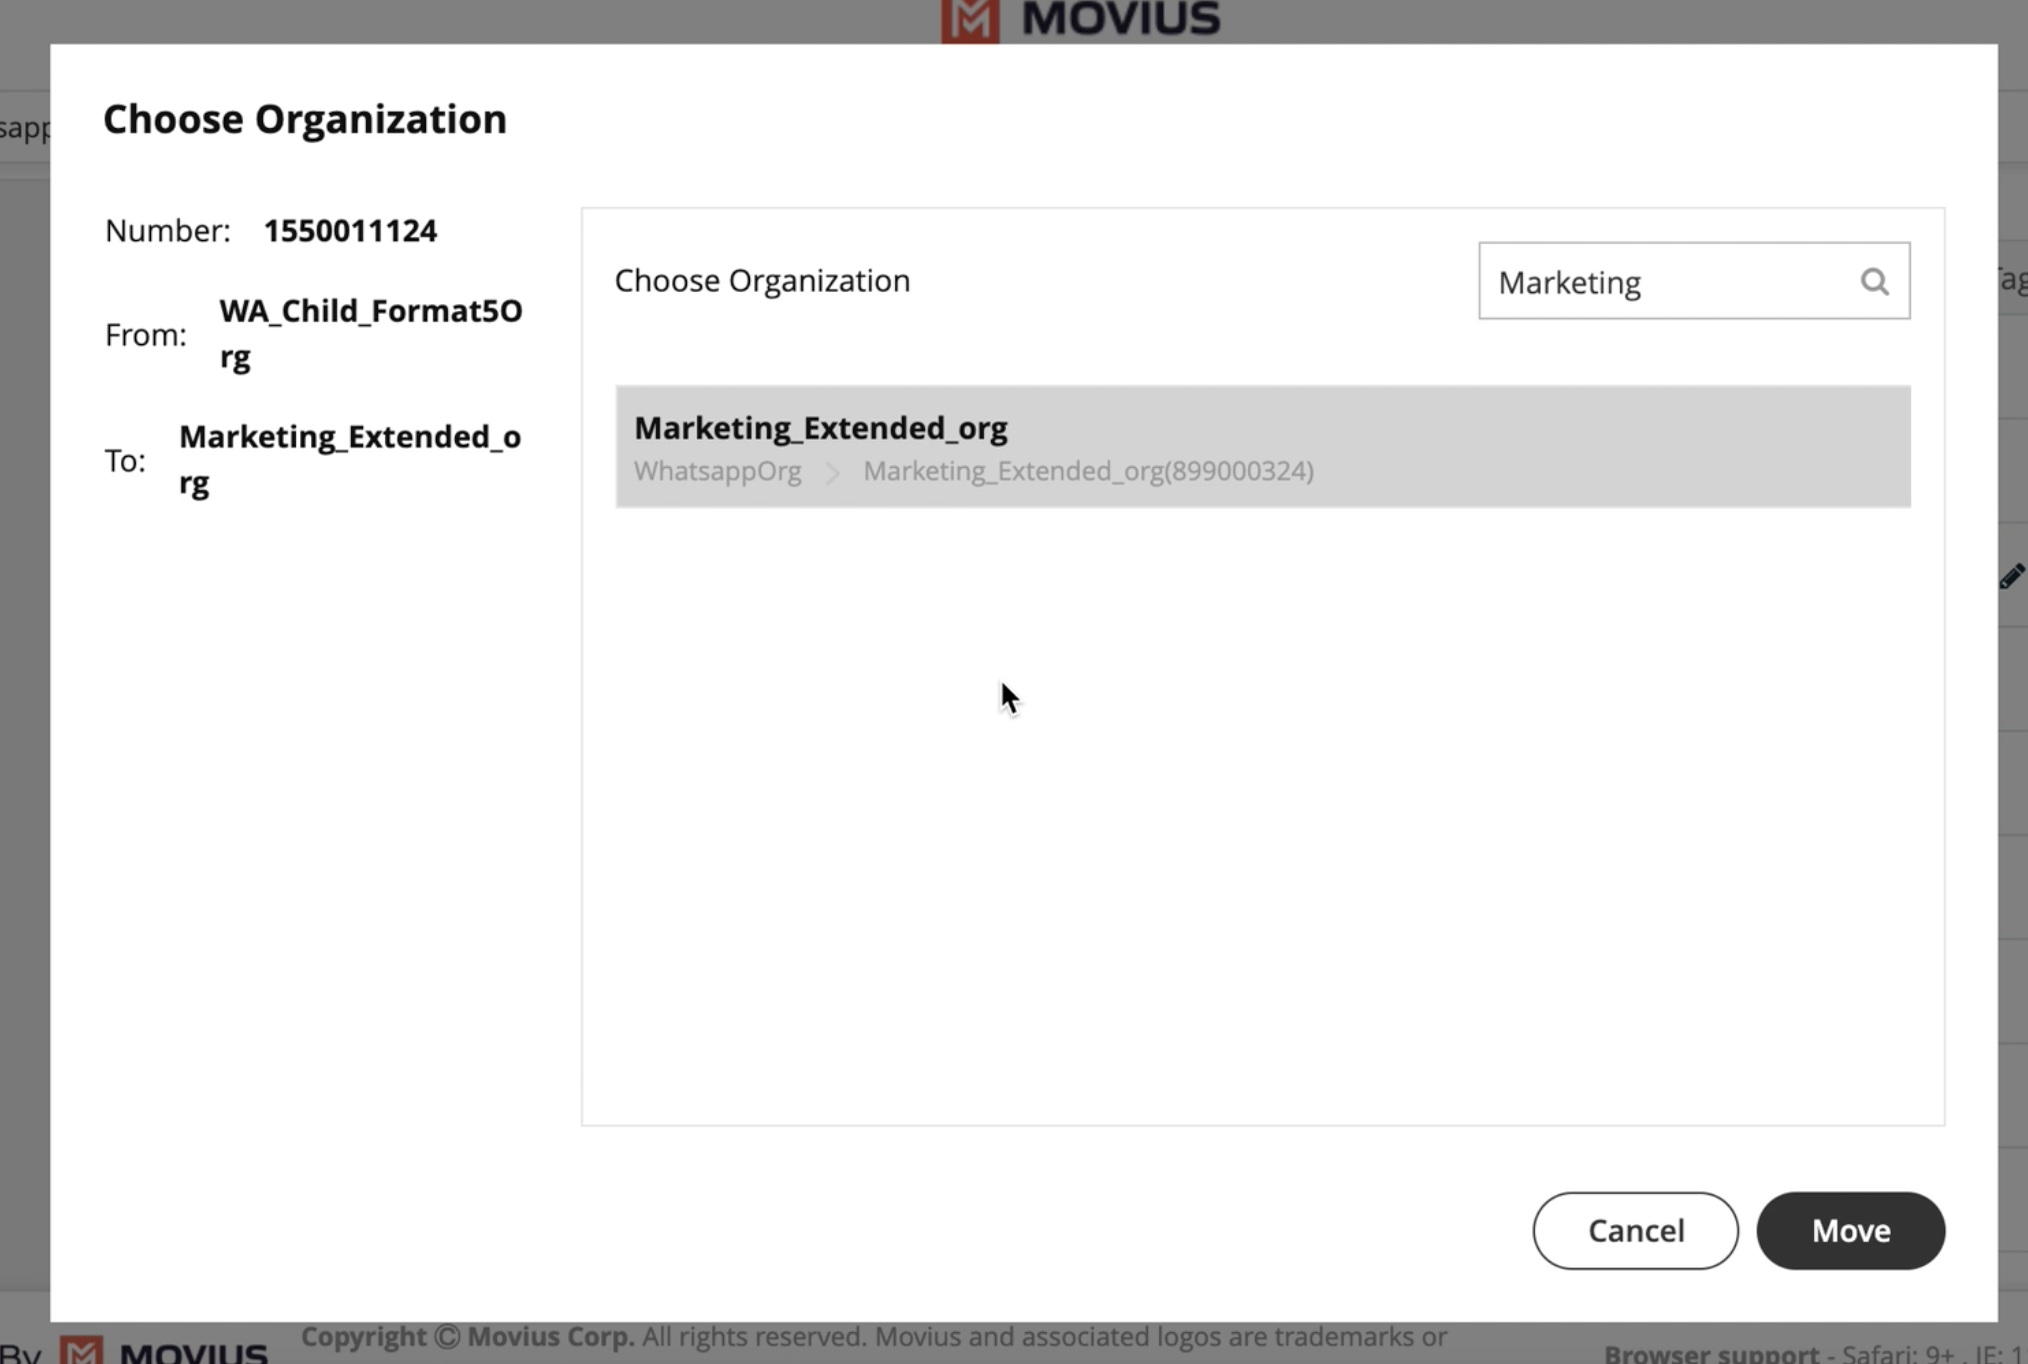
- Select an organization to display its sub-organizations and keep selecting until you have selected the organization you want to move the number to.
- Click Move.


Add, edit, and delete Reserved tags
You can add Reserved Tags to Available numbers. If a number is reserved, the Reserved tag column will contain the reserved tag, otherwise it will be blank.
Reserve a number
- Click Reserve from the menu icon in the Action column.
- In the field that appears in the Reserved Tag column, enter your tag name. Note: you cannot leave this field blank.
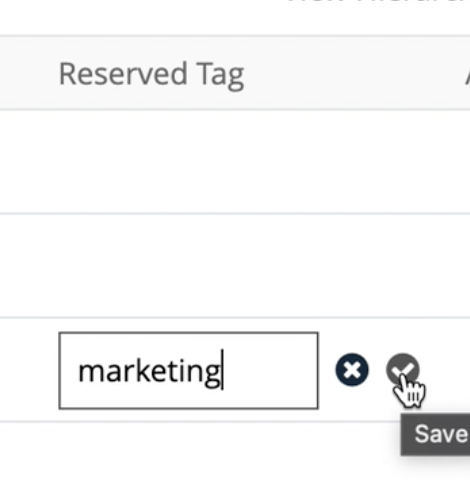
- Click the check mark to save, or 'x' mark to cancel.


Edit a tag
- Click the Edit pencil in the Reserved Tag column.

- Edit the tag name in the field.
- Click the check mark to save, or 'x' mark to cancel.

Unreserve a number
- Click Unreserve from the action menu to remove the tag. Note: The status of the number will change from Reserved to Available.

Read this to learn about how to work with reserved numbers, tagging them, editing and deleting tags, etc.
Overview
Tags put numbers in the Reserved pool. Tags help admins find numbers that are reserved for a specific purpose.
- You're required to add a tag to reserve a number. You can optionally reserve the number for a specific organization.
- You can reserve and unreserve numbers from Number Status and Actions or from Number Management
- When numbers are initially deleted, the admin has a one-time option to tag the number and add a forwarding number. See Delete user and release, reserve, or forward calls.
- Note: After completing the deletion, it is impossible to forward a number that didn't initially have a forwarding number attached to it.
- However, if there is a forwarding number attached at that time, it can be edited or deleted.
Before you start
- An admin must have "Setup" Privilege in their Role in the organization to do these instructions. See What Admin Privileges are in Management Portal?.
Reserve a number
Reserve a number from Number Status and Actions
- Go to Setup > Number Status and Actions
- Click Reserve from the Actions menu and enter the tag name. Note: You can't leave tag name blank.
To Unreserve, click Unreserve from the Actions menu. This will remove the tag from the number and put it in the Available pool.
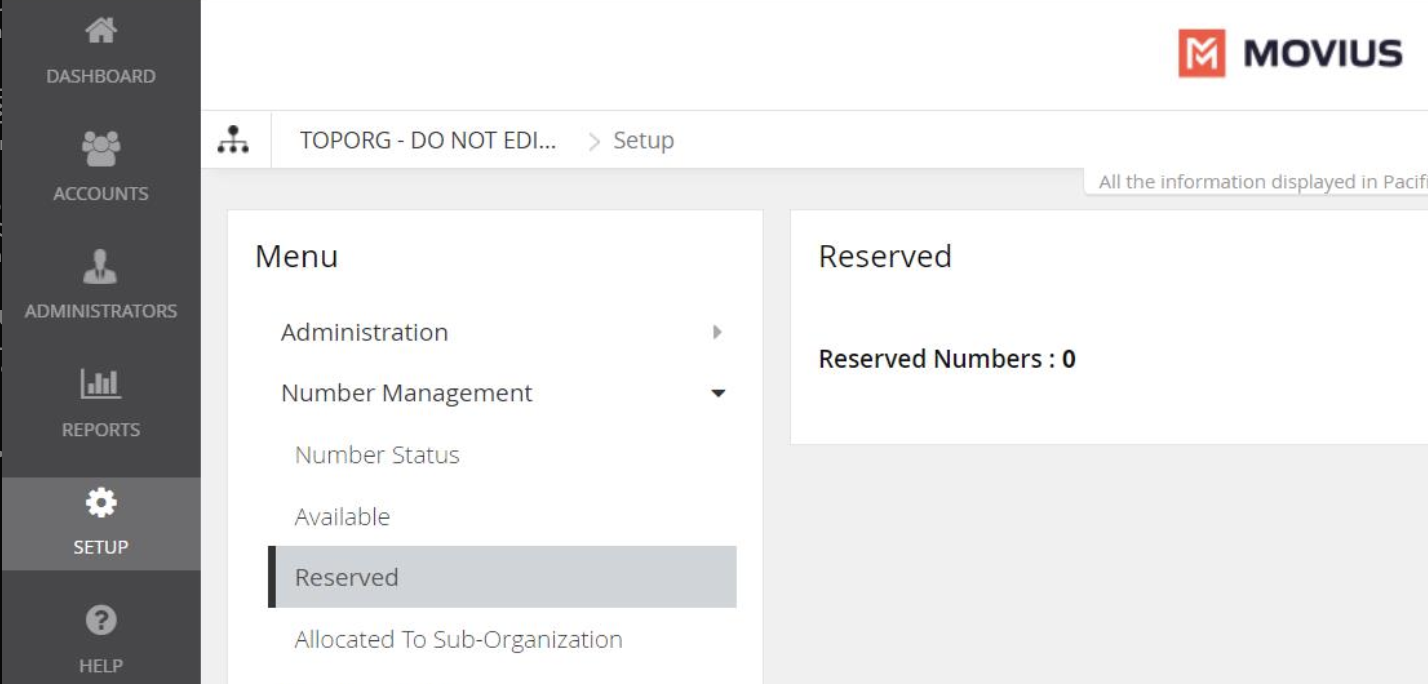
Reserve a number from Number Management
- Go to Setup > Number Management > Reserved.
- Click Reserve Number.
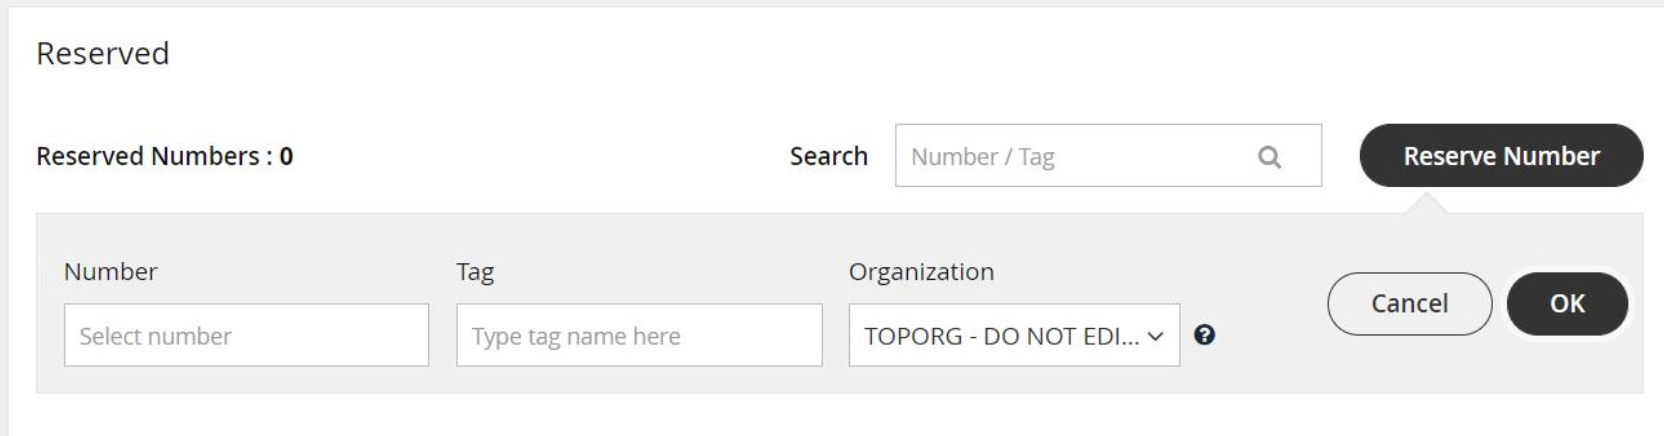
- Select the number, enter the Tag, and select the Organization you are allocating the number to. Then click OK.


A confirmation message will appear and the number will enter the Reserved Numbers list:
Edit a tag or forwarding number
- Go to Setup > Number Management > Reserved Numbers.
- Search for the Number or Tag to narrow your results, if desired.
- Click the Edit icon.

- Edit the Tag then click Save.
- Click Forwarded to to edit the Forwarding Number.
- Select Update the Number or Remove the Number according to your needs, then click Proceed.

Delete a tag
- Go to Setup > Number Management > Reserved Numbers.
- Search for the Number or Tag to narrow your results, if desired.
- Click Remove.

- You can then confirm you want to delete the Tag. The number will be removed from the Reserved Numbers list.

Read this to learn how to withdraw an unused number.
Overview
Withdrawing a number will remove it from being allocated to that Sub-Organization and moves it to the immediate parent organization. You can only withdraw unused numbers.
Before you Start
- An admin must have "Setup" Privilege in their Role in the organization to do these instructions. See What Admin Privileges are in Management Portal?.
Withdraw unused numbers
- Go to the sub-organization that has numbers allocated to it.
- Go to Setup > Number Management > Bulk Number Operations > Allocated to Sub-Organization.
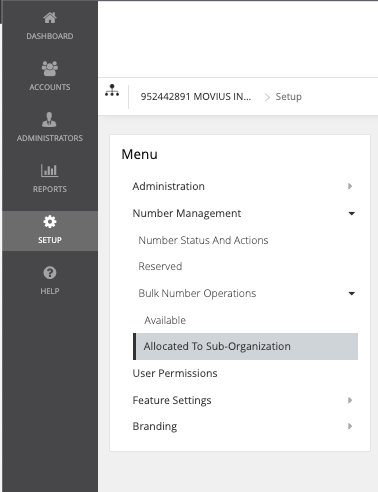
- Click on the organization to expand it and view the allocated number series and click Withdraw Numbers.
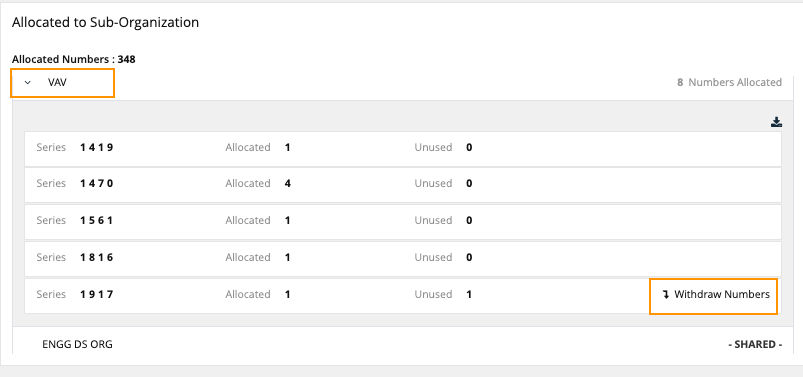
- Enter the quantity to be withdrawn.
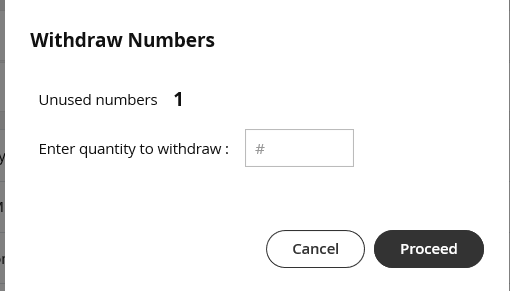
- Click Proceed. Note: the quantity should not be greater than the Allocated Numbers.


You're done!
When completed a confirmation message will appear
Read this to learn how to allocate a number to a sub-organization.
Overview
Allocating a number to a sub-organization will force the number to only be used within that Sub-Organization.
Before you Start
- An admin must have "Setup" Privilege in their Role in the organization to do these instructions. See What Admin Privileges are in Management Portal?.
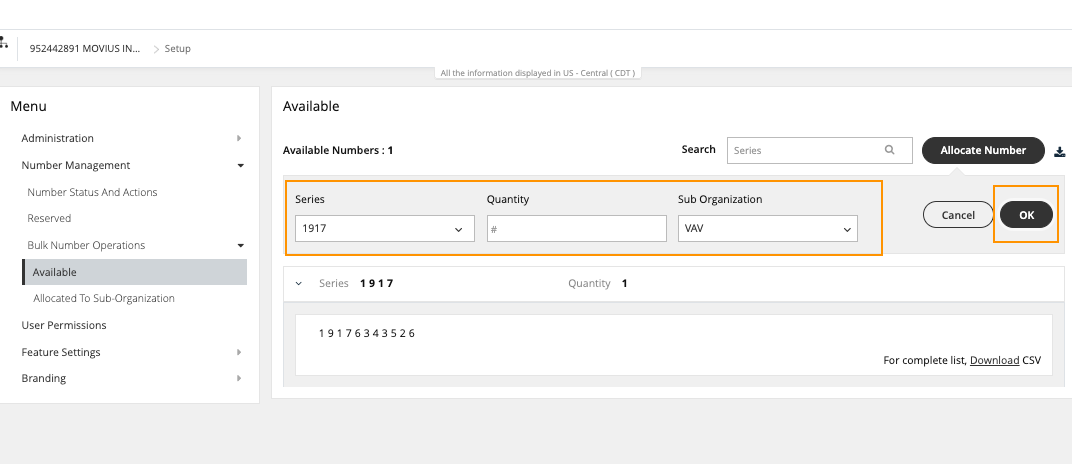
Allocate available numbers
- Go to the organization that has the available numbers that you want to allocate to a sub-organization.
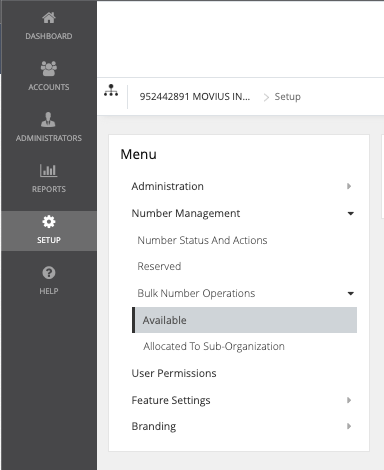
- Go to Setup > Number Management > Bulk Number Operations > Available.
- Select the Allocate Number button. Note: If there are no available numbers this option will not appear.
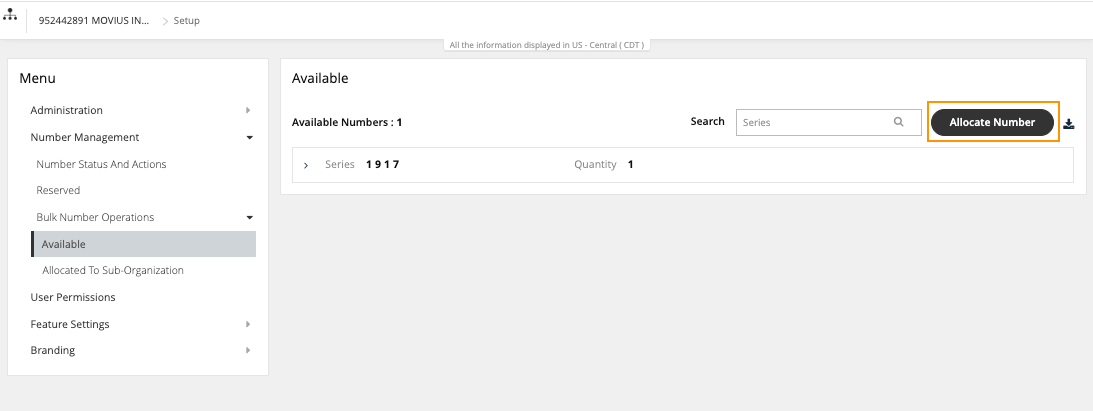
- Select the Series, Quantity, and Sub Organization you want to allocate the numbers to, then select OK.